background image


Caricamento della carta a modulo continuo


     25

Italiano


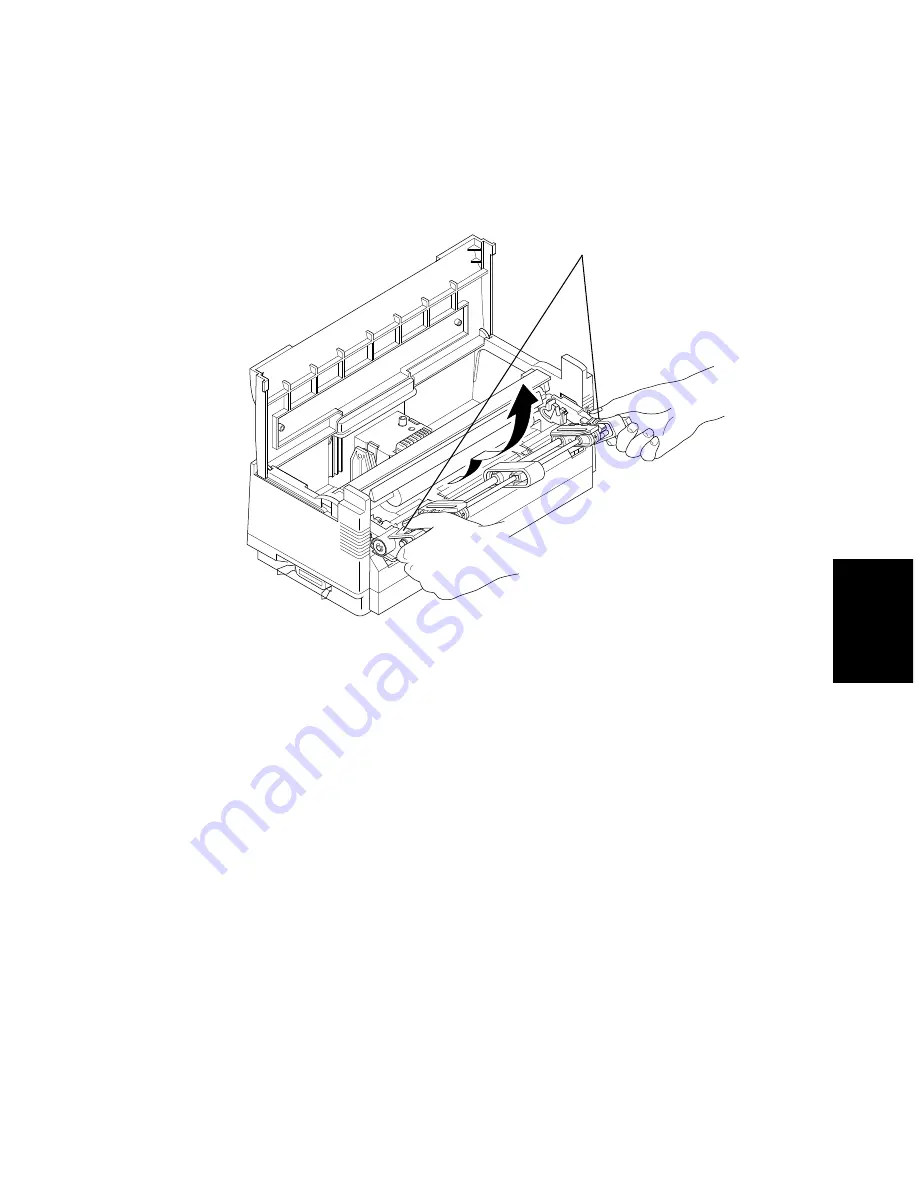
Premete le due levette di sgancio situate a sinistra e a destra dell’unità di 
trascinamento ed estraete quest’ultima dalla stampante tirandola verso 
l’alto.


Riapplicate i coperchi dei ganci dell’unità di trascinamento.


Reinstallate l’alimentatore automatico a fogli singoli.


Caricamento della carta a modulo continuo


Posizionate la carta a modulo continuo dietro la stampante.


Scollegate l’alimentazione elettrica della stampante.


Tirate la leva del selettore di consegna carta verso la parte anteriore della 
stampante.


Se nella stampante si trova già un foglio, toglietelo.


Aprite il coperchio frontale della stampante.


Rimuovete l’alimentatore automatico a fogli singoli.

leve di sgancio

Summary of Contents for PT-10Y

Page 1: ...USERS MANUAL BEDIENUNGSANLEITUNG MODE D EMPLOI MANUALE UTENTE PT 10Y 80825721 ...

Page 2: ...leitung ergeben REMARQUE Tous droits réservés La reproduction de toute partie de ce mode d emploi sous quelque forme que ce soit est strictement interdite sans l autorisation expresse de STAR Le contenu de ce mode d emploi est sujet à modification sans préavis Tous les efforts ont été faits pour assurer la précision du contenu de ce manuel au moment de l impression STAR serait très heureux d être ...

Page 3: ...tzung der Trennfunktion für Endlospapier 15 TABLE DES MATIERES Mécanisme tracteur poussant PT 10Y Installation du mécanisme tracteur poussant 16 Dépose du mécanisme tracteur poussant 17 Chargement de papier en continu 18 Impression sur papier en continu 21 Mise en attente du papier 22 Rechargement du papier mis en attente 22 Fonction de découpe rapide 22 INDICE Unità di trascinamento PT 10Y Instal...

Page 4: ...the printer is unplugged from its AC power source Open the front cover of the printer as described in the printer s Users Manual Detach the automatic sheet feeder as described in the printer s Users Manual Remove the two covers on the back of the printer that conceal the tractor feeder hooks Important Make sure that you keep these two covers in a safe place so you can replace them if you ever remo...

Page 5: ...so that its two tabs smoothly enter into the tractor feeder hooks and snap into place Raise the release lever so that it locks the tractor feeder onto the printer Re install the automatic sheet feeder as described in the printer s Users Manual Close the front cover of the printer Removing the push tractor unit from the printer Make sure that the printer is unplugged from its AC power source Open t...

Page 6: ...ctor feeder hook covers Re install the automatic sheet feeder Loading fanfold paper Position the stack of paper behind the printer Unplug the printer from its AC power supply Pull the release lever toward the front of the printer If there is already paper in the printer remove it Open the front cover of the printer Remove the automatic sheet feeder hook release ...

Page 7: ... position so that they are aligned with the holes in the fanfold paper Once the tractors are aligned the way you want push the gray levers back down to their original positions to lock them in place Open the covers of the tractors and align the paper so that the pins on the tractors are inserted into the holes of the paper ...

Page 8: ...er into the slots inside the printer You should have the automatic sheet feeder angled towards the front of the printer at about the same angle that it was when you pulled the feeder forward while detaching it Lower the automatic sheet feeder all the way down When you do it should naturally slip into place with the part that holds the paper angled slightly towards the back of the printer Close the...

Page 9: ...ach sheet The following shows the recommended print area for fanfold paper Also note the following important points whenever using fanfold paper and continuous forms You can use the same line feed and form feed operations as you use with single sheet paper When using continuous multi part forms do not use forms with more than three parts Be sure to adjust the printer for the proper paper thickness...

Page 10: ...oading parked paper After you are finished printing on single sheet paper use the following procedure to reload the parked fanfold paper and make it available for printing If any single sheet paper is still in the printer press the control panel s PAPER button to eject it Pull the release lever forward toward the front of the printer Press the control panel s PAPER button The printer automatically...

Page 11: ...anz aus der Netzsteckdose herausgezogen ist Vordere Druckerabdeckung nach Bedienungsanleitung des Druckers öffnen Die automatische Papierzuführung nach Bedienungsanleitung des Druckers abnehmen Hinten am Drucker die beiden Schutzkappen entfernen die als Abdeckung der Aufnahmen für den Schubtraktor dienen Wichtig Sicherstellen daß beide Schutzkappen bestens aufbewahrt sind damit sie auch wieder gef...

Page 12: ...n Schubtraktor gleiten und dort einrasten können Den Freigabehebel so anheben daß Schubtraktor und Drucker miteinander verriegelt werden Die automatische Papierzuführung nach Bedienungsanleitung des Druckers installieren Vordere Druckerabdeckung verschließen Den Schubtraktor vom Drucker abmontieren Vergewissern daß das Druckerstromkabel ganz aus der Netzsteckdose herausgezogen ist Vordere Druckera...

Page 13: ...Schutzkappen wieder anbringen Die automatische Papierzuführung wieder installieren Einlegen von Endlospapier Den Papierstapel hinter den Drucker legen Druckerstromkabel ganz aus der Netzsteckdose herausziehen Den Freigabehebel zur Drucker Vorderseite hin vorziehen Sollte sich bereits Papier im Drucker befinden dieses herausnehmen Vordere Druckerabdeckung öffnen Die automatische Papierzuführung abn...

Page 14: ...ieben so einstellen daß sie auf die Randlöcher im Endlospapier ausgerichtet sind Die ausgerichteten Traktoren in der gewünschten Stellung durch Zurückklappen der grauen Hebel nach unten fixieren Die Abdeckungen der beiden Traktoren öffnen und das Papier so ausrichten daß die Traktorstacheln beidseitig in seine Randlöcher eingreifen können ...

Page 15: ...n Rundstifte an deren Enden gut in die vorgesehenen Vertiefungen im Drucker passen Dazu die automatische Papierzuführung zur Drucker Vorderseite hin ankippen und zwar etwa im gleichen Winkel in dem sie beim Abnehmen vorgezogen wurde Nun die automatische Papierzuführung ganz absenken wobei sie wie von selbst einrasten soll und die Papierstützen leicht zur Drucker Rückseite hin geneigt werden Vorder...

Page 16: ...ne Druckbereich für Endlospapier ist in der folgenden Abbildung dargestellt Jedesmal wenn Endlospapier und formulare verwendet wird sollte man auch die folgenden Gesichtspunkte beachten Sie können die gleichen Techniken für Zeilen und Seitenvorschub verwenden die Sie vom Einsatz mit Einzelblättern her kennen Wenn Endlosformularsätze verwendet werden benutzen Sie nur solche mit einer Durchschlage K...

Page 17: ... auf Einzelblättern erledigt ist läßt sich das geparkte Endlospapier wieder laden damit der Druck auf Endlospapier weitergehen kann Dies geschieht wie folgt Auf dem Bedienungsfeld die PAPER Taste betätigen um alle noch vorhandenen Einzelblätter aus dem Drucker auszuwerfen Den Freigabehebel zur Drucker Vorderseite hin vorziehen Auf dem Bedienungsfeld die PAPER Taste drücken Der Drucker transportier...

Page 18: ...te est débranchée du secteur Ouvrez le capot avant de l imprimante en suivant les instructions du manuel de l utilisateur de l imprimante Retirez le chargeur automatique en suivant les instructions du manuel de l utilisateur de l imprimante Retirez les deux caches de protection des crochets du mécanisme tracteur situés à l arrière de l imprimante Important Conservez les caches de sorte à pouvoir l...

Page 19: ... encliquètent plus facilement dans les rouleaux Relevez le levier de dégagement afin de verrouiller le mécanisme tracteur Réinstallez le chargeur automatique en suivant les instructions du manuel de l utilisateur de l imprimante Refermez le capot avant de l imprimante Dépose du mécanisme tracteur poussant Assurez vous que l imprimante est débranchée du secteur Ouvrez le capot avant de l imprimante...

Page 20: ...aches de protection de crochet Réinstallez le chargeur automatique Chargement de papier en continu Placez la rame de papier en continu derrière l imprimante Débranchez l imprimante du secteur Tirez le levier de dégagement vers l avant de l imprimante S il y a du papier dans l imprimante retirez le Ouvrez le capot avant de l imprimante Retirez le chargeur automatique Boutons de dégagement de croche...

Page 21: ...r les tracteurs de façon à les aligner sur les perforations du papier en continu Une fois les tracteurs à la bonne position abaisser les leviers gris afin de les bloquer Ouvrez les volets situés sur les deux tracteurs et placez le papier de façon à ce que les picots des tracteurs s insèrent dans les perforations du papier ...

Page 22: ... rouleaux situés à ses extrémités s insèrent correctement dans les fentes de l imprimante prévues à cet effet Positionnez le chargeur automatique au même angle que pour sa dépose c à d en le relevant vers l avant de l imprimante Abaissez tout à fait le chargeur automatique Celui ci devrait se remettre automatiquement en place la pièce maintenant le papier est légèrement dirigée vers l arrière de l...

Page 23: ...sous indique la zone imprimable recommandée Veuillez également tenir compte des points importants suivants lors de l impression sur papier en continu et sur formulaires à multi feuillets Vous pouvez régler l interligne et l avance du papier de la même façon que pour l impression feuille à feuille Lors de l impression sur formulaires à multi feuillets ne pas utiliser de formulaires de plus de trois...

Page 24: ...t du papier mis en attente Après avoir terminé l impression feuille à feuille rechargez le papier mis en attente en suivant les instructions suivantes Si une feuille de papier se trouve toujours dans l imprimante appuyez sur la touche PAPER du panneau de configuration afin de l éjecter Placez le levier de dégagement vers l avant de l imprimante Appuyez sur la touche PAPER du panneau de configurati...

Page 25: ...rica della stampante sia scollegata Aprite il coperchio frontale della stampante come indicato nel Manuale dell Utente della stampante Estraete l alimentatore automatico a fogli singoli come indicato nel Manuale dell Utente della stampante Rimuovete i due coperchi situati sul retro della stampante per scoprire i ganci su cui va montato l alimentatore a trattori Importante Vi consigliamo di conserv...

Page 26: ...o in posizione Tirate in avanti la leva di bloccaggio in modo da bloccare l alimentatore a trattori sulla stampante Estraete l alimentatore automatico a fogli singoli come indicato nel Manuale dell Utente della stampante Chiudete il coperchio frontale della stampante Rimozione dell unità di trascinamento dalla stampante Accertatevi che l alimentazione elettrica della stampante sia scollegata Aprit...

Page 27: ...ento Reinstallate l alimentatore automatico a fogli singoli Caricamento della carta a modulo continuo Posizionate la carta a modulo continuo dietro la stampante Scollegate l alimentazione elettrica della stampante Tirate la leva del selettore di consegna carta verso la parte anteriore della stampante Se nella stampante si trova già un foglio toglietelo Aprite il coperchio frontale della stampante ...

Page 28: ...re nella posizione corretta in modo da allinearli ai fori del modulo continuo Quando i trattori sono allineati nella posizione voluta bloccateli spingendo le levette grigie nella posizione originaria Aprite i coperchi sui trattori e allineate la carta in modo che i perni dei trattori entrino nei fori del modulo continuo ...

Page 29: ... della stampante L alimentatore a fogli singoli dovrà essere inclinato verso la parte anteriore della stampante alla stessa angolazione in cui si trovava nel momento in cui è stato tirato in avanti per estrarlo Continuate ad abbassare fino in fondo l alimentatore a fogli singoli facendolo scivolare in posizione con il lato che regge la carta leggermente inclinato verso il retro della stampante Chi...

Page 30: ... area di stampa raccomandata per i fogli a modulo continuo Utilizzando carta a modulo continuo tenete presente le seguenti importanti note Potete utilizzare le funzioni di avanzamento riga e avanzamento pagina come per il foglio singolo Se dovete stampare su moduli continui a copia multipla evitate di usare moduli costituiti da più di tre fogli Ricordate di regolare la distanza della testina dal r...

Page 31: ...ato Quando avete terminato di stampare sul foglio singolo eseguite le seguenti operazioni per ricaricare il modulo continuo parcheggiato e renderlo disponibile per la stampa Se nella stampante è rimasto un foglio singolo premete il tasto PAPER sul pannello di controllo per farlo uscire Tirate la leva del selettore di consegna carta verso la parte anteriore della stampante Premete il tasto PAPER su...

Page 32: ...stomer response Worldwide Headquarters STAR MICRONICS CO LTD 536 Nanatsushinya Shimizu Shizuoka 424 Japan North and South America Markets STAR MICRONICS AMERICA INC 70 D Ethel Road West Piscataway NJ 08854 European Market STAR MICRONICS DEUTSCHLAND GMBH Westerbachstraße 59 D 60489 Frankfurt F R of Germany U K Market STAR MICRONICS U K LTD Star House Peregrine Business Park Gomm Road High Wycombe B...

Reviews: