

Initializing the communication settings (For Wired LAN Interface)
Insert a pen with a small tip or similar item
and press the RESET button on the back
.
At the same time, press the power switch on
the front of the printer until the POWER LED
turns on (power ON)
.
Keep pressing RESET switch until the Net-
work LED (green) on the front of the printer
flashes
.
Press and hold the FEED button
to con-
firm.
RESET
DC
24V
LAN
Cash D
rawer
/Buzze
r
0.5A
2.4A
0.5A
iPad
4
3
1
2
If the communication connection is not suc-
cessful, follow the procedure below and
initialize the communication setting.
After initialization, perform connection again
starting from the beginning of 3-A, B, or D.
<Procedure>
Check that the printer power is OFF.
3
-B
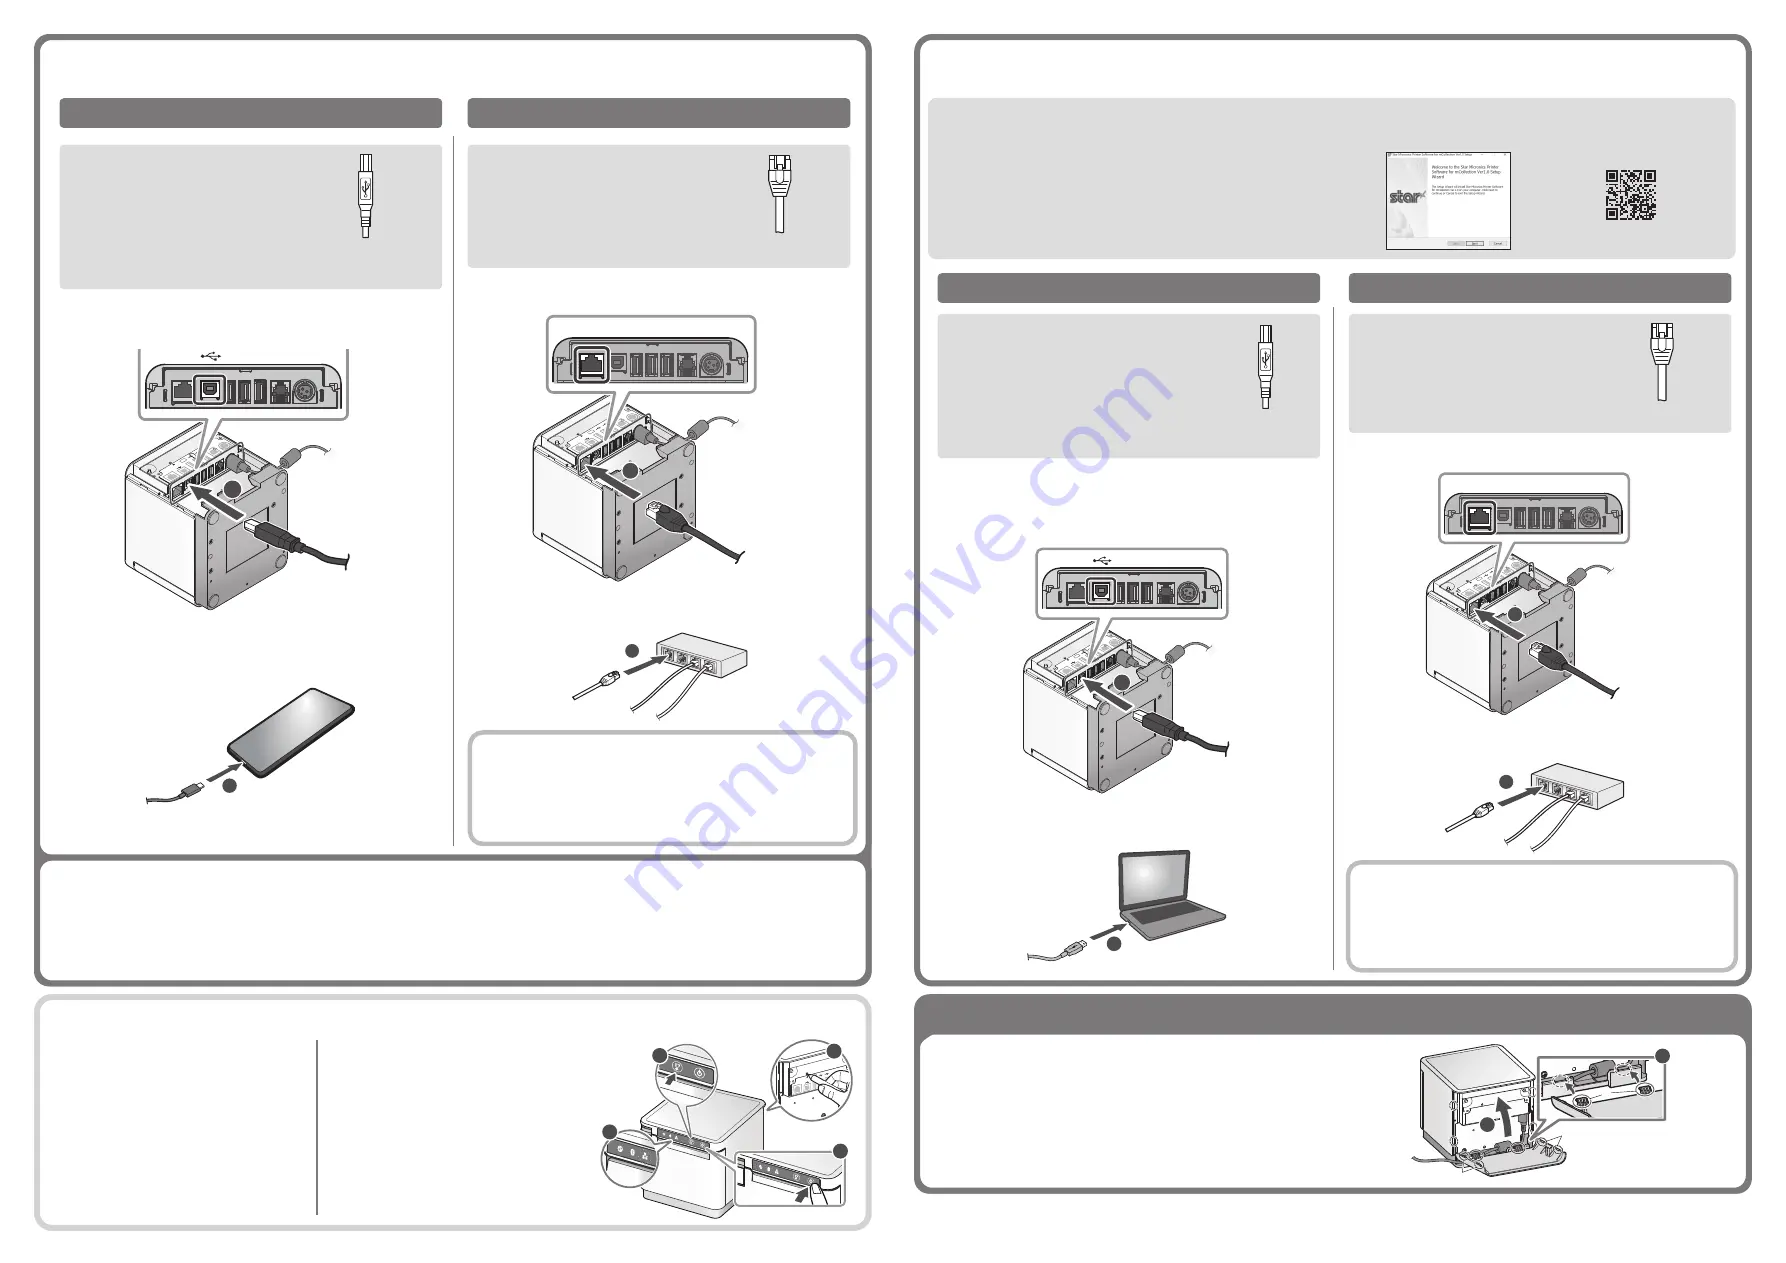
Connecting an Android terminal to the printer
Connect the LAN cable to the printer LAN connector
.
RESET
DC24V
LAN
Cas
h D
raw
er
/Bu
zze
r
0.5A
2.4A
0.5A
iPa
d
LAN
1
2
Connect the other plug to the connector of the router, hub, or other
LAN device
.
Wired LAN
interface
You will need:
• Commercially-available LAN cable
Printer-side plug
USB
interface
Connect the USB cable to the printer USB (Type B) connector
.
You will need:
• Prepare a USB cable and USB
adapter according to the connector
shape of the smartphone/tablet
that you use.
2
Printer-side plug
(Type B)
Connect the other plug to the smartphone/tablet
.
DHCP is enabled by default for the wired LAN settings. To
continually use the same IP address, set a static IP address
before use.
For the static IP address setting procedure, refer to the On-
line Manual.
3
-D
Connecting a Windows tablet or PC terminal to the printer
Connect the LAN cable to the printer LAN connector
.
RESET
DC24V
LAN
Cas
h D
raw
er
/Bu
zze
r
0.5A
2.4A
0.5A
iPa
d
LAN
1
2
Connect the other plug to the connector of the router, hub, or other
LAN device
.
Wired LAN
interface
You will need:
• Commercially-available LAN cable
Printer side Plug
Connect the USB cable to the printer USB (Type B) connector
.
USB
interface
You will need:
• Prepare a USB cable and USB
adapter according to the connector
shape of the tablet or PC that you
use.
Printer-side plug
(Type B)
2
Be sure to install the Windows driver before connecting the USB
cable.
Connect the other plug to the connector of the Windows tablet/PC
.
DHCP is enabled by default for the wired LAN settings. To
continually use the same IP address, set a static IP address
before use.
For the static IP address setting procedure, refer to the On-
line Manual.
RESET
DC24V
LAN
Cas
h D
raw
er
/Bu
zze
r
0.5A
2.4A
0.5A
iPa
d
1
RESET
DC24V
LAN
Cas
h D
raw
er
/Bu
zze
r
0.5A
2.4A
0.5A
iPa
d
1
Installing the rear cover
Installing the rear cover onto the back of the printer
Press the hooks A at the bottom of the rear cover into the notches in the
printer main unit
, then fit the hooks B on the left and right of the rear
cover into the printer main unit until they click into place
.
A
B
B
1
2
www.star-m.jp/mac-cps.html
●
Download the Mac CUPS driver
Download the Mac CUPS driver or Linux CUPS driver.
For details, refer to the Online Manual.
www.star-m.jp/linux-cps.html
●
Download the Linux CUPS
driver
3
-C
Connecting a Mac/Linux terminal to the printer
www.star-m.jp/mcprint-wsw.html
Download the StarPRNT for
mCollection Windows driver
Installing the Windows driver
Download [mCollection Printer Software].
Extract the downloaded software and execute “Setup.exe”.
Follow the wizard instructions and complete software installation.
The Windows driver is included in the mCollection Printer Software.
The mCollection Printer Software can be used to configure the printer
settings and perform an operation test.
For the owners of other companies’ trademarks mentioned in this document, see Trademarks in our website (https://www.star-m.jp/eng/trademarks.html).
©
2018-2021 Star Micronics Co., Ltd.


