Stanley STHT77366 Manual Download Page 8

Manual Development Template 

GT&S Tech Docs Graphics Req #: XXXX 


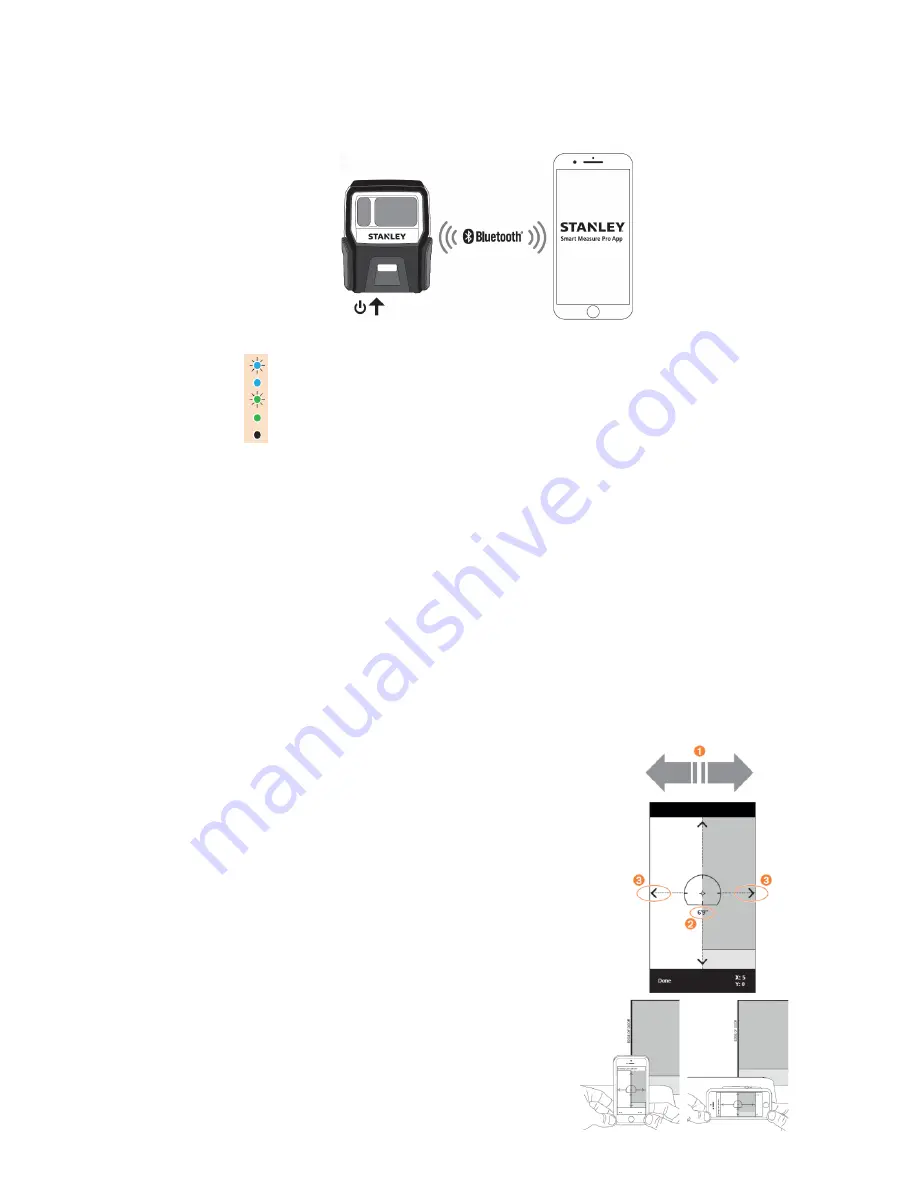
Pairing Your Smart Measure Pro 


NOTE: 

The LED indicator shows the status of your Smart Measure Pro: 

Blue flashing: Smart Measure Pro discoverable over Bluetooth 
Blue on: Smart Measure Pro connected to device 
Green flashing: Smart Measure Pro charging 
Green on: Smart Measure Pro fully charged 
Off: Power off 

1.  Turn on Bluetooth on your device. 
2.  On your Smart Measure Pro, press the Power button. 

• The LED indicator flashes blue indicating that the Smart Measure Pro is discoverable over 
Bluetooth. 
• If the LED indicator remains off, Smart Measure Pro may need charging. 

3.  On your device, tap on the Smart Measure Pro app to launch it. 
4.  Tap the 

NO DEVICE CONNECTED

 button. 

The menu will display the Smart Measure Pro unit available for pairing. 
If no unit appears, ensure that the Smart Measure Pro 

unit’s LED indicator is flashing blue (see 

Step 2). 

5.  When your Smart Measure Pro unit appears, tap on it to pair it with your device. 

This step is necessary the first time you use Smart Measure Pro. For subsequent uses, your 
Smart Measure Pro will automatically be paired with your device. 

Note: After connecting your Smart Measure Pro, go into the Smart Measure Pro app 

SETTINGS

, and 

select your preferred units of measurements: feet or meters. 
 

Aligning the Smart Measure Pro Laser


Before using your Smart Measure Pro, you need to ensure that the 
laser is aligned with the camera on your device.  The Smart Measure 
Pro app contains a detailed instruction tutorial on this procedure 
under 

SETTINGS

: Align Laser.


1.  In the Smart Measure Pro app, tap on 

SETTINGS

, then tap 

Align Laser

2.  Rest your device on top of a flat, hard surface, such as a 

table top. Then hold your device vertically and aim it towards 
two objects that are at different distances, for example the 
edge of a door. Ensure that the closest object has a vertical 
edge. 


The distance between the two objects should be at least 
15 feet (5 meters). 


You can use the vertical edge of an open door and the 
wall of the room behind it. 

3.  Slowly move your device sideways 


and check that the 

distance measurement 


changes when the crosshair in the 

center of


the screen moves on and off the vertical edge.


Summary of Contents for STHT77366

Page 1: ...ery EX North America translations can be included in the imagery In the case where many translations are necessary in imagery ex EU imagery should utilize numerical alphabetical labeling followed by a...

Page 2: ...Manual Development Template GT S Tech Docs Graphics Req XXXX 2 This page should be used for desired imagery direction...

Page 3: ...ther trademarks and trade names are those of their respective owners User Safety Retain all sections of this manual for future reference WARNING To reduce the risk of injury read all safety and operat...

Page 4: ...splash or immerse in water or other liquids DO NOT store or use in locations where the temperature may reach or exceed 40 5 C 105 F such as outside sheds or metal buildings in summer For best life st...

Page 5: ...eiver Connect the equipment into an outlet on a circuit different from that to which the receiver is connected Consult the dealer or an experienced radio TV technician for help Canada Industry Canada...

Page 6: ...pt to remove the battery from the device as you may damage the device To charge the unit connect the USB charging cable into the micro USB charging port on the unit and then plug it in to an appropria...

Page 7: ...en your Smart Measure Pro is not in use NOTE Ensure that your Smart Measure Pro is mounted securely to your device before taking measurements it should not move or rock Smart Measure Pro should sit fl...

Page 8: ...necessary the first time you use Smart Measure Pro For subsequent uses your Smart Measure Pro will automatically be paired with your device Note After connecting your Smart Measure Pro go into the Sma...

Page 9: ...you need to ensure that 1 Your target is a flat surface and is all on the same plane 2 Your target is or has a rectangular shape on it to align the object 3 Your laser cross hair on the screen is poin...

Page 10: ...ve aligned your app to the object you can measure the area of your object While on the Area tab you can tap and drag to create rectangular measurements Drag the outline of the rectangular shape to ali...

Page 11: ...estimating purposes tap Calculator Specifications Range 6ft 492ft 1 8m 150m Laser Class 1 Laser Wavelength 895 905nm Auto Power Switch Off 3 minutes after no Bluetooth Connectivity Battery Type Integr...

Page 12: ...or any reason you can return it within 30 days from the date of purchase with a receipt for a full refund IMPORTANT NOTE The customer is responsible for the correct use and care of the instrument More...

Reviews: