Stanley STBS720 Manual Download Page 6

6

Motor

Be sure your power supply agrees with nameplate marking. 

This information is printed on the nameplate. Lower voltage 

will cause loss of power and can result in over-heating. All 

STANLEY tools are factory-tested; if this tool does not 

operate, check the power supply.

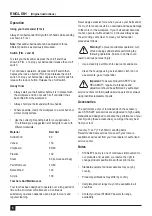
Use Of Extension Cords

Make sure the extension cord is in good condition before 

using. Always use the proper size extension cords with the 

tool – that is, proper wire size for various lengths of cord and 

heavy enough to carry the current the tool will draw. Use of 

an undersized cord will cause a drop in line voltage resulting 

in loss of power and overheating.

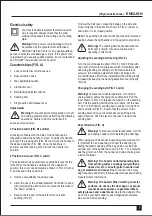
Specific Safety Rules

•  Avoid prolonged contact with dust from power 

sanding, sawing, grinding, drilling, and other 

construction activities. Wear protective clothing and 

wash exposed areas with soap and water.

 Allowing 

dust to get into your mouth, eyes, or lay on the skin may 

promote absorption of harmful chemicals.

Warning! Use of this tool can generate and/ or 

disburse dust, which may cause serious and 

permanent respiratory or other injury.

 Always 

use NIOSH/OSHA approved respiratory protection 

appropriate for the dust exposure. Direct particles away from 

face and body.

Caution!


Wear appropriate hearing protection 

during use.

 Under some conditions and duration 

of use, noise from this product may contribute to 

hearing loss.

Warning!

•  Always wear eye and respiratory protection.
•  Clean your tool out periodically.

Safety of others

•  This appliance is not intended for use by persons 

(including children) with reduced physical, sensory or 

mental capabilities, or lack of experience and 

knowledge, unless they have been given supervision or 

instruction concerning use of the appliance by a person 

responsible for their safety.

•  Children should be supervised to ensure that they do not 

play with the appliance.

Residual risks.

Additional residual risks may arise when using the tool which 

may not be included in the enclosed safety warnings. These 

risks can arise from misuse, prolonged use etc. Even with 

the application of the relevant safety regulations and the 

implementation of safety devices, certain residual risks can 

not be avoided. These include:

•  Injuries caused by touching any rotating/moving parts.
•  Injuries caused when changing any parts, blades or 

accessories.

•  Injuries caused by prolonged use of a tool. When using 

any tool for prolonged periods ensure you take regular 

breaks.

•  Impairment of hearing.
•  Health hazards caused by breathing dust developed 

when using your tool (example:- working with wood, 

especially oak, beech and MDF.)

Vibration

The declared vibration emission values stated in the 

technical data and the declaration of conformity have been 

measured in accordance with a standard test method 

provided by EN 60745 and may be used for comparing one 

tool with another. The declared vibration emission value may 

also be used in a preliminary assessment of exposure.                         

Warning!

 The vibration emission value during actual use of 

the power tool can differ from the declared value depending 

on the ways in which the tool is used. The vibration level 

may increase above the level stated.
When assessing vibration exposure to determine safety 

measures required by 2002/44/EC to protect persons 

regularly using power tools in employment, an estimation of 

vibration exposure should consider, the actual conditions of 

use and the way the tool is used, including taking account of 

all parts of the operating cycle such as the times when the 

tool is switched off and when it is running idle in addition to 

the trigger time.

Read 

I

nstructions 

Manual

U

se Eye 

Protection

U

se Ear 

Protection

V ........   Volts         
A ........  Am

p

eres

Hz .......  Hertz
W ........ 

W

atts

min .....  minutes

.....  Alternating  


Current

.....  Direct  


Current 

n

0

  .......  No-Load 

S

p

eed

 ......  Class 

II


Construction

....  Earthing  


Terminal

....  Safety Alert 


Symbol

.../min..  Revolutions  

or Reci

p

ro- 

cation 

p

er  

minute

Labels on tool

The label on your tool may include the following symbols:

Position of date barcode

The Date Code, which also includes the year of 

manufacture, is printed into the housing.

Example:


2014 XX JN


             Year of manufacturing

ENGLISH    

(Original instructions)

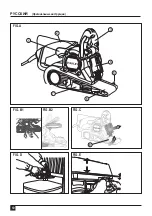
Summary of Contents for STBS720

Page 1: ...STBS720 English Page 4 Russian Page 12 Ukrainian Page 22 French Page 32 Portuguese Page 40 Arabic Page 52...

Page 2: ...2 FIG A FIG B1 FIG B2 FIG C FIG E FIG D 1 2 3 4 6 8 5 7 ENGLISH Original instructions...

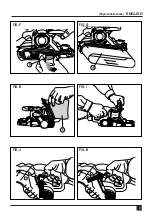
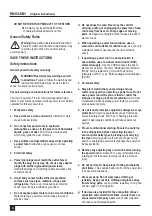
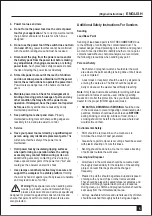
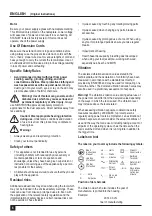
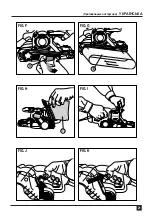
Page 3: ...3 FIG F FIG H FIG J FIG G FIG I FIG K 9 10 11 Original instructions ENGLISH...

Page 4: ...or entangled cords increase the risk of electric shock e When operating a power tool outdoors use an extension cord suitable for outdoor use Use of a cord suitable for outdoor use reduces the risk of...

Page 5: ...on against toxic dust and fumes and ensure that persons within or entering the work area are also protected Additional Safety Instructions For Sanders Sanding Lead Base Paint Sanding of lead based pai...

Page 6: ...losed safety warnings These risks can arise from misuse prolonged use etc Even with the application of the relevant safety regulations and the implementation of safety devices certain residual risks c...

Page 7: ...ition unless the bail handle is in the uppermost position Warning The sanding belt is exposed when the belt cover is raised Use extra caution when operating in this mode Adjusting the sanding belt tra...

Page 8: ...sander Too much force can result in an overload and cause damage to the motor or the workpiece If your belt sander becomes too hot operate it without load for 2 minutes Always keep the air cooling ve...

Page 9: ...ur after sales service is available on the internet at www stanleytools com Protecting the environment Separate collection This product must not be disposed of with normal household waste Should you n...

Page 10: ...10 FIG A FIG B1 FIG B2 FIG C FIG E FIG D 1 2 3 4 6 8 5 7...

Page 11: ...11 FIG F FIG H FIG J FIG G FIG I FIG K 9 10 11...

Page 12: ...12 STANLEY 1 b 2 b d f RCD GFCI ELCB 3 a b...

Page 13: ...13 d f g 4 a b c d c f 5...

Page 14: ...14 NIOSH 4 STANLEY NIOSH OSHA...

Page 15: ...l can differ from the declared value depending on the ways in which the tool is used The vibration level may increase above the level stated When assessing vibration exposure to determine safety measu...

Page 16: ...16 3 B1 B2 1 2 2 C D C 1 a b c D C 2 E E E F G 5 3 21 76 533 6 H 7 I I J J K...

Page 17: ...17 80 150 60 80 100 80 40 60 100 100 2 STANLEY 3 21 76 533 STANLEY STANLEY...

Page 18: ...18 Stanley Stanley Stanley Stanley Stanley www 2helpU com10 STANLEY STANLEY STANLEY STANLEY 24 STANLEY STANLEY Stanley Stanley Stanley Stanley www stanleytools com STBS720 720W 220 240V 50 60Hz 800...

Page 19: ...19 1 STANLEY 2 3 24 5 4 STANLEY www 2helpU com 5 6 7 7 1 7 2 7 3 7 4 7 5 8 8 1 8 2 8 3 8 4 65510 40...

Page 20: ...20 FIG A FIG B1 FIG B2 FIG C FIG E FIG D 1 2 3 4 6 8 5 7...

Page 21: ...21 FIG F FIG H FIG J FIG G FIG I FIG K 9 10 11...

Page 22: ...22 STANLEY 1 b 2 b d f RCD GFCI ELCB 3 a b...

Page 23: ...23 d f g 4 a b c d f g 5...

Page 24: ...24 NIOSH 4 STANLEY NIOSH OSHA...

Page 25: ...ffer from the declared value depending on the ways in which the tool is used The vibration level may increase above the level stated When assessing vibration exposure to determine safety measures requ...

Page 26: ...26 C 1 a b c D C 2 G 5 3 21 76 533 6 H 7 I I J J K...

Page 27: ...27 80 150 60 80 100 80 40 60 100 100 2 STANLEY 3 21 76 533 STANLEY STANLEY Stanley Stanley Stanley Stanley Stanley www 2helpu com10...

Page 28: ...28 I STANLEY STANLEY STANLEY STANLEY 24 STANLEY STANLEY Stanley Stanley Stanley Stanley www stanleytools com STBS720 720W 220 240V 50 60Hz 800...

Page 29: ...29 1 STANLEY 2 3 24 5 4 STANLEY www 2helpU com 5 6 7 7 1 7 2 7 3 7 4 7 5 8 8 1 8 2 8 3 8 4 Stanley Black Decker Deutschland GmbH Black Decker Str 40 D 65510 Idstein...

Page 30: ...30 FRAN AIS Instructions initiales FIG A FIG B1 FIG B2 FIG C FIG E FIG D 1 2 3 4 6 8 5 7...

Page 31: ...31 Instructions initiales FRAN AIS FIG F FIG H FIG J FIG G FIG I FIG K 9 10 11...

Page 32: ...maltraiter le c ble d alimentation Ne jamais utiliser le c ble pour porter l outil et ne le tirez pas pour d brancher l outil Maintenir le c ble loign des sources de chaleur de la graisse des bords c...

Page 33: ...es de serrage ou tout autre dispositif de xation pour s curiser la pi ce usiner sur un support stable Tenir la pi ce usiner la main ou contre son corps la rend instable et peut conduire une perte de c...

Page 34: ...bruit manant de cet appareil pourrait contribuer la perte d audition Attention Portez toujours des lunettes et un masque de protection Nettoyez votre outil p riodiquement S curit des autres Cet outil...

Page 35: ...permettre un pon age plus polyvalent FIG D Pour abaisser le capot de la bande abrasive saisissez la languette sur le c t puis d placez la l g rement dans le sens indiqu comme le montre la FIG C Fl che...

Page 36: ...rel chez l interrupteur marche arr t Pour teindre la ponceuse bande appuyez sur l interrupteur marche arr t puis rel chez le bouton de verrouillage Rel chez l interrupteur marche arr t Conseils utiles...

Page 37: ...e veuillez rapporter votre appareil aupr s d un centre de r paration agr qui se chargera de le collecter en notre nom Pour conna tre l adresse d un centre de r paration agr pr s de chez vous contactez...

Page 38: ...38 PORTUGUESE Instru es Originais FIG A FIG B1 FIG B2 FIG C FIG E FIG D 1 2 3 4 6 8 5 7...

Page 39: ...39 Instru es Originais PORTUGUESE FIG F FIG H FIG J FIG G FIG I FIG K 9 10 11...

Page 40: ...o risco de choque el trico e Quando operar uma ferramenta el trica no exterior use um o de extens o adequado para uso exterior O uso de um o apropriado para uso exterior reduz o risco de choque el tr...

Page 41: ...metal da ferramenta el trica sob tens o e provocar um choque el trico no operador Utilize grampos ou outra maneira pr tica de segurar e apoiar a pe a de trabalho numa plataforma est vel Segurar a pe a...

Page 42: ...lar e respirat ria Limpe a sua ferramenta periodicamente Seguran a de outras pessoas Este aparelho n o se destina a ser utilizado por pessoas incluindo crian as com de ci ncia f sica sensorial ou ment...

Page 43: ...te superior da correia para lixar mais vers til Fig D Para descer a cobertura da correia segure a ange de lado e mova a ligeiramente na dire o mostrada na Fig C Seta 2 e devolva o sua posi o Nota A co...

Page 44: ...cont nuo pressione o interruptor on off ligar desligar em seguida solte o bot o de bloqueio Fig K e liberte o interruptor on off ligar desligar Para parar a sua lixadora de correia solte o interruptor...

Page 45: ...evendedor STANLEY local para a disponibilidade da gama Protegendo o ambiente Recolha separada Este produto n o deve ser descartado com o resto do lixo caseiro normal Se encontrar que um dia o seu prod...

Page 46: ...a STANLEY garante a substitui o de todas as pe as defeituosas sem custos por nossa conta substitui a unidade sem custos dado que O produto n o foi mal usado e foi usado de acordo com o manual de instr...

Page 47: ...f fE G b e Y J JG f Hh dG H e e 2helpU com www e G e e c d c G I G e G cG e e e c T f S a J gD e OG aCG f d H dG e G cG e L jh A LQCG L VQ j I LC G d H I j Lh d a e N J Y UEG hCG a IQ e Y G Z J c e G...

Page 48: ...b e dG I dG R L G SG Y dG kG HCG J dG b hCG G J Jh R G Y dG IO jR EG W G bO I M hO H b R G IQG M LQO JQG d M h e dG I dG R L d j dG a a f Y k FGO a Mh d dG G G JG J jE H b R d O G Z dG j CG AG LEG b Q...

Page 49: ...b G Vh j e a G Vh I dG S A Z b X e Vh YCG G dG A Z j e Y k a e I dG S j j V dG G g R G J YkG L fG k Y a e g dG I dG S J j J G H bh I MGh HkG L eGh g dG R G bG EG Qh j dG c GPEG I dG S J M e HkGQ a G j...

Page 50: ...i NCG G dGh e dG IQGOEG G dGh e d W dG kG H dG GQ dGh G L H b Q d V d S Gh Gh L dG Y b R G G SG A KCG S G PC G bGh JQG J G H R G Y dG A V dG OD J dG G a EG G S G I e Mh j dG bh d bG dG GQ dG k FGO JQ...

Page 51: ...j bh I e Z j G N hCG dG N e NC G H I S YkG L fG j G Q dG b JQGh S Q Z Y Q j b dG O Gh G dG j M e d c cC Jh e dG NOC Gh Q dG e j d k N G SG Y a VE G e dG J j dG hCG jO L G U TC G e dG I dG I LCG I dG I...

Page 52: ...Y dG O HEG Y U MG G e Y f hCG F H dG d dG SC G EG M c G AG LC G hCG IO G G Gh dGh F H c e U h M N e j J H G hCG S e j S SG Q G R G J Y g G S d S e S G SG EG M LQ G G S d F H c e U h M N e j LQ G S a...

Page 53: ...53 ARABIC FIG F FIG H FIG J FIG G FIG I FIG K 9 10 11...

Page 54: ...54 ARABIC FIG A FIG B1 FIG B2 FIG C FIG E FIG D 1 2 3 4 6 8 5 7...

Page 55: ...90618261 01 2015...

Page 56: ...44600525 Fax 974 44601338 Al Muftah Service Centre Al Wakrah Road P O Box 875 Doha Qatar Tel 974 44650880 44650110 44446868 Fax 974 44441415 44662599 SAUDI ARABIA Al Bahr Mohamed Ahmed Bin A f Est P O...

Reviews: