


ENGLISH (
Original Instructions)
22
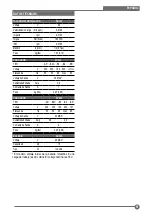
Pack Charging mode. This feature ensures maximum
battery life. The light flashes in the pattern indicated on the
label.
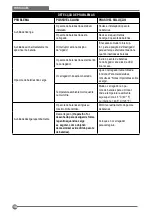
Problem power line
When the charger is used with some portable
power sources such generators or sources that
convert DC to AC, the charger may temporarily
suspend operation. The LED flashes in the pattern indicated
on the label. This indicates that the power source is out of
limits.
LEAVING THE BATTERY IN THE CHARGER
The charger and battery pack can be left connected with
the LED glowing indefinitely. The charger will keep the
battery pack fresh and fully charged. This charger features
an automatic tune-up mode which equals or balances the
individual cells in the battery pack to allow it to function at
peak capacity. Battery packs should be tuned up weekly or
whenever the battery no longer delivers the same amount of
work. To use the automatic tune-up mode, place the battery
pack in the charger and leave it for at least 8 hours.
IMPORTANT CHARGING NOTES
1. Longest life and best performance can be obtained if
the battery pack is charged when the air temperature
is between 65°F and 75°F (18°C - 24°C). DO NOT
charge the battery pack in an air temperature below
+40°F (+4,5°C), or above +105°F (+40,5°C). This
is important and will prevent serious damage to the
battery pack.
2. The charger and battery pack may become warm to
touch while charging. This is a normal condition, and
does not indicate a problem. To facilitate the cooling of
the battery pack after use, avoid placing the charger or
battery pack in a warm environment such as in a metal
shed, or an uninsulated trailer.
3. If the battery pack does not charge properly:
a. Check current at receptacle by plugging in a lamp or
other appliance
b. Check to see if receptacle is connected to a light switch
which turns power off when you turn out the lights.
c. Move charger and battery pack to a location where the
surrounding air temperature is approximately 65°F -
75°F (18°C - 24°C).
d. If charging problems persist, take the tool, battery pack
and charger to your local service center.
4. The battery pack should be recharged when it fails to
produce sufficient power on jobs which were easily
done previously.
5.
DO NOT CONTINUE
to use under these conditions.
Follow the charging procedure.
6. You may also charge a partially used pack whenever
you desire with no adverse affect on the battery pack.
OPERATING INSTRUCTIONS
Installing and removing the battery pack from the tool.
CAUTION!
Make certain the lock-off button is engaged
to prevent switch actuation before removing or installing
battery.
To install battery pack (Fig. B)
♦ Insert battery pack firmly into tool until an audible click
is heard. Ensure battery pack is fully seated and fully
latched into position.
Note: Make sure that the battery pack is firmly seated
in place.
To remove battery pack (Fig. C)
♦ Depress the battery release button (7) and pull battery
pack out of tool.
Drilling
♦ Use sharp drill bits only.
♦ Support and secure work properly, as instructed in the
Safety Instructions.
♦ Use appropriate and required safety equipment, as
instructed in the Safety Instructions.
♦ Secure and maintain work area, as instructed in the
Safety Instructions.
♦ Run the drill very slowly, using light pressure, until the
hole is started enough to keep the drill bit from slipping
out of it.
♦ Apply pressure in a straight line with the bit. Use enough
pressure to keep the bit biting but not so much as to stall
the motor or deflect the bit.
♦ Hold the drill firmly with two hands, one hand on the
handle, and the other gripping the bottom around the
battery area or the auxiliary handle if provided.
♦ Do not click the trigger of a stalled drill off and on in an
attempt to start it. Damage to the drill can result.
♦ Minimize stalling on break through by reducing pressure
and slowly drilling through the last part of th hole.
♦ Keep the motor running while pulling the bit out of a
drilled hole. This will help reduce jamming.
♦ Make sure switch turns drill on and off.
LED work light
When drill is activated by pulling the trigger switch (1), the
integrated LED work light (8) will automatically illuminate
the work area.
Note: The work light is for lighting the immediate work
surface and is not intended to be used as a flashlight.
Bit tip storage
A bit storage slot (9) is built into the base of the tool.
Fitting and removing a screwdriver bit or socket
(Fig. D)
This tool is fitted with a quick release chuck to allow for an
easy exchange of bits.
WARNING!
Make certain the tool is locked to prevent
switch actuation before installing or removing accessories.
♦ Lock the tool by setting the forward/reverse slider (2) to
the centre position.
♦ Pull and hold the chuck collar (4) away from the front
of the tool.
♦ Insert the bit shaft (14) into the chuck (3).
♦ Release the collar. The accessory is locked in place.
Note: To remove the bit/socket repeat the above steps.
WARNING!
Use only impact sockets. Non-impact sockets
may break and cause a hazardous condition. Inspect socket
prior to use to ensure that it contains no cracks.


