background image

4 - ENG

•  Do not point the tool at co-workers or yourself 

at any time. No horseplay! 

Work safe! Respect the 

tool as a working implement. (Fig. J)

•  Keep  bystanders,  children,  and  visitors  away 

while  operating  a  power  tool.  Distractions  can 

cause you to lose control. 

When tool is not in use, 

it should be locked in a safe place, out of the reach of 

children.

•  Remove  finger  from  trigger  when  not  driving 

fasteners.

•  Never  carry  tool  with  finger  on  trigger.  Using 

the  trigger  lock-off  will  prevent  accidental   

discharge. 

Accidental discharge could result.

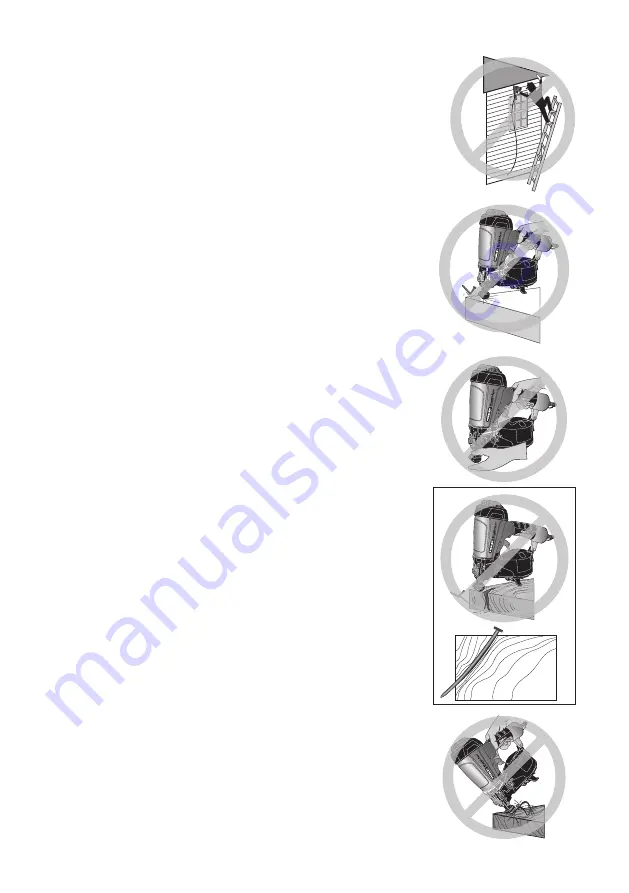
•  Do  not  overreach.  Maintain  proper  footing  and 

balance at all times. 

Loss of balance may cause per-

sonal injury. (Fig. K)

•  Make sure hose is free of obstructions or snags. 

Entangled  or  snarled  hoses  can  cause  loss  of 

balance or footing. 

•  Use  the  tool  only  for  its  intended  use.  Do 

not  discharge  fasteners  into  open  air,  concrete, 

stone,  extremely  hard  woods,  knots  or  any   

material  too  hard  for  the  fastener  to  penetrate. 

Do not use the body of the tool or top cap as a  

hammer. Discharged fasteners may follow unexpected 

path and cause injury. (Fig. L)

•  Always  keep  fingers  clear  of  contact  trip  to 

prevent injury from inadvertent release of nails. 

(Fig. 

M)

•  Refer  to  the 

Maintenance

  and 

Repairs

  sections 

for  detailed  information  on  the  proper  mainte-

nance of the tool.

•  Always operate the tool in a clean, lighted area. 

Be  sure  the  work  surface  is  clear  of  any  debris 

and be careful not to lose footing when working 

in elevated environments such as rooftops.

•  Do  not  drive  fasteners  near  edge  of  material. 

The workpiece may split causing the fastener to 

ricochet,  injuring  you  or  a  co-worker. 

Be aware 

that the nail may follow the grain of the wood (shiner), 

causing it to protrude unexpectedly from the side of 

the work material. Drive the nail perpendicular to the 

grain to reduce risk of injury. (Fig. N)

•  Do  not  drive  nails  onto  the  heads  of  other   

fasteners  or  with  the  tool  at  too  steep  an 

angle. Personal injury from strong recoil, jammed  

fasteners, or ricocheted nails may result. 

(Fig. O)

•  Be aware of material thickness when using the 

nailer. A protruding nail may cause injury.

Fig. K

Fig. L

Fig. M

Fig. N

Fig. O

Summary of Contents for FMFP12704

Page 1: ...UCCIONES CON LA HERRAMIENTA PARA FUTURA REFERENCIA SI TIENE ALGUNA DUDA COMUN QUESE CON SU REPRESENTANTE DE STANLEY TOOLS O CON SU DISTRIBUIDOR LIRE ATTENTIVEMENT LE PR SENT MANUEL AVANT D UTILISER L...

Page 2: ...ngs on the nameplate of the tool Not to exceed 120 psi 8 3 bar Do not connect the tool to a compressor rated at over 175 psi The tool operating pressure must never exceed 175 psi even in the event of...

Page 3: ...ine perform maintenance or clear jammed fasteners while connected to the air supply If the contact trip is adjusted when the tool is connected to the air supply and nails are loaded accidental dischar...

Page 4: ...e body of the tool or top cap as a hammer Discharged fasteners may follow unexpected path and cause injury Fig L Always keep fingers clear of contact trip to prevent injury from inadvertent release of...

Page 5: ...ed areas Sudden recoil can result in impact to the body especially when nailing into hard or dense material Fig S Grip tool firmly to maintain control while allowing tool to recoil away from work surf...

Page 6: ...ated lumber Your risk from these exposures varies depending on how often you do this type of work To reduce your exposure to these chemicals work in a well ventilated area and work with approved safet...

Page 7: ...trigger is depressed AIR FITTING A 3 8 9 5 mm male quick connector coupling may be used when a 1 4 6 4 mm supply line is not available Always use couplings that relieve all pressure from the tool when...

Page 8: ...ontact trip NEVER use a tool that has the contact trip restrained in the actuated position 6 Check air supply Ensure air pressure does not exceed recommended operating limits 70 to 120 psi 4 9 to 8 3...

Page 9: ...5 NOTE Be careful not to deform the coil of nails during the loading process Otherwise the nail guide door will not close and the nails might not feed consistently 9 Close the canister door I complete...

Page 10: ...ive is factory adjusted Test drive a fastener and check depth If a change is desired 1 To drive the nail shallower rotate the depth setting wheel G to the left 2 To drive a nail deeper rotate the dept...

Page 11: ...r 4 Remove the jammed nail 5 Correct any deformation that may have occurred to the nail coil NOTE Should nails continue to jam frequently in nosepiece have tool serviced by an authorized Stanley Black...

Page 12: ...her drain valves on compressor tanks Allow any accumulated water to drain from hoses Clean canister feed piston area and contact trip mechanism Permits smooth operation of magazine reduces wear and pr...

Page 13: ...ferable It only covers damage resulting from defects in material or workmanship and it does not cover conditions or malfunctions resulting from normal wear neglect abuse accident or repairs attempted...

Page 14: ...air inlet Worn or damaged o rings or seals Install Overhaul Kit Air leak near bottom of tool Loose screws Tighten screws Worn or damaged o rings or bumper Install Overhaul Kit Tool jams frequently Inc...

Page 15: ...ay have difficulty at very rapid rates Compressor will be adequate only when tools are utilized at slow production rates punch out or occasional use NR Not Recommended Portable Handcarry 3 2 4 CFM 5 5...

Page 16: ...provoquer des l sions oculaires l op rateur L op rateur et les autres personnes uvrant dans la zone de travail DOIVENT porter des lunettes de s curit munies de protecteurs lat raux Ces lunettes de s c...

Page 17: ...r la zone de travail ou de remettre l outil un autre op rateur Ne pas transporter l outil vers une autre zone de travail qui comprend des cha faudages des marches des chelles etc avec la source d alim...

Page 18: ...es Ne jamais transporter l outil alors que le doigt repose sur la g chette L utilisation du verrou de g chette vitera un tir accidentel Un tir accidentel peut se produire Ne pas trop tendre les bras C...

Page 19: ...e sa plage de fonctionnement les clous peuvent passer compl tement travers un mat riau mince ou tr s souple S assurer que la pression dans le compresseur est r gl e de fa on ce que les clous soient fi...

Page 20: ...ion et rel cher la g chette apr s chaque action Lorsqu on utilise l actionnement par coup de la cloueuse il faut toujours bien ma triser l outil Un positionnement inad quat de l outil peut causer une...

Page 21: ...e causer des probl mes respiratoires graves et permanents ou d autres probl mes m dicaux Toujours porter un appareil respiratoire approuv par la NIOSH OSHA pour se prot ger de la poussi re Diriger les...

Page 22: ...e est enfonc e RACCORD D AIR Un connecteur rapide m le de 9 5 mm 3 8 po peut tre utilis lorsqu une conduite d alimentation de 6 4 mm 1 4 po n est pas disponible toujours utiliser des raccords qui lib...

Page 23: ...utiliser l outil si l ensemble ne fonctionne pas correctement NE JAMAIS modifier le d clencheur par contact NE JAMAIS utiliser un outil dont le d clencheur est coinc en position de marche 6 V rifier...

Page 24: ...che K fig 4 Ins rer les attaches L avec les pointes vers le bas IMPORTANT les attaches doivent pointer dans la direction o elles seront enfonc es 7 D rouler assez de clous environ 76 mm 3 po pour atte...

Page 25: ...st enfonc Ceci permet l utilisateur d enfoncer rapidement plusieurs attaches de suite R GLAGE DE LA PROFONDEUR FIG 8 pour r duire les risques de blessures graves par actionnement accidentel de l outil...

Page 26: ...clouer selon une distance pr cise Q depuis le bord frontal de la rang e de bardeaux pr c dente R comme illustr D GAGEMENT DES CLOUS COINC S FIG 1 12 Afin d viter les risques de blessures toujours d c...

Page 27: ...us les jours ou apr s chaque utilisation FONCTIONNEMENT PARTEMPS CHAUD L outil devrait fonctionner normalement Toutefois le prot ger de la lumi re directe du soleil car la chaleur excessive risque de...

Page 28: ...ais laisser de liquide p n trer dans l outil et n immerger aucune partie de l outil dans un liquide SERVICE PI CES DE RECHANGE N utiliser que des pi ces de rechange identiques Consulter la liste des p...

Page 29: ...nis et au Canada Les limitations impos es par la dur e d une garantie implicite ou l exclusion des dommages accessoires ou indirects n tant pas reconnue dans certains tats les limitations ou exclusion...

Page 30: ...s V rifier si les attaches sont appropri es c d de bonne dimension et en bobine angle de 15 Attaches endommag es Fils de bobine fl chis Remplacer par des attaches intactes Vis du r servoir ou du bec d...

Page 31: ...3 4 NR 5 NR 6 NR NR 7 NR NR 8 NR NR Le compresseur peut actionner tout outil quel que soit le taux de production Le compresseur peut actionner des outils des taux de produc tion faibles ou mod r s mai...

Page 32: ...operador El operador y toda otra persona que se encuentre en el rea de trabajo DEBEN usar anteojos de seguridad con protecci n lateral Estos anteojos de seguridad deben cumplir con los requisitos ANSI...

Page 33: ...operador No lleve la herramienta a otra rea de trabajo en la que el cambio de ubicaci n involucre el uso de andamios escalones escaleras etc con el suministro de aire conectado No realice ajustes ext...

Page 34: ...o fuera del alcance de los ni os Quite el dedo del gatillo cuando no est colocando clavos Nunca transporte la herramienta con el dedo en el gatillo Usar el bloqueo del gatillo ayuda a prevenir disparo...

Page 35: ...o rebote de los clavos Fig O Conozca el espesor del material cuando utilice la clavadora Un clavo que sobresale puede provocar una lesi n Tenga en cuenta que cuando se utiliza la herramienta a presio...

Page 36: ...eados si se permite accidentalmente que el interruptor de contacto vuelva a tocar la superficie de contacto mientras el gatillo permanece en la posici n de disparo Fig T PARA EVITAR LOS DOBLES DISPARO...

Page 37: ...crosc picas El uso de esta herramienta puede generar o dispersar part culas de polvo que pueden causar lesiones respiratorias permanentes y graves u otras lesiones Use siempre protecci n respiratoria...

Page 38: ...contacto mientras se oprime el gatillo CONECTOR DE AIRE Puede usarse un adaptador macho de conexi n r pida de 9 5 mm 3 8 pulg si no hay disponible una l nea de alimentaci n de 6 4 mm 1 4 pulg Utilice...

Page 39: ...ectamente No use la herramienta si alg n conector no funciona adecuadamente NUNCA intente forzar el activador por contacto NUNCA use una herramienta que tenga el activador por contacto restringido en...

Page 40: ...en la plataforma para clavos J NOTA Observe el icono del elemento de fijaci n K Fig 4 Coloque los elementos de fijaci n L con las puntas hacia abajo IMPORTANTE Los elementos de fijaci n deben apuntar...

Page 41: ...rmanezca presionado la herramienta disparar un sujetador cada vez que se presione el interruptor de contacto Esto permite que el usuario dispare m ltiples sujetadores r pidamente en forma secuencial A...

Page 42: ...fila de tejas anterior R como se muestra en la figura EXTRACCI N DE UN CLAVO ATASCADO FIG 1 12 Siempre desconecte la l nea de aire de la herramienta y quite los sujetadores del cartucho antes de reali...

Page 43: ...iamente o despu s de cada uso OPERACI N EN CONDICIONES CLIM TICAS CALUROSAS La herramienta deber a funcionar normalmente Sin embargo mantenga la herramienta alejada del sol directo ya que el calor exc...

Page 44: ...pa o humedecido s lo con agua y jab n neutro Nunca permita que penetre l quido dentro de la herramienta y nunca sumerja las piezas de la herramienta en un l quido SERVICIO PIEZAS DE REPUESTO Utilice...

Page 45: ...ciones a la duraci n de una garant a impl cita ni la exclusi n o limitaci n de da os fortuitos o consecuenciales de modo que las limitaciones o exclusiones anteriores pueden no corresponder a su caso...

Page 46: ...ue los elementos de fijaci n sean del tama o correcto y que el ngulo recortado sea de 15 grados Elementos de fijaci n da ados Cabezal recortado doblado Reemplace con elementos de fijaci n en buen esta...

Page 47: ...3 4 NR 5 NR 6 NR NR 7 NR NR 8 NR NR El compresor ser suficiente para las herramientas a todo ndice de producci n El compresor ser suficiente a ndices de producci n lentos o moderados pero tendr dific...

Reviews: