


8
ENGLISH
(Original instructions)
9
ENGLISH
(Original instructions)
Warning: Gloves must be worn when removing accessories
as then may become hot during use.
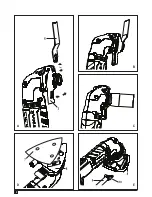
Fitting a sanding sheet (fig. D)
u
Line up the sanding sheet (7) with the sanding base (8) as
shown.
u
Press the sheet firmly and evenly onto the sanding base,
making sure that the holes in the sheet coincide with the
holes in the base.
Removing a sanding sheet
u
Pull the sanding sheet off the sanding base (8).
Warning! Never use the sanding base without a sanding
sheet or accessory in place.
Fitting the dust extraction adaptor (fig. E)
u
Line up the dust extraction adaptor (9) with the sanding
base (8) as shown.
u
Press the adaptor firmly and evenly in to the sanding
base.
u
Secure the adaptor by turning the locking nut (10) clock-
wise.
u
Connect a vacuum cleaner to the dust extraction adaptor.
Removing the dust extraction adaptor
u
Turn the locking nut (10) anti-clockwise.
u
Pull the dust extraction adaptor (9) out of the sanding
base (8).
Fitting alternative accessories (fig. F)
u
Place the spacer (11) onto the collar (12).
u
Place the alternative accessory (13) onto the collar (12).
u
Firmly attach the fixing bolt (14) into place to ensure a
tight fit for the alternative accessory (13).
Note: The spacer and fixing bolt are not used to attach Stan-
ley FaxMax accessories. Black and decker accessories are
attached using the Super-lok
TM
Tool free accessory clamping
lever.
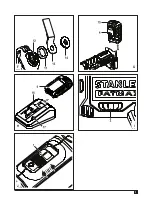
Fitting and removing the battery (fig. G)
u
To fit the battery (4), line it up with the receptacle on the
tool. Slide the battery into the receptacle and push until
the battery snaps into place.
u
To remove the battery, push the release buttons (15) while
at the same time pulling the battery out of the receptacle.
Use
Warning! Let the tool work at its own pace. Do not overload.
Warning! Before cutting into walls, floors or ceilings, check for
the location of wiring and pipes.
Charging the battery (fig. H)
The battery needs to be charged before first use and whenev-
er it fails to produce sufficient power on jobs that were easily
done before. The battery may become warm while charging;
this is normal and does not indicate a problem.
Warning! Do not charge the battery at ambient temperatures
below 10 °C or above 40 °C. Recommended charging tem-
perature: approx. 24 °C.
Note: The charger will not charge a battery if the cell
temperature is below approximately 10 °C or above 40 °C.
The battery should be left in the charger and the charger
will begin to charge automatically when the cell tempera-
ture warms up or cools down.
u
To charge the battery (4), insert it into the charger (16).
The battery will only fit into the charger in one way. Do
not force. Be sure that the battery is fully seated in the
charger.
u
Plug in the charger and switch on at the mains.
The charging indicator (17) will blink.
The charge is complete when the charging indicator (17)
switches to continuously on. The charger and the battery can
be left connected indefinitely. The LED will switch on as the
charger occasionally tops up the battery charge.
u
Charge discharged batteries within 1 week. Battery life will
be greatly diminished if stored in a discharged state.
Leaving the battery in the charger
The charger and battery pack can be left connected with the
LED glowing indefinitely. The charger will keep the battery
pack fresh and fully charged.
Charger diagnostics
If the charger detects a weak or damaged battery, the charg-
ing indicator (17) will flash red at a fast rate. Proceed as
follows:
u
Re-insert the battery (4).
u
If the charging indicators continues flashing red at a fast
rate, use a different battery to determine if the charging
process works properly.
u
If the replaced battery charges correctly, the original
battery is defective and should be returned to a service
centre for recycling.
u
If the new battery gives the same indication as the original
battery, take the charger to be tested at an authorised
services centre.
Note: It may take as long as 30 minutes to determine that
the battery is defective. If the battery is too hot or too
cold, the LED will alternately blink red, fast and slow, one
flash at each speed and repeat.


