- 21 -
EN
6.4.
How to check the settings
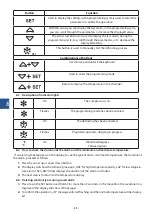
Press the „SET” button and immediately release it, the display will show the settings. After pressing and
releasing the „SET” button or hold it down for 5 seconds to display the values of the sensor again.
6.5.
How to change the settings
1.
Press the „SET” button and hold it down for more than 2 seconds to change the values;
2.
The value of the settings will be displayed and the LED indicator light will start flashing
3.
To change the settings, press
or
and hold it down for 10 seconds
4.
To save the new settings, press the „SET” button and hold it down for 10 seconds.
6.6.
Starting manual defrosting
To start manual defrosting process, press the „SET” button and hold it down for 2 seconds, that will activate
the defrost process.
6.7.
Changing of parameters value
To change the parameters values, proceed as follows:
1.
Enter the programming mode by pressing the SET button and the arrow down button and holding
them down for 3 seconds and the „SET” button will start flashing;
2.
Select the parameter
3.
Press he „SET” button to display the values
4.
Use the up or down arrows to change the settings;
5.
Press the „SET” button to save the new parameters;
6.
To exit, press the SET + arrow up buttons or wait for 15 seconds without pressing any buttons.
6.8.
Locking of the keyboard
1.
Press the buttons arrow up and arrow down and hold them down for 3 seconds.
2.
The POF message will appear on the display and the keyboard will be locked. Only information about
maximum and minimum temperature can be displayed in this mode.
3.
If any button is pressed and held down for 3 seconds POF message will be displayed.
6.9.
Unlocking of the keyboard
Press the up and down arrow buttons and hold them down for 3 seconds until you see the „Pon”. message.
6.10.
Continuous mode
If the defrosting process is not enabled, the continuous mode can be activated by pressing and holding
down the arrow up button for 3 seconds. The compressor will start operating in continuous mode until the
Cct parameter setting is reached. This process can be terminated before it ends by using the arrow up but-
ton and holding it down for 3 seconds.
6.11.
Alarms
Message
Cause
P1
Chamber sensor error
P2
Evaporator sensor error
HA
Maximum temperature reached
LA
Minimum temperature alarm
7. INSTALLATION
7.1.
Positioning of the appliance
The appliance should be placed in a dry, adequately ventilated room. In order to ensure proper work
do not place the appliance near a heat source and do not expose it to direct sunlight. The optimal tempera-
ture range in the room in which the appliance operates is between: + 16 °C and + 35 °C.
Avoid placing the appliance in rooms with a high chlorine and acids content in the air (e.g. at a pool), as this
may cause corrosion of the surface made of stainless steel.


