background image

The safe has a UL Listed interior electrical outlet 

that can be connected to an exterior 110V-15A 

power source only.   

ELECTRICAL OUTLET

Install the exterior power cord into the electrical 

outlet in the back of the safe.  

NOTE:  For easy access, install the power cord 

before securing the safe to the floor.

40676-1605

4 20

OPENING THE SAFE USING 

YOUR FINGERPRINT

To open the safe, press the scanner with a recorded 

finger.  The blue light will come on with one beep (if 

the sound is turned on) and the scan will begin.  

If the green light flashes twice with 2 beeps (if the 

sound is turned on), the scan has been accepted and 

you will have 5 seconds to turn the handle to open 

the door.

If the red light flashes once, the scanner did not read 

your fingerprint and you must try again.  If the red 

light flashes 3 times, the scanner read your fingerprint 

and did not accept it.

If there are 3 rejected scans, where your 

fingerprint was read, and the red light flashes 5 

times with 5 beeps (if the sound is turned on), 

you will have an automatic lockout for 60 

seconds before you can try a scan again.  The 

safe will beep one time (if the sound is turned 

on) and the green light will flash once when the  

lockout period is over.

If there is 1 more rejected scan where your 

fingerprint was read and the red light flashes 5 times 

with 5 beeps (if the sound is turned on),  you will 

have an automatic lockout for 5 minutes before you 

can try a scan again.  The safe will beep one time (if 

the sound is turned on) and the green light will flash 

once when the  lockout period is over.

SELECTING A LOCATION

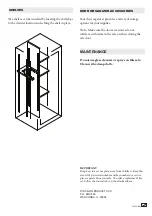
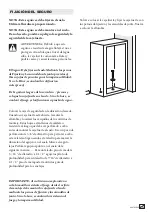
The safe should be flat against the wall and floor.  

Remove the baseboard if necessary.

The safe must be mounted to the floor.  For 

optimal safety and security, the safe should be 

installed adjacent to a side wall with minimal 

space on either side of the safe, in an isolated, 

dry and secure area.

CHILDREN SHOULD NOT PLAY 

WITH OR AROUND THE SAFE AT 

ANY TIME.

LOCKING THE SAFE

To lock the safe, close the door and rotate the 

handle counter clockwise until it stops.  If the 

handle is not turned until it stops, the locking 

mechanism will not lock.

TURNING THE SOUND OFF/ON

To turn the sound off, press the scanner with a 

recorded fingerprint for 10 seconds until the green 

light flashes twice.

To turn the sound on, press the scanner with a 

recorded fingerprint until you hear two beeps and 

the green light flashes twice.

Your safe comes with the beep sound turned on.

Summary of Contents for TD-40-SB-B-S

Page 1: ...e Instructions WARNING Tip Over Hazard A child or adult can tip the safe and be killed or seriously injured Failure to secure the safe as shown in these instructions can result in death or serious inj...

Page 2: ...ctions on locking and unlocking the safe Safety Interlock Screw 40676 1605 2 20 BATTERY INSTALLATION TAB You must first install the batteries which are located in the front protective Styrofoam This s...

Page 3: ...until there is two beeps if the sound is turned on and the green light flashes twice Lift your finger off the scanner Your fingerprint is now recorded NOTE In certain dry climate conditions your fing...

Page 4: ...he sound is turned on and the green light will flash once when the lockout period is over If there is 1 more rejected scan where your fingerprint was read and the red light flashes 5 times with 5 beep...

Page 5: ...e safe in the desired location When your safe is open lift the carpeting up and locate the mounting hole bushings These bushings are filled with fire resistant caulking which must be drilled out befor...

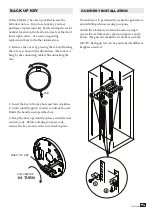
Page 6: ...able while unlocking the safe 2 Insert the key in the key hole and turn clockwise 1 4 turn until stopped in order to unlock the safe Rotate the handle and open the door 3 Keep the door open until you...

Page 7: ...talled by locating the shelf clips to the desired location and setting the shelf in place STACK ON PRODUCTS CO P O BOX 489 WAUCONDA IL 60084 IMPORTANT Keep keys in a secure place away from children Ke...

Page 8: ...ame ____________________________________ Date Purchased___ ___ ____ Owner s Address ___________________________ Unit or Apt Number _________________ City ___________________________ State ____________...

Page 9: ...S WARRANTY DOES NOT COVER ANY PRODUCT OR ANY PART OF ANY PRODUCT WHICH HAS BEEN SUBJECT TO EXCESSIVE USE ACCIDENT NEGLIGENCE IMPROPER INSTALLATION INCORRECT MAINTENANCE ALTER ATION OR REPAIR BY ANYONE...

Page 10: ...In addition the Stack On Fire Resistant Waterproof Steel Safe is not designed for the storage of and this limited reimbursement guarantee does not apply to computer disks CD s DVD s audio visual mater...

Page 11: ...ro de Vuelco Un ni o o un adulto puede volcar la caja fuerte y resultar muerto o gravemente heridos Si no se asegura la caja fuerte como se muestra en estas instrucciones puede causar la muerte o lesi...

Page 12: ...instrucciones de bloqueo y desbloqueo de la caja fuerte Seguridad fijaci n por tornillo 40676 1605 12 20 INSTALACI N DE LA BATER A LENGUA Primero debe instalar las bater as que se encuentran en la esp...

Page 13: ...luz verde parpadea dos veces Levantar el dedo del esc ner Su huella digital se registra ahora NOTA En ciertas condiciones de clima seco su huella digital no puede escanear Si su huella digital no se h...

Page 14: ...uz verde parpadea una vez cuando el per odo de bloqueo ha terminado Si hay 1 exploraci n m s rechazada donde se ley la huella dactilar y la luz roja parpadea 5 veces con 5 pitidos si el sonido est act...

Page 15: ...evantar la alfombra y localizar los casquillos de los orificios de montaje Estos bujes est n llenos de calafateo resistente al fuego que debe ser perforado a cabo antes de montar la caja fuerte al sue...

Page 16: ...caja fuerte 2 Introducir la llave en el ojo de la cerradura y girar en sentido horario 1 4 de vuelta hasta que sea detenido con el fin de desbloquear la caja fuerte Gire la manija y abrir la puerta 3...

Page 17: ...localizaci n de los ganchos correspondientes a la ubicaci n deseada y el establecimiento de la plataforma en su lugar STACK ON PRODUCTS CO P O BOX 489 WAUCONDA IL 60084 IMPORTANTE Mantenga las llaves...

Page 18: ...del due o __________________________________Fecha de compra___ ___ ____ Direcci n del propietario ___________________________ Unidad o Apartamento N mero _________________ Ciudad ____________________...

Page 19: ...o del producto sin cargo o reembolsar el precio de compra del producto ESTA GARANT A NO CUBRE NING N PRODUCTO O CUALQUIER PARTE DE CUALQUIER PRODUCTO QUE HA SIDO OBJECTO PARA USO EXCESIVO ACCIDENTE NE...

Page 20: ...resistente a prueba de agua de acero Caja de seguridad Stack On Fire no est dise ado para el almacenamiento de y esta garant a de reembolso limitada no se aplica a los discos de ordenador CD DVD mater...

Reviews: