background image

32

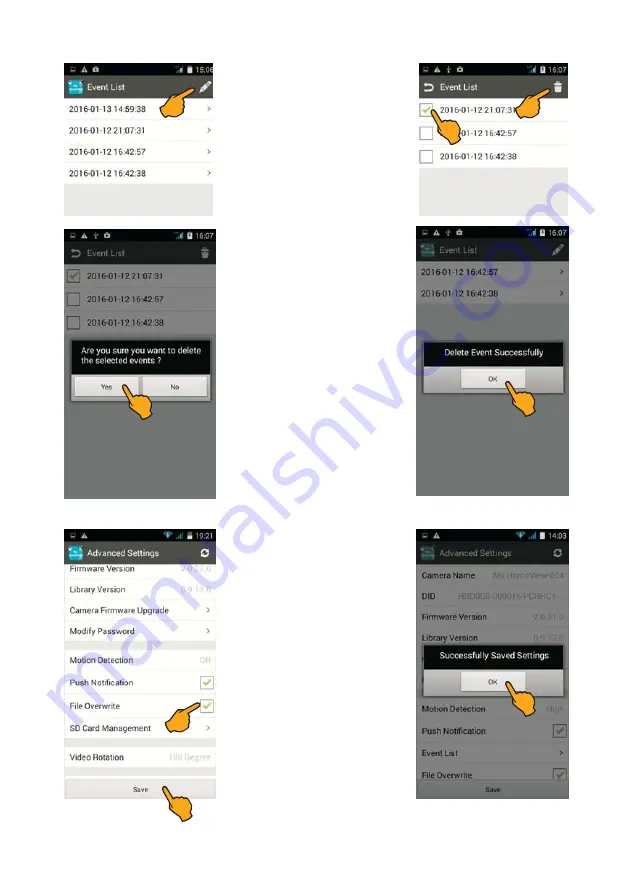
If you wish to delete the recording

afterwards, tap the 

pencil.

Mark the recordings to be deleted

by placing a tick mark in the corre-

sponding field. For deleting them

tap the 

waste bin

.

The confirmation prompt "

Are you

sure you want to delete the se-

lected events

?" is displayed. Tap

Yes,

 to delete the recording (or

cancel deleting by pressing 

No

).

The message "Delete Event Suc-

cessfully" is displayed.
Confirm by pressing 

OK

.

6. File Overwrite (for overwriting

previous data)

When activating the 

File Overwrite

function, the current recording is

used to overwrite the oldest files

presupposed that the storage ca-

pacity of the internal camera me-

mory is exhausted.

Important note:


If this function is

not activated, no further recording

will be done when the memory is

full!
Mark 

File Overwrite

 by placing a

tick mark in the corresponding field

and store by pressing 

Save

.

The message 

"Successfully Saved

Settings" is displayed. 

Confirm by

pressing 

OK

.

Summary of Contents for M8GB-L

Page 1: ... read through all operating instructions Keep these operating instructions in a safe place it contains important hints for operating the device Bedienungs anleitung User manual digitale Funktechnik 2 4 GHz digital radio technology 2 4 GHz multifon WLAN outdoor cam M8GB L Video Sicherheitssystem mit Intercom video security system with intercom Art Nr 51088 per WLAN mit App für Android iOS via App f...

Page 2: ...edienungsanleitung deutsch englisch Montagematerial Bitte überprüfen Sie den Packungsinhalt auf Vollständigkeit Prüfen Sie vor der Benutzung der Geräte ob äußerliche Beschädigungen vorliegen In diesem Fall nehmen Sie das Produkt nicht in Betrieb sondern setzen sich umgehend mit Ihrem Fachhändler in Verbindung ...

Page 3: ...der manuell über das Mobil gerät eingeschaltet werden Dank der Intercom Funktion ist zudem eine Sprechverbindung zwischen Kamera und Mobilgerät möglich Warn und Sicherheits Hinweise Gesetzliche Vorschriften zur Videoüberwachung beachten Stellen Sie sicher dass weder benachbarte Privatgrundstücke noch angrenzende öffentliche Bereiche erfasst werden Beachten Sie bei gewerblichen Flächen unbedingt di...

Page 4: ...4 Das Gerät im Überblick Mikrofon LED x6 Infrarot LED Objektiv PIR Sensor Dämmerungs Sensor Reset Taste Antenne Lautsprecher Montage und Anschluss der Kamera siehe Seite 21 ...

Page 5: ...te am Beispiel der Android Version der App beschrieben Kamera über Internet Verbindung mit dem Mobilgerät verbinden Stecken Sie zunächst das Kamera Netzteil in eine 230 V Steckdose und verbinden den Stecker mit der DC IN Buchse der Kamera Stellen Sie sicher dass Ihr Mobilgerät mit Ihrem WLAN Router verbunden ist Öffnen Sie die App My HomeView und tippen Sie auf das Plussymbol Tippen Sie auf Smart ...

Page 6: ...a Symbol Bei der ersten Inbetriebnahme werden Sie nun aufgefordert das voreingestellte Passwort 000000 zu ändern Das neue Passwort muss aus 8 bis 16 Zeichen Buchstaben und Zahlen bestehen Hinweise Notieren Sie sich Ihr neues Passwort Sie benötigen es wenn Sie weitere Mobilgeräte hinzufügen wollen Passwort Rücksetzung auf Werks einstellung 000000 Drücken Sie die RESET Taste an der Kamera rückseite ...

Page 7: ...etwork Suche über Kamera Netzwerk Für das Hinzufügen weiterer Mobilgeräte benötigen Sie in jedem Fall Ihr persönliches Passwort welches Sie bei der Erstinstallation vergeben haben Installieren Sie zunächst die entsprechende App My HomeView auf dem hinzuzufügenden Mobilgerät Öffnen Sie My HomeView und tippen Sie auf das Pluszeichen a QR Code Scan Scannen des QR Codes Tippen Sie auf QR Code Scan Sca...

Page 8: ...Bestätigen Sie mit OK Es erscheint das Live Bild der Kamera c Search in Local Network Suche über Kamera Netzwerk Drücken Sie kurz die RESET Taste an der Kamera die Betriebs LED leuchtet dauerhaft Tippen Sie auf Search in Local Network Die verbundene Kamera wird angezeigt tippen Sie auf den entsprechenden Kenncode DID Nummer der Kamera Geben Sie Ihr Passwort ein und tippen dann auf Save Es erschein...

Page 9: ...Öffnen des Menüs Advanced Settings für individuelle Einstellungen 1 Camera Firmware Upgrade 2 Modify Password Passwort Änderung 3 Motion Detection Videobewegungserkennung 4 Push Notification Automatische Benachrichtigung 5 Event List Liste der Kameraaufnahmen 6 File Overwrite Überschreib Funktion Alte Daten überschreiben lassen 7 SD Card Management Speicher Informationen Alle Daten löschen 8 Video...

Page 10: ...und speichern Sie mit Save Hinweis Ist die Funktion deaktiviert off aus so wird eine Aufzeichnung nur über den Bewe gungssensor der Kamera gestartet Es erscheint die Meldung Successfully Saved Settings Einstellungen erfolgreich gespeichert Bestätigen Sie mit OK 4 Push Notification Automati sche Benachrichtigung Auf Wunsch können Sie sich eine Benachrichtigung Push Notifica tion auf Ihr Mobilgerät ...

Page 11: ...n Tippen Sie auf Event List Tippen Sie auf Period um den Aufzeichnungs Zeitraum auszu wählen Wählen Sie den gewünschten Zeitraum Tag Woche Monat oder benutzerdefiniert Range Tippen Sie auf Load Jede Aufzeichnung wird mit Datum und Uhrzeit angegeben Tippen Sie auf die gewünschte Aufnahme um die Wiedergabe zu starten 11 ...

Page 12: ...Es erscheint die Meldung Delete Event Successfully Aufnahme erfolgreich gelöscht Bestätigen Sie mit OK 6 File Overwrite Alte Daten überschreiben lassen Bei Aktivierung der Funktion File Overwrite werden wenn die Kapa zität des internen Kameraspei chers erschöpft ist die ältesten Dateien mit der aktuellen Auf zeichnung überschrieben Wichtiger Hinweis Ist diese Funk tion nicht aktiviert erfolgt kein...

Page 13: ...cht zu entnehmen Es erscheint die Sicherheitsabfrage Are you sure you want to delete all data Wollen Sie wirklich alle Daten löschen Tippen Sie auf Yes ja um den Spei cher zu formatieren oder brechen die Formatierung mit No nein ab Es erscheint die Meldung Format SD Card Successfully Kartenfor matierung erfolgreich Bestätigen Sie mit OK 8 Video Rotation Ansicht des Live Bilds Tippen Sie auf Video ...

Page 14: ...ahl zu bestätigen Speichern Sie mit Save Es erscheint die Meldung Suc cessfully Saved Settings Ein stellungen erfolgreich gespeichert Bestätigen Sie mit OK 10 WLAN Networks Wenn Ihr Mobilgerät direkt mit der Kamera verbunden ist können Sie über WLAN Networks ein lokales Netzwerk auswählen Tippen Sie auf WLAN Networks Wählen Sie das Netzwerk aus 14 ...

Page 15: ...s Lichts nach Aktivierung fest Duration wählen die Helligkeitsstufe für den LED Strahler Dimmer und stellen die Zeitschaltuhr für feste Beleuchtungszeiten Timer Tippen Sie auf Light Settings Duration Tippen Sie auf Duration Ein Aus und Einschaltdauer LED Strahler Mit der Einstellung OFF Aus ist die Strahler Funktion für die Aus lösung durch Bewegungserken nung ausgeschaltet Bei aktivierter Strahle...

Page 16: ... Funktion können Sie den LED Strahler zu festgelegten Zeiten aktivieren Der LED Strahler wird dann unabhängig von Bewegungserkennung oder Lichtverhältnissen ein und ausgeschaltet dabei sind für jeden Wochentag verschiedene individuell einzustellende Zeitfenster möglich Tippen Sie auf Timer Tippen Sie auf das Pluszeichen um die Funktion aufzurufen Tippen Sie auf Light On Time um die Einschaltzeit f...

Page 17: ...der von Ihnen festgelegten Zeit ein ausgeschal tet werden soll Markieren Sie alle gewünschten Wochentage durch ein Häkchen in dem betreffenden Kästchen und bestätigen Ihre Einstellungen mit OK Tippen Sie auf Save Es erscheint eine Übersicht Ihrer Timer Einstellungen speichern Sie Ihre Eingaben mit Save Es erscheint die Meldung Suc cessfully Saved Settings Ein stellungen erfolgreich gespeichert Bes...

Page 18: ...den Blei stift Markieren Sie das die zu löschende n Zeitfenster durch ein Häkchen in dem betreffenden Kästchen und tippen dann auf den Abfall Eimer Tippen Sie auf Save um Ihre Einstellungen zu speichern Es erscheint die Meldung Suc cessfully Saved Settings Ein stellungen erfolgreich gespeichert Bestätigen Sie mit OK 18 ...

Page 19: ... zu löschen oder brechen den Löschvorgang mit No nein ab Es erscheint die Meldung Delete Camera Successfully Kamera erfolgreich gelöscht Unter dem Symbol ist außerdem ein Direktzugriff auf folgende Funktionen möglich View Anzeigen des Live Bildes Modify Ändern der Kamera Daten More Aufrufen der Menü Einstellungen 19 ...

Page 20: ... ein Häkchen in dem betreffenden Kästchen und tippen dann auf den Abfall Eimer Es erscheint die Sicherheits abfrage Are you sure you want to delete the selected Photos Wollen Sie die ausgewählten Fotos wirklich löschen Tippen Sie auf Yes ja um das die Foto s zu löschen oder brechen den Lösch vorgang mit No nein ab Tippen Sie auf den Bleistift ...

Page 21: ...ändig erfasst wird bevor Sie Löcher für den Kamerahalter bohren Vergewissern Sie sich dass an der Stelle keine Kabel Leitungen in der Wand liegen die beim Bohren beschädigt werden könnten Markieren Sie die gewünschte Position der drei Schraublöcher indem Sie den Kamerahalter als Schablone nutzen Bohren Sie die drei Montagelöcher und befestigen Sie den Halter mit für den Untergrund geeig neten Schr...

Page 22: ...2 A Quick start operating instructions German English Mounting material Please check the contents of the package for completeness Prior to using the sets examine them with respect to any external damage In case of an external damage do not put the product into operation but contact your specialist dealer immediately ...

Page 23: ...or manually through the mobile device Thanks to the Intercom function voice communication between camera and mobile device is furthermore possible Safety notes and warnings Observe the legal provisions on video surveillance Make sure that neither neighboring private property nor adjacent public areas are covered For commercial areas it is essential to observe the corresponding information duty Do ...

Page 24: ...24 The camera at a glance Mounting and connecting the camera see page 41 Microphone LED x6 IR LED Objective PIR sensor Twilight sensor Reset Key Antenna Speaker ...

Page 25: ...perating instructions all operational steps are described for the Android version of the app Connecting the camera to the mobile device through an Internet connection Plug the power supply unit into a socket 230 V and connect the plug to the DC IN socket of the camera Make sure that your mobile device is connected to your WLAN router Open My HomeView and tap the plus sign Tap Smart Config Check if...

Page 26: ...ap the camera symbol You are now requested to change the preset password 000000 The new password must be composed of 8 16 characters numbers and letters Notes Note your new password You will need it for adding further mobile devices Reset to preset password 000000 Press the RESET key on the back of the camera for at least 5 sec until the power LED is blinking rapidly Enter the new password twice a...

Page 27: ...l Input or c Search in Local Network For adding further mobile devices you definitely need your individual password which you have assigned during the initial installation Install first the corresponding app My HomeView on the mobile device to be added Open the app My HomeView and tap the plus sign a QR Code Scan Tap QR Code Scan Scan the QR code on the back of the camera Enter your password and t...

Page 28: ...ly is displayed Confirm by pressing OK The live image of the camera is shown c Search in Local Network Briefly press the RESET key on the back of the camera The status LED is lit permanently Tap Search in Local Network The connected camera is shown Tap the camera s corresponding code DID number Enter your password and tap Save The message Add New Camera Successfully is displayed Confirm by pressin...

Page 29: ... during recording the red dot is flashing LED spotlight Manually activating deactivating the LED spotlight The icon is yellow as long as the spotlight is on Menu Opening of the menu Advanced Settings for individual settings 1 Camera Firmware Upgrade 2 Modify Password 3 Motion Detection 4 Push Notification 5 Event List 6 File Overwrite 7 SD Card Management 8 Video Rotation 9 Time Zone 10 WLAN Netwo...

Page 30: ...re by pressing Save Note If the function is set to off recording is only started through the motion detector of the camera The message Successfully Saved Settings is displayed Confirm by pressing OK 4 Push Notification automatic notification Upon demand a notification push notification can be sent to your mobile device if the camera de tects a movement via motion de tector or Video Motion Detectio...

Page 31: ...to view the stored camera recordings Tap Event List Tap Period to select the recording period Select the requested period day week month or user defined range Tap Load Each recording is displayed with date and time Tap the requested recording to start playback 31 ...

Page 32: ...nt Suc cessfully is displayed Confirm by pressing OK 6 File Overwrite for overwriting previous data When activating the File Overwrite function the current recording is used to overwrite the oldest files presupposed that the storage ca pacity of the internal camera me mory is exhausted Important note If this function is not activated no further recording will be done when the memory is full Mark F...

Page 33: ...ra is equipped with a built in memory the SD card cannot be removed The confirmation prompt Are you sure you want to delete all data is displayed Tap Yes to format the memory or cancel formatting by pressing No The message Format SD Card Successfully is displayed Confirm by pressing OK 8 Video Rotation view of live image Tap Video Rotation This option allows you to select a view of the live image ...

Page 34: ... confirm your choice Store by pressing Save The message Successfully Saved Settings is displayed Confirm by pressing OK 10 WLAN Networks If you mobile device is directly connected to the camera the option WLAN Networks can be used to select a local network Tap WLAN Networks Select the network 34 ...

Page 35: ...er on time of the spotlight after activation Duration to select the brightness level of the LED spotlight Dimmer and to set the timer switch for specific lighting periods Timer Tap Light Settings Tap Duration on off and power on time of LED spotlight When set to OFF the spotlight function is deactivated for being triggered through movement detection When the spotlight function is activated the LED...

Page 36: ... of LED spotlight The Timer function is used to activate the LED spotlight at pre determined times With this function the LED spotlight is switched on and off independent of movement detection or lighting conditions Individual time windows can be set for each day of the week Tap Timer Tap the plus sign to activate the function Tap Light On Time to specify the power on time When the requested time ...

Page 37: ...r switching the LED spotlight on and off at the specified time Mark all requested days of the week by placing a tick mark in the corresponding field and confirm your settings by pressing OK Tap Save An overview of your timer settings is displayed Store your settings by pressing Save The message Successfully Saved Settings is displayed Confirm by pressing OK 37 ...

Page 38: ...ings is displayed Tap the pencil Mark the time window s to be deleted by placing a tick mark in the corresponding field s and tap the waste bin afterwards Tap Save to store your settings The message Successfully Saved Settings is displayed Confirm by pressing OK 38 ...

Page 39: ...lete the camera or cancel deleting by pressing No The message Delete Camera Successfully is displayed The icon furthermore allows direct access to the following functions View Viewing the live image Modify Modifying the camera data More Indicating the menu settings 39 ...

Page 40: ...photo s to be dele ted by placing a tick mark in the corresponding field s and tap the waste bin afterwards The confirmation prompt Are you sure you want to delete the selected photos is dis played Tap Yes to delete the photo s or cancel deleting by pres sing No Tap the pencil ...

Page 41: ...y covered prior to drilling the holes for the camera support Make sure that no cables or conducts are placed in the wall which may be damaged when drilling Mark the desired position for the three drilling holes of the fixing screws by using the camera support as drilling jig Drill the three mounting holes and fix the support using screws which are suitable for the respective base material Afterwar...

Page 42: ... der Reparatur oder des Ersatzes obliegt uns Ausgetauschte Geräte oder Bauteile selbiger gehen in unser Eigentum über Garantieleistungen bewirken weder eine Verlängerung der Ursprungsgarantie es wird auch keine neue Garantielaufzeit in Gang gesetzt III Garantieansprüche müssen unverzüglich nach Bekanntwerden unter Vorlage des Kaufbelegs innerhalb der Garantiezeit geltend gemacht werden IV Garantie...

Page 43: ...ety EN 60950 1 2006 A11 2009 A1 2010 A12 2011 Photobiological safety of lamps and lamp system EN 62471 2008 ErP directive 2009 125 EC Regulation EC No 278 2009 The equipment is a wireless video camera device typically used for surveillance within home or office operating frequency 2 4 GHz FM transmitter Manufacturer stabo Elektronik GmbH Münchewiese 14 16 31137 Hildesheim Germany Place and date of...

Page 44: ...s Schwierigkeiten das neue Gerät in Betrieb zu nehmen Hochwertige elektronische Geräte sind sehr komplex kleine Ursachen haben manchmal große Wirkung Viele Probleme lassen sich jedoch schnell und unkompliziert am Telefon lösen Schicken Sie deshalb Ihr neues Gerät nicht gleich zurück sondern nutzen Sie die telefonische Beratung des stabo Service Teams Unsere Techniker kennen sich mit den Geräten se...

Reviews: