background image

R12 Robot Manual 

page 

15     


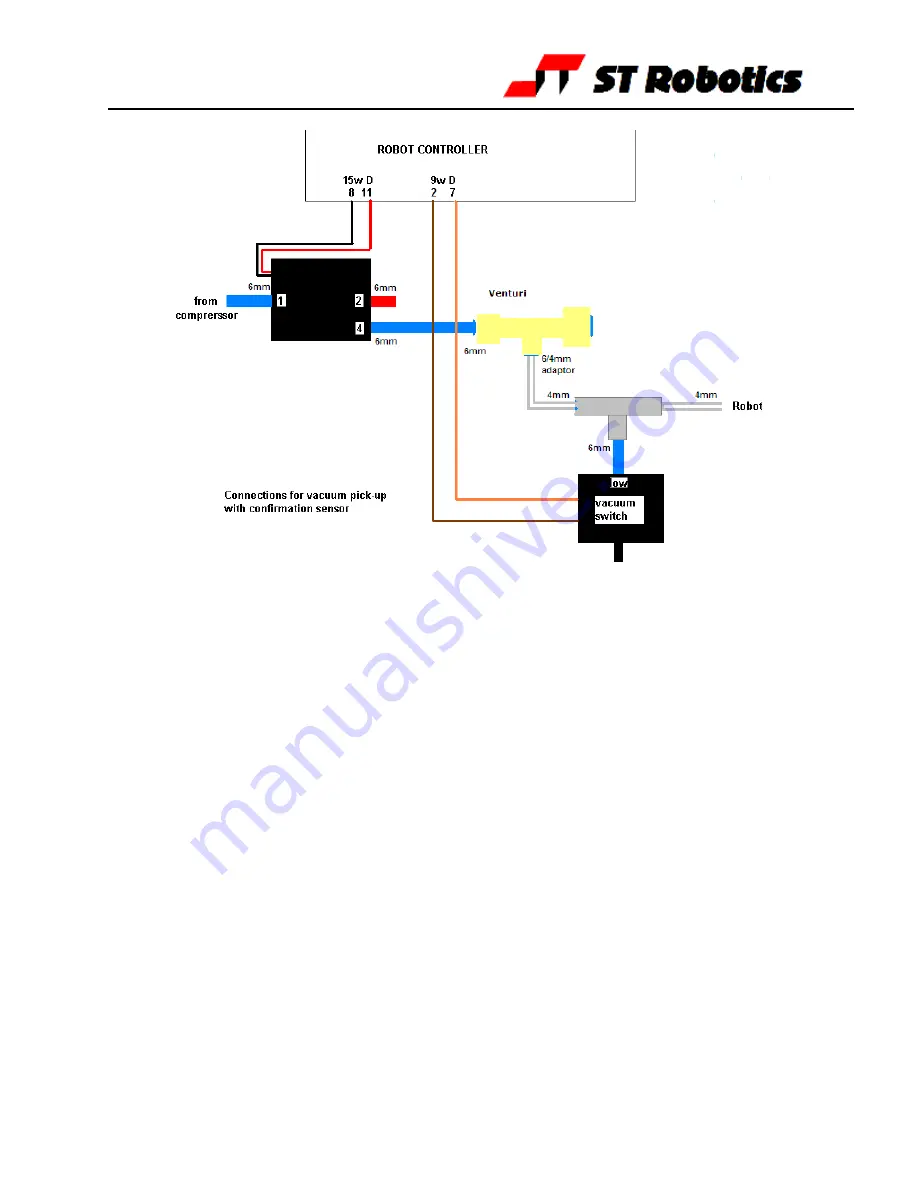
Vacuum pick-up connections:

Change from gripper to vacuum:

There will be a total of 3 valves. One for the gripper as above and one for the vacuum as 
above. Both these valves connect to PA 0 so the command GRIP will operate either of them. 
A third valve is provided to switch between the two, connected to PA 2.
So to operate the pneumatic gripper PA 2 should be OFF, just enter GRIP and UNGRIP.
To operate the vacuum use

PA 2 ON 

then

 GRIP 

or

 UNGRIP

Programming the optional vacuum sensor:

The vacuum switch is connected to PB 6. You can quickly check this with

GRIPCHECK

Insert this word at a suitable place for the robot to check it has a valid pick e.g.

JIG GRIP WITHDRAW GRIPCHECK

If there is no vacuum (object not picked) you will get “Grip fail” error.

Adjusting the vacuum sensor.

It has already been set at the factory but you can adjust as follows:

1. type GRIP (remember that this consumes a great deal of air and you may need to 

UNGRIP then allow the compressor to recharge before trying again.

2. Type PP to display the input port. You should see 11111111
3. Adjust the sensor using the 1.5mm Allen key supplied until you see 11011111 then 

back off again until you see 11111111.

4. Cover the vacuum cups and the display should change back to 11011111

Summary of Contents for R12-500

Page 1: ...bot Manual page 1 01 04 2017 Welcome to the R12 500 Firefly robot arm User Manual We hope you enjoy your experience Any problems at all just contact us support strobotics com 1 609 584 7522 44 1223 42...

Page 2: ...type 1 Sensor and encoder cable 25 way each end M F 1 Cable D type 25 way male to 9 way female K11R to PC RS232 1 Power cable to K11R 1 Pack of CONNECTORS 1 output connector 1 input connector 1 Disk...

Page 3: ...t all decisions about robot activity are usually made by the controller which is capable of running without any host computer The function of the computer is to a program the controller b to copy back...

Page 4: ...the robot will not crash into something in the workspace OR into itself including taking into account any complex end effector fitted 7 DO have your hand poised over the emergency stop button whenever...

Page 5: ...ontroller stop circuit Another alternative is a light curtain easily connected to the robot controller Guarding is not always possible and where bench top robots work closely with human workers interl...

Page 6: ...already in use you can use any other COM port If a USB serial adaptor is used this can connect directly between a computer USB port and the controller or the cable may be used to extend the adaptor DO...

Page 7: ...ep 5 5 If you are not told what the COM number is you will need to find out Go to control panel system hardware device manager ports You will see USB serial port note the port COM number 6 RobWin will...

Page 8: ...ller CPU has Flash ROM and static RAM on the same PCB Cold warm start selection is a front panel key switch The memory image is in flash ROM which is loaded to RAM when you power up or press reset Whe...

Page 9: ...fuse This should be 3 amp quick blow The 5v logic and lower all comes from the 12v regulated supply so if this fuse blows the whole controller is dead This supply emerges from the 9 way input and 15...

Page 10: ...PREPARING FOR USE Switch off the controller and set the robot up visually to an approximate home position see below This is the only position from which you can calibrate the robot 5 axis home 6 axis...

Page 11: ...t the digits are waist shoulder elbow left hand wrist 4 Now move the joints very slowly towards the sensors which could be in either direction but not more than 10 20 degrees from the home position Do...

Page 12: ...s method pressing a key on the teach box moves the arm Since you might let go of the key at any time and expect the robot to stop it is not possible to accelerate to high speed Moreover a slow speed i...

Page 13: ...op button Check cables check the starting home position repeat from above CALIBRATE drives all the joints to the proximity detectors and corrects the counts The robot then returns to the HOME position...

Page 14: ...R12 Robot Manual page 14 8 END EFFECTORS Pneumatic Gripper connections If the gripper opens when it should close and vice versa simply swap over the two 4mm tubes at one end...

Page 15: ...cted to PB 6 You can quickly check this with GRIPCHECK Insert this word at a suitable place for the robot to check it has a valid pick e g JIG GRIP WITHDRAW GRIPCHECK If there is no vacuum object not...

Page 16: ...per 0 GTYPE for pneumatic gripper If the vacuum is connected to some other bit not PA 0 enter the bit number for GTYPE For example 4 GTYPE if the valve is connected to PA 4 If you have both electric g...

Page 17: ...n mSecs usually 1000 mS E1 E2 EG12 E1 gripper is a fulcrum or scissors style operation supplied with sculpted fingers It s normal to glue some low friction material or foam to the inside of the finger...

Page 18: ...iously saved To ensure that the new program is reloaded after a power up or reset type the command USAVE If you forget to do this and accidentally lose power or press reset or are forced to press rese...

Page 19: ...alculations of joint positions from Cartesian coordinates Encoders The encoders are fitted as watch dogs not as feedback devices as such After a move the encoders are checked to see if the motor did w...

Page 20: ...IO S RATIO E RATIO W RATIO T RATIO R RATIO To print the current value enter e g B RATIO Energizing current Although the high power motors will accept 4 amps we energize at less for two reasons 1 at lo...

Page 21: ...press reset 2 Select file load binary Change parameters to start 4000 length 6000 bank should be 0 3 Choose the backup file supplied with your robot e g R12C123 RAM You will see a blue progress bar 4...

Page 22: ...ELL ELBOW E RATIO MOVE to get the hand horizontal to make it easier to work with TELL WRIST DATUM to find the sensor Maybe repeat it if you get the too far error See fig1 Fit the end effector It will...

Page 23: ...simple teach pad in joint mode and a spirit level move J6 in a negative direction to level the gripper as in the picture on right 4 Enter TRANSFORM ASSUME 5 TELL WRIST DATUM the robot seeks out the se...

Page 24: ...use the teach pad J1 and J2 to level the top of shoulder and elbow Press escape for next step Shoulder returns to HOME position Enter CAL2 Use the teach pad to level the hand Press esc for next step...

Page 25: ...25 motor 6 winding 2 6th axis rotate If track fitted there is an MS connector to the track see track pin out and wiring from the cable chain to the robot remain as above apart from 22 25 SENSORS ENCOD...

Page 26: ...back of the robot and you can also get it by typing WRU who are you We can solve your problem given enough information You can 1 No need to do a screen shot Go to the top of RobWin click comms save co...

Page 27: ...ease refer to the section SAFETY IS YOUR RESPONSIBILITY on page 5 of this manual Name and Status of the Assessor Date Activity being assessed Known or expected hazards associated with the activity The...

Reviews: