SSSI Black1600Neo User Manual Download Page 13

12

3. Display Mode

• User can select from a variety of multi-screen display modes (1/4/6/8/9/13/16ch)

• The initial display mode is set to either 8ch or 16ch mode. 

3. Display

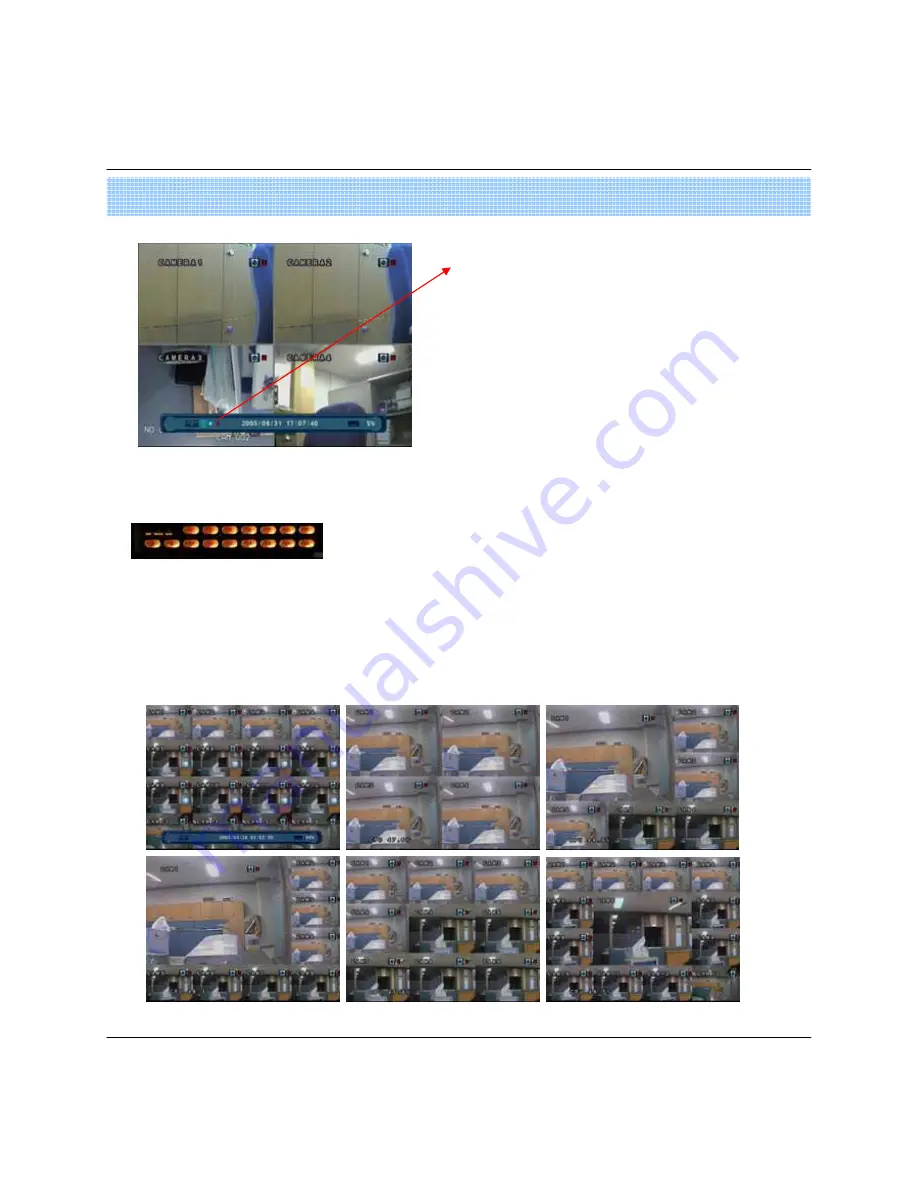
2. Screen View Selection

• Select One Channel using the channel selection buttons (1-8/16).

• Use the display button to change the multi-channel Display mode.

• Press channel selection button twice to view the channel on full screen.

When this unit is connected with a remote client PC, a

Network status icon will appear on the Status Bar

• This icon indicates the current network conditions

- Green: Network is connected and stable.

- Blue: Network is connected, but is unstable.

- Red: Network is very unstable.

Summary of Contents for Black1600Neo

Page 1: ...0 Standalone DVR USER S MANUAL DVR Black4Neo DVR Black800Neo DVR Black1600Neo Revision date Oct 2006...

Page 2: ...00Neo Front Panel 5 2 DVR 1600Neo 800Neo Rear Panel 7 3 DVR Black4Neo Front Panel 8 4 DVR Black4Neo Rear Panel 9 5 Remote Controller 10 Chapter 3 Display 1 System Power ON 11 2 Screen View Selection 1...

Page 3: ...tup 16 1 Display 17 2 Camera 21 3 Sound 22 4 System 25 5 Event Sensor 30 6 Disk Management 31 Go to Record Menu 34 1 Recording Operation 34 2 Timer motion setup 35 3 Alarm Record Schedule 34 4 Panic s...

Page 4: ...st Please Confirm the Contents When open Package Basic Contents Remote Controller User s Manual Remote Client Program Install CD AAA Battery X 2 Power Cable Option Contents HDD CD RW USB Memory 1 Spec...

Page 5: ...rm Sensor 1 8 16 Relay Out VCR VGA Monitor AV Monitor Remote Client PC Image Printer Video In Video Out TCP IP Alarm Input Out Remote Controller CD RW It is not supported on DVR Black4Neo Backup AVI B...

Page 6: ...t button for convenience CD DVD RW Back up image to CD DVD RW HOLD Hold Current Jog Shuttle position RETURN Cancel Deselect Return to previous screen Direction Navigation Button UP DOWN LEFT RIGHT ENT...

Page 7: ...Lock Button Default password 1234 When locked LOCK is displayed on screen Press lock button to unlock ARCHIVE Go to archiving setup menu Default password 1234 PTZ Go to Camera PTZ Control SETUP Go to...

Page 8: ...Audio Line Input Terminal Audio Out RCA Audio Line Out Terminal Alarm 8 16 x Input TTL Alarm Sensor Input Terminal USB USB port for use the USB memory stick and USB HDD Backup VGA OUT VGA Main Monitor...

Page 9: ...Selection Button Select Channel or Input Password Led Indicator Indicate Present System Status Information PWR System On Off REC Record On Off ALARM Alarm Sensor Detection Status NET Client Network C...

Page 10: ...ut DVR Video to AV Monitor Spot Out Output Spot out Video to AV Monitor NTSC PAL Select NTSC or PAL Type VGA OUT Output Video to a Computer Monitor by Connected VGA Option SVHS Output Video by Connect...

Page 11: ...their descriptions have been omitted Every Button on the controller will function the same as its corresponding button on the Front Panel Remote Controller will only work when used within line of sigh...

Page 12: ...cording Mode Picture of Power On after Finishing Installation 3 Display Check System status LEDs Power Indicates System On Off Record Indicates Recording On Off Network Indicates Network LAN Client co...

Page 13: ...selection buttons 1 8 16 Use the display button to change the multi channel Display mode Press channel selection button twice to view the channel on full screen When this unit is connected with a rem...

Page 14: ...trol Control Camera Movement of PTZ Pan Tilt Zoom devices Press PTZ Button to switch into PTZ mode Status Bar is replaced by PTZ controls 5 System Power Off Press power button to power system off Inpu...

Page 15: ...alendar Press enter to open selected date Recorded timeline will appear Move cursor to the specific time and press enter The timeline is divided into 15 minutes segments Menu will be hidden from view...

Page 16: ...checking the checkbox next to each of the desired options V ENTER To change Date Time selection Press enter and use the directional keys to Increase or decrease the value When desired value is set Pre...

Page 17: ...s enter The Initial password for the Admin account is 1234 On Screen display will show the password digit as To set up or edit user accounts or Login Password information go to System setup System Use...

Page 18: ...otion Sensor Toggle Motion Detection Off Active Inactive Active Display motion sensor of motion detection area Inactive Display motion sensor except motion detection area Off No display of motion sens...

Page 19: ...cing in high resolution low frame This applies only D1 resolution 704X480 Alarm pop up mode alarm channel will go full screen on activation Alarm pop up dwell alarm pop up time 1 60sec Motion pop up m...

Page 20: ...nter then red border line will disappear Setup mode will be activated Select display mode type for sequence via navigation key Input channel No for sequence function via virtual keyboard User will add...

Page 21: ...20 5 Setup 1 4 SPOT OUT Channel Select spot out channel 4CH 1 SPOT 8CH 2 SPOT 16CH 4 SPOT Select camera channel for spot out User can see the selected channel via AV monitor...

Page 22: ...be hidden Live view and Playback but video will still be recorded Title User will input camera name by using virtual key board Adjust the brightness contrast color and tint of each channel All values...

Page 23: ...Address 0 255 PTZ Protocol Select type of PTZ Camera Enter button and setup the PTZ details Baud Rate Setup PTZ Communication Speed 2400 4800 9600 19200 38400 BPS PTZ Supplied Protocol Samsung MRX 100...

Page 24: ...arked will be unmarked Adjust the Motion Sensitivity Level 1 10 Click area setup to define motion sensitive area Area is selected on a 16 x 16 target grid The entire viewing area is selected on all ch...

Page 25: ...io in terminal Audio Monitoring Channel Select channel for audio output Network Audio TX Allow transmission of live audio over network Network Audio RX Allow reception of audio talkback from PC 3 2 Bu...

Page 26: ...not set you may experience problems when using Date Time search Tip 4 System Basic System environment Setup 4 1 Date Time User should set the proper Time zone for your geographic location before adju...

Page 27: ...n set the DDNS properties user name password and domain name and reboot the system 3 To access the DVR using the name server address the format for the address is http user name domain Example http my...

Page 28: ...DVR Server Setup the outgoing Mail server address Input the server address using the Virtual Keyboard Port Mail server port number default is port 25 Security For a mail server the requires outgoing S...

Page 29: ...A Total 7 users can be established for each account type Input the new User ID Input a password using channel selection buttons 0 9 Choose the Group which the user belongs to Input the E mail Address...

Page 30: ...AC address of the DVR 5 Setup F W update User can do F W update by USB or CD device Press Press Select F W from the list Press START Factory default User can initialize all setup but recording data is...

Page 31: ...ll HDDs are listed by IDE channel Number Smart alarm Set Temperature Alarm on off Check interval Time between smart alarm checks 5 Setup 4 6 Control device System ID Select system ID 1 254 Protocol Se...

Page 32: ...Off when HDD has the problem Page down up Move display page Operation Setup Alarm Sensor Connection Status enable disable Type Setup Alarm Sensor N Open N Close Type Normal Open Open status in normal...

Page 33: ...de Setup in Latched Transparent Mode same as Alarm out HDD Event Turn buzzer on off when HDD event occurs Duration Buzzer time 5sec 5min or manual reset on DVR Setup each channel to trigger buzzer on...

Page 34: ...u in order to ensure delivery Disk Overwrite ON OFF overwrite permission when HDD is full ON Overwrite HDD starting with the oldest data first also known as FIFO first in first out OFF When HDD is ful...

Page 35: ...e that you configure will be used for every day of the week Weekly You must configure the recording schedule for each day of the week individually Pre Event recording time 1 5 seconds data will be rec...

Page 36: ...n FPS Quality and Audio on each channel Continuous recording Icon Motion recording Icon Select an area channel time of day on the schedule grid and press enter to adjust its properties Set area as Tim...

Page 37: ...le blocks Press ENTER again to set up the resolution FPS quality and audio on each channel Select an area channel time of day on the schedule Press enter to select or deselect alarm recording If WEEKL...

Page 38: ...37 4 Panic Setup 5 Setup To setup each channel press enter Setup each channel Size FPS Quality Audio By using panic button of front panel can record urgently as setup...

Page 39: ...the title of backup by virtual keyboard Event Select attach event text file in backup Start Start backup Tip Compatible CD Writer Models are LG GCE 8526B GCE 8527B SAMSUNG SW 252F TS H292A SH 522C ASU...

Page 40: ...umper When two HDD Install or additional Install first one setup as 1 master and the other is for slave slave setup has no pin When more than two HDD install setup as master or slave 1 to connect one...

Reviews: