background image

22

SPRINTER 16 OWNER’S MANUAL

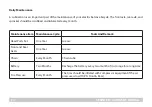
Daily Maintenance

6. Lubrication is an important part of the maintenance of your electric balance bicycle. The front axle, rear axle, and 
sprocket should be scrubbed and lubricated every month.

Maintenance Item Maintenance Cycle

Tools And Remark

Head Parts Set

One Year

Grease

Front and Rear 
Axels

One Year

Grease

Chain

Every Month

Chain Lube

Battery 

Two Months

Recharge the battery every two months if in storage for a long time

Tire Pressure

Every Month

The tires should be inflated with compressor equipment if the air 
pressure is low (10 PSI Front & Rear)

Summary of Contents for Sprinter 16

Page 1: ...Owner s Manual ...

Page 2: ...2 SPRINTER 16 OWNER S MANUAL Table of Contents 1 Precautions 3 2 Sprinter16Structure 4 3 Sprinter16Assembly 5 7 4 Operation 8 15 5 Daily Maintenance 16 23 6 Warranty 24 28 ...

Page 3: ... on a rainy snowy day or on slippery surfaces to ensure the safety of the rider 5 Non professional maintenance persons are prohibited from disassembling and replacing parts 6 Do not use this bike to do stunt riding 7 Please inspect and ensure all hardware is tight before riding 8 The controller is equipped with an overload protection function It will cut off the power automatically once overloaded...

Page 4: ... 3 Front Fork 4 Gooseneck 5 Frame 6 Seat 7 Seat Post 8 Inner Tube 9 Rear Wheel 10 Chain Adjuster 11 Chain Cover 12 Side Cover 13 Controller 14 Battery 15 Seat Post Release 16 Right Grip 17 Throttle 18 Handlebar 19 Left Brake Lever 20 Left Grip 21 Brake Cable 22 Rear Brake ...

Page 5: ... wheel to the front fork using the 13mm 15mm wrench Attention 1 1 When installing the front wheel with the wrench pay attention to the gap on either side of the wheel it should be symmetrical 1 2 Make sure the locking washer is hooked to the front fork to prevent rotation of the hub in the fork The wheel should be centered ...

Page 6: ...PRINTER 16 OWNER S MANUAL Sprinter 16 Assembly 2 Install the front number plate Remove the bolt attached to the front fork install the front number plate and secure it using the M6 nut and sup plied tools ...

Page 7: ...7 SPRINTER 16 OWNER S MANUAL Sprinter 16 Assembly 3 Set the brake lever angle it should sit at 45 horizontally ...

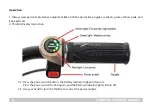
Page 8: ... goggles sneakers gloves elbow pads and knee pads etc 2 Throttle Display instruction 2 2 Press the power switch button the battery indicator light will turn on Press the power switch button again and the battery indicator light will turn off 2 3 Use your hand to turn the throttle to control the power output ...

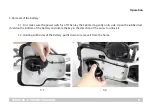
Page 9: ...e sure the power switch is off Then lay the Sprinter16 gently on its side Open the rubber dust shield on the bottom of the battery and rotate the key in the direction of the arrow to unlock it 3 2 Holding both sides of the battery pull it down to remove it from the frame 3 1 3 2 ...

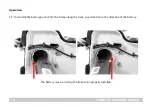
Page 10: ...NTER 16 OWNER S MANUAL Operation 3 3 To reinstall the battery push it into the frame along the track pay attention to the direction of the battery the battery must run along the track to be properly installed ...

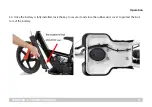
Page 11: ...11 SPRINTER 16 OWNER S MANUAL Operation 3 4 Once the battery is fully installed lock the key to secure it and close the rubber dust cover to protect the bot tom of the battery rear ...

Page 12: ...r plug in connection speed limiting line The plug in speed limiting line is disconnected or connected to turn on either of the two speed modes Mode 1 The speed limiting line is disconnected the Sprinter 16 top speed is 11MPH Mode 2 The speed limiting line is connected the Sprinter 16 top speed is 6 MPH The connection disconnection of this speed change switch requires an adult to perform ...

Page 13: ...me cover using a phillips screwdriver and pull out the speed limiting line 5 1 2 Disconnect or reconnect the connector then check to see if the desired speed has been achieved 5 1 3 Once the desired speed has been achieved replace the connector into the housing and reinstall the left frame cover using the screws you previously removed ...

Page 14: ...14 SPRINTER 16 OWNER S MANUAL Operation Note Be sure to install the brake and display cables into the slot of the left frame cover ...

Page 15: ...maintaining balance Electric mode 6 6 Turn on the power switch 6 7 Turn the display to normal 6 8 Place your feet on the ground let the rider slowly move forward and practice pressing the throttle to slowly accelerate 6 9 Let the rider practice opening and closing the throttle and safely operating the brake to stop 6 10 When the rider is skillful in controlling the throttle and braking skills plac...

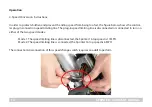
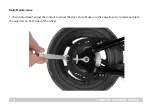
Page 16: ...16 SPRINTER 16 OWNER S MANUAL Daily Maintenance 1 Chain Adjustment adjust the locknut to adjust the drive chain Make sure the adjustments are made evenly to the adjusters on both sides of the wheel ...

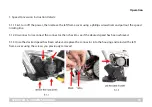
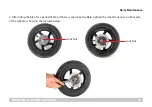
Page 17: ...16 OWNER S MANUAL Daily Maintenance 2 After riding the bike for a period of time if there is any wheel wobble tighten the wheel lock nut on either side of the wheel as shown in the pictures below Lock Nut Lock Nut ...

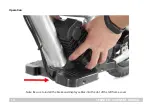
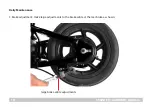
Page 18: ...18 SPRINTER 16 OWNER S MANUAL Daily Maintenance 3 Brake adjustment make large adjustments to the brake cable at the rear brake as shown large brake cable adjustments ...

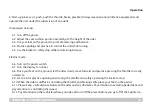
Page 19: ...intenance Continued make small adjustments to the brake cable at the brake lever Loosen the locknut turn the cable adjuster bolt to make your adjustment then tighten the locknut when the adjustment is complete small brake cable adjustments ...

Page 20: ...pen the waterproof cover of the charging port plug the end of the charger into the charging port and then plug the charger into the wall socket When disconnecting first remove the connection at the wall socket then remove the end of the charger cable from the charging port ...

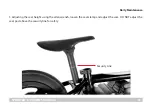
Page 21: ...TER 16 OWNER S MANUAL Daily Maintenance 5 Adjusting the seat height using the allen wrench loosen the seat clamp and adjust the seat DO NOT adjust the seat post above the security line for safety Security Line ...

Page 22: ...ed and lubricated every month Maintenance Item Maintenance Cycle Tools And Remark Head Parts Set One Year Grease Front and Rear Axels One Year Grease Chain Every Month Chain Lube Battery Two Months Recharge the battery every two months if in storage for a long time Tire Pressure Every Month The tires should be inflated with compressor equipment if the air pressure is low 10 PSI Front Rear ...

Page 23: ...fe operation by children and also to keep the bike in the best operational condition 6 3 Please always check the performance of the brake before use and adjust it as needed Attention please increase the braking distance when riding on wet surfaces or riding downhill 6 4 After each use please charge the battery to keep it in the best condition 6 5 The front and rear wheel locknuts should be checked...

Page 24: ...tune ups and service checks are your responsibility to pay for and have performed and are not covered by this warranty Repairs to your Electric Balance Bike for failures that occurred after the expiration date of the warranty period Damage to the Electric Balance Bike that is not our fault such as damage caused by accidents or carelessness Damage caused by misuse abuse or unreasonable or improper ...

Page 25: ...hemical clean ers that damage the finish of the Electric Balance Bike Damage to the Electric Balance Bike caused by improper storage such as weathered or faded finishes rusting or corrosion of metal components wearing or deterioration of components subject to normal wear during normal Electric Balance Bike operation such as tires brake pads or linings and drive chains and sprockets LIMITATIONS Thi...

Page 26: ... Balance Bike to an Authorized SSR Electric Balance Bike Dealer for repair Your dealer will perform the necessary repairs or adjust ments within a reasonable amount of time and will provide you with a copy of the repair order for your records Any parts replaced under coverage of this limited warranty become the property of SSR Motorsports If you should suffer a second failure of the same item on y...

Page 27: ... be allowed for us to thoroughly investigate the facts of the situation When contacting SSR Motorsports we urge you to write rather than call so that you can provide us with a detailed description of your concern You may also call the SSR Motorsports Customer Service Department The address and phone numbers are SSR Motorsports Electric Balance Bike Customer Relations 12825 Alondra Blvd Norwalk CA ...

Page 28: ...RPOSE SHALL BE LIMITED TO THE DURATION OF THIS WARRANTY SOME STATES DO NOT ALLOW LIMITATIONS ON HOW LONG AN IMPLIED WAR RANTY LASTS SO THE LIMITATIONS MAY NOT APPLY THIS WARRANTY GIVES YOU SOME SPECIFIC RIGHTS AND YOU MAY ALSO HAVE OTHER RIGHTS WHICH VARY FROM STATE TO STATE SSR DOES NOT AUTHORIZE ANY PERSON TO CREATE FOR IT ANY OTHER WARRANTY OBLIGATION OR LIABILITY IN CONNECTION WITH THESE PRODU...

Reviews: