


SP300A Square Perfect A Series Pro Flash
Thank you for your purchase of the SP300A Square Perfect A Series Pro
Flash. This flash is a very high quality professional strobe that will give you
years of service. It is perfect for commercial studios, location photogra-
phers as well as advanced amateurs. You can use this strobe for a main
light, fill light, back light, or hair light. With the variable power setting you
will have complete control over your light output. It is perfect for film or
digital cameras. Please read this manual carefully before use, and keep it
handy for use during break down of equipment. For ordering spare bulbs
or replacement parts, contact us at [email protected]. Also check
out our extended line of photo equipment now available.
Power Input :
AC120V/60 Hz
Flash Power :
300ws (joule) in full
Guide No. :
190ft/58m ISO100
Color Temperature : 5300K
Flash-tube Lifetime :
over 10,000 typical flashing
Power Setting :
1/8 to full continuously
Recharge Time :
1.5 seconds in full
Flashing Duration :
1/600 sec. @t=0.1; 1/1000 sec. @t=0.5
Modeling Power :
Halogen 100W
Sync Voltage :
6 Volt
Fuse :
5A
Weight :
7 Lb (3.175kg)
Triggering :
Sync Cord/Test Button/ Wireless
Remote/Photocell
Will work with Bowen Speed Rings.
1. Make sure all switches are in the “OFF” position prior to use. Attach power cord into the Power Cord Port (12) in the
flash unit and plug other end of the cord into a grounded AC120V/60Hz wall outlet.
NOTE:
NEVER tamper with grounding pin or attempt to use the power cord if it has been altered.
2. Turn the Main Power Switch (8) to the “ON” position. The green Power Indicator Light (9) will go on and the unit is now charging.
3. When the Recycle Indicator Light (3) turns on, you will hear a beep. This indicates that the flash has charged to 70%.
The flash will be fully charged after hearing a second beep.
4. For continuous lighting that synchronizes with the flash power, adjust the Modeling Lamp Dial (2) to the desired power.
Turning the Modeling Continuous Lighting Switch upward in the ( - ) position gives continuous lighting that will change with
the flash power simultaneously. For constant light, turn the Modeling Lamp Continuous Lighting Switch downward in the ( = )
position. This will maintain continuous light at full strength and will not change with the flash power. To turn the Modeling
Lamp OFF, move the switch to the ( O ) position.
5. Use the built-in Photocell (7), Test Button (1) or Sync Port (11) to fire the flash. Get output from 1/8 to full power using
the Fully Variable Power Dial (10).
6. To replace 5A fuse: MAKE SURE UNIT IS UNPLUGGED BEFORE OPENING SOCKET COVER. Push on the Fuse Cover (13)
to expose the fuse. Use tweezers to pull out the old fuse and insert new. Close cover when complete.
SPECIFICATIONS
OPERATING INSTRUCTIONS
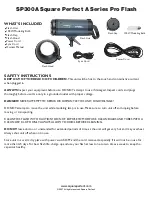
1
5
10
9
8
7
12
13
11
6
3
2
4
Test Button
Fully Variable
Power Dial
Main Power Switch
Power Indicator Light
Photocell
Buzzer
Power Cord Port
5A Fuse Cover
Sync Port
Light Inductor
Modeling Lamp Dial
Recycle Indicator Light
Modeling Lamp Continuous
Lighting Switch
© 2007 All rights reserved Square Perfect.
www.squareperfect.com


