A. Insert a microSD Card
Insert a microSD card into the microSD card
slot. (MicroSD cards with a speed of Class 6
or above are recommended for optimal video
quality.)
B. Switch On/Start Recording
To turn on the Inventio-HD Pro and begin
recording, press the ON/OFF/RECORD button.
The blue LED light will flash. If the audio alerts
are enabled, the Inventio-HD Pro will emit
4 short beeps. The Inventio-HD Pro is now
recording.
C. Switch Off /Stop Recording
To turn off the Inventio-HD Pro and stop
recording, press the ON/OFF/RECORD button.
The Inventio-HD Pro will automatically save all
data and power off.
Date/Time Stamping on Videos (RTCDisplay)
Range: 0 – 1
Default Setting: 1
1–Enables date/time stamp display, 0–Disables date/time stamp display
Enabling Audio Alerts (AudioEnable)
Range: 0 – 1
Default Setting: 1
0–Off, 1–On
Audio Volume (AudioVol)
Range: 0 – 3
Default Setting: 1
0–High, 1–Medium, 2–Low, 3–Off
VideoSwitch
Range: 0 – 1
Default Setting: 0
Resolution:0–1080P, 1–720P
Time Lapse Recording (TimeLapse)
Range: 0 – 1
Default Setting: 0
0–Off, 1–On
BuzzerAlert
Range: 0 – 3
Default Setting: 2
0–Off, 1–High, 2–Middle, 3–Low
A. Connect to a Computer
Connect the Inventio-HD Pro to the computer and open the Inventio-HD
Pro drive. Locate and open the setting.txt file on the Inventio-HD Pro drive.
This file will allow you to personalize various settings which are explained
in detail below. Be sure to change update to Y (yes) and save the file in
order to preserve your settings.
B. Settings Guide
Exposure (EV)
Range: 1 – 12
Default Setting: 6
Adjusting the exposure to “–EV” increases exposure levels, ideal for use in
strong sunlight. Using “+EV” will increase the brightness in dark or cloudy
conditions.
White Balance (AWB)
Range: 0 – 4,
Default Setting: 0
0–Auto, 1–Daylight, 2–Cloudy, 3–Tungsten Filament, 4–Incandescent
White balance changes the overall balance of colors in an image. This set-
ting may be used for color correction.
Contrast (CTST)
Range: 1 – 200
Default Setting: 100
A higher contrast ratio results in an image with higher resolution and
brighter colors. A lower contrast ratio produces an image that will appear
dimmer.
Saturation (SAT)
Range: 1 – 200
Default Setting: 100
Saturation is the colorfulness of an image relative to its own brightness.
Adjusting the saturation setting will affect the apparent intensity of color.
Sharpness
Range: 1 – 200
Default Setting: 100
Adjusting the sharpness enhances the edge contrast of the video in order
to improve its acutance (apparent sharpness).
Quality
Range: 0 – 2
Default Setting: 0
0–High, 1–Middle, 2–Low
Adjusting the video quality determines the Bit Rate for recording.
Light Frequency (LIGHTFREQ)
Range: 0 – 1
Default Setting: 1
0–60Hz, 1–50Hz
Adjust the light frequency setting to avoid power interference stripes,
which may occur indoors with certain lighting.
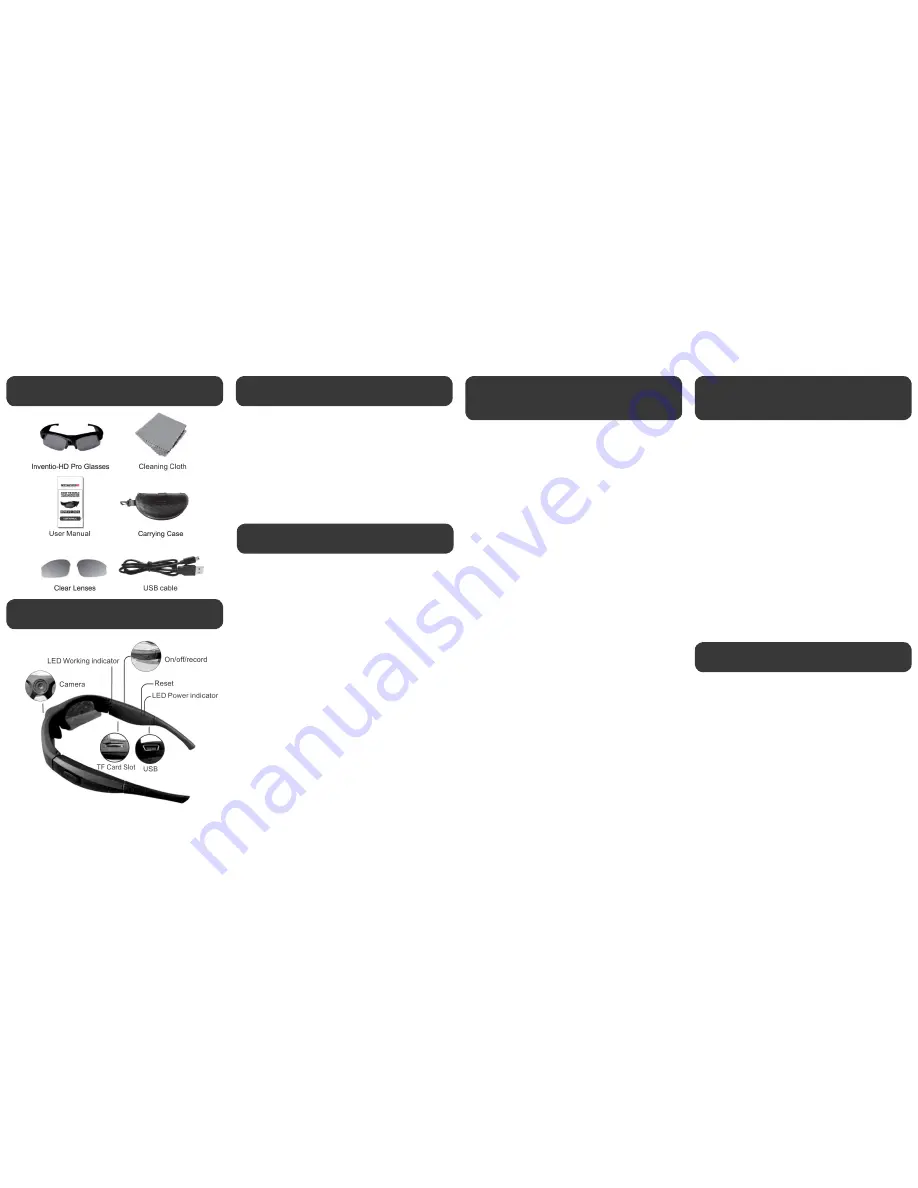
Inventio-HD Pro Features
•
ON/OFF/RECORD Button
•
LED Indicator Light
•
MicroSD Card Slot
•
RESET Button
•
Mini USB Port
•
6 Audio Alerts
Inventio-HD Basic Operation
Changing the Inventio-HD
Pro’s Settings
Changing the Inventio-HD
Pro’s Settings
Viewing Videos on a PC or Mac
A. On a PC
1. Connect the Inventio-HD Pro to the PC using the
enclosed USB cable.
2. Double-click on “My Computer” and locate “Remov-
able Disk”.
3. Double-click on “Removable Disk”
4. Double-click on “DCIM”
5. You may now copy, move, or play your video files.
B. On a Mac
1. Connect the Inventio-HD Pro to the Mac using the
enclosed USB cable.
2. The Inventio-HD Pro will be recognized as an External
Hard Drive.
3. Double-click on the External Hard Drive
4. You may now copy, move, or play your video fi
les.
Inventio-HD Pro Features
Inventio-HD Pro Features


