


24
25
12 volt Power
The camera SPYPOINT IR-5 can also be powered from an
external 12 volt DC input. When using a 12 volt connection,
we recommend to remove the alkaline batteries to prevent
surcharges. The switch inside the battery case can be placed
to « Rechargeable » or to « Alkaline » without any impact.
To find the accessories available for the 12 volt, refer to the
section « OPTIONS ».
MEMOrY CArD
Using a memory card is required to operate the camera
SPYPOINT IR-5. When the camera is « ON » and no memory
card is used, the LCD panel displays « CArd » meaning to
insert one. The SD slot of the camera can accept memory cards
up to 32 GB capacity. Before inserting or removing the memory
card, the camera must be turned « OFF ». Failing to do so may
cause loss of or damage the pictures already recorded from the
memory card. When the SD card is full, the LCD panel indicates
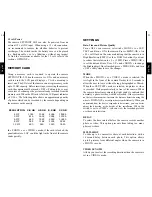
« FULL ». The following data shows an approximate quantity
of photos which can be recorded by the camera depending on
the memory card capacity.
rESOLUTION 2.0 GB 4.0 GB 8.0 GB
32 GB
4 MP
5 MP
6 MP
8 MP
12 MP
1024
816
640
584
480
2048
1632
1280
1168
960
4096
3264
2560
2336
1920
16384
13056
10240
9344
7680
In « PHOTO » or « VIDEO » mode, if the card is locked, the
panel indicates « LOC » and the light in the front of the camera
winks quickly.
SETTINGS
Date, Time and Picture Quality
Turn « OFF » your camera; set switch « MODE » to « SET/
TEST » and turn « ON » the camera. Press « MENU/OK ». An
« H » will flash on the screen indicating that the camera is in
High Resolution (5 MP). Use the « DOWN » button if you want
to reduce the resolution to « L » (3 MP). Press « MENU/OK »
to set the date and time. Use « UP » and « DOWN » to change
the blinking digit. Once finished, press « MENU/OK » and turn
« OFF » the system to save the changes.
MODE
When the « PHOTO » or « VIDEO » mode is selected, the
test light in the front of the camera flashes for 60 seconds to
allow the user to leave without being photographed or filmed.
When the « SET/TEST » mode is selected, no picture or video
is recorded.
Walk perpendicularly in front of the camera.
When
the camera detects movement, the light winks to indicate that
normally, a photo or video would be recorded.
If the system does
not detect the movement, increase the distance detection using the
wheel
« DISTANCE »
or realign the system differently. When you
understand how the device responds to detections, you can better
adjust the direction or the height of the installation.
When the
switch is set to « VIEW », you can view the recorded pictures
or videos on television.
DELAY
To select the time interval before the camera records another
photo or video. This option prevents from taking too many
photos or videos.
MULTI-SHOT
To take up to 4 consecutive shots at each detection, with a
10 second delay between each photo. This option allows
up to 4 pictures from different angles when the camera is in
« PHOTO » mode.
VIDEO LENGTH
Allows you to select the recording duration when the camera is
set in « VIDEO » mode.
English
English
Summary of Contents for IR-5
Page 2: ...3 Français Français v 2 ...
Page 10: ...19 English English ...
Page 17: ...33 Deutsch Deutsch ...


