background image

8

9

English

English

SETTINGS

Date, Time, Picture Quality and Temperature 

Turn "OFF" your camera; set switch "MODE" to "SET/
TEST" and turn "ON" the camera. Press "MENU/
OK". An "H" will flash on the screen indicating that 
the camera is in High Resolution. Use the "DOWN" 
button if you want to reduce the resolution to "L". Press 
"MENU/OK" to set the date and time (

mm/dd/yy, hh/mm

). 

Use "UP" and "DOWN" to change the blinking digit. Choose 
"F" or "C" to display the temperature in Fahrenheit (°F) or 
Celsius (°C). Press "MENU/OK" to go to the next option. Once 
finished, press "MENU/OK" and turn "OFF" the system to save 
the changes. 

Note: 

When the photo resolution is set to "L", the video 

resolution is automatically set to 320 x 240 and if the photo 
resolution is set to "H", the video resolution is automatically 
set to 640 x 480.

MODE 

PHOTO

Allows you to take pictures. When the "Photo" mode is selected,
the test light in the front of the camera (see below) will flash
for 60 seconds to allow the user to leave the area without being
photographed. 

VIDEO

Allows you to take videos. When the "video" mode is selected, 
the test light in the front of the camera (see above) will flash 
for 60 seconds to allow the user to leave the area without being 
videoed. 

SET/TEST

Allows the user to test the detection system of the camera. 
When the "SET/TEST" mode is selected, no picture or video 
is recorded. Walk perpendicularly in front of the camera. When 
the camera detects movement, the light blinks to indicate 
that normally, a photo or video would be recorded. If the 
system does not detect the movement, increase the distance 
detection using the wheel "DISTANCE" or realign the system 
differently. When you understand how the device responds to 
detections, you can better adjust the direction or the height of 
the installation. 

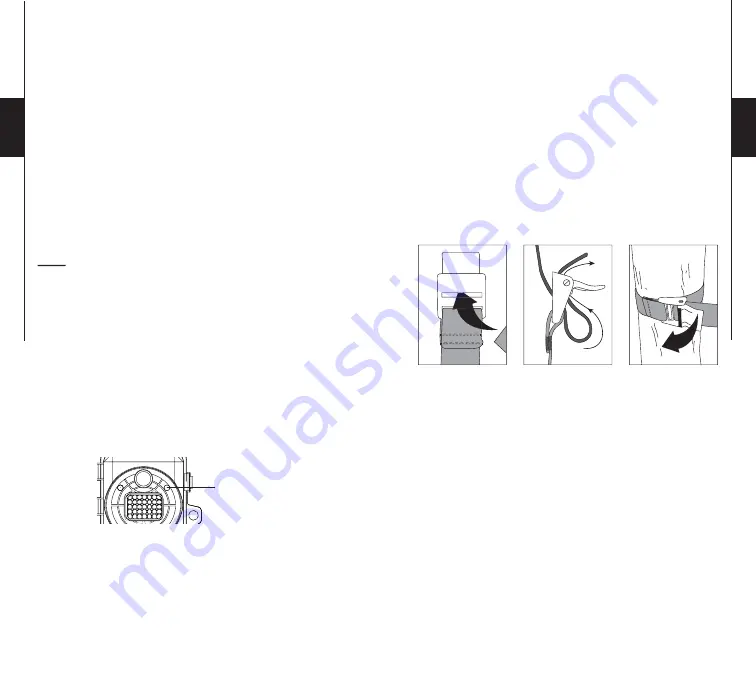
How to properly install your camera 
using the supplied installation strap:

(Recommanded installation height: about 3 feet).

VIEW

Allows the user to view photos and videos directly on a TV set.
Turn "OFF" your camera and select "VIEW". Connect the 
yellow end of the audio-video cable (supplied) into the 
"VIDEO IN" of the TV and the other end into the "TV OUT" of 
the camera. Turn "ON" the camera. You will see the last picture 
or video recorded by your system. To change the picture or the 
video, use the key "UP" or "DOWN". If you press "MENU/
OK", the following options will appear:

Test light

Summary of Contents for I-6

Page 1: ...igital Surveillance Camera Système de surveillance photographique Fotografisches Überwachungs system User manual Manuel d utilisation Bedienungsanleitung www spypoint com I 6 model Modèle I 6 Modell I 6 ...

Page 2: ...sh Thank you for choosing the SPYPOINT I 6 monitoring system This manual will help you get the most out of your new device For the latest version of the user manual or for additional information visit our website at www spypoint com ...

Page 3: ...SB 2 0 Power supply accessories sold separately see Options Alkaline or lithium batteries 6x AA Lithium battery pack Rechargeable battery pack LIT 09 LIT C 8 External 12V jack 12 volt battery KIT 12V BATT 12V 12 volt adapter AD 12V Detection system Motion sensor PIR Detection angle 30 Detection range Adjustable from 5 to 50ft Delay between each detection Adjustable from 1 to 15min Additional 10 se...

Page 4: ...KIT 12V BATT 12V sold separately or a 12 volt adapter AD 12V sold separately When using a 12 volt connection we recommend removing the AA batteries to prevent surcharges During the installation of a 12 volt connection place the switch inside the battery case to ALK i e alkaline If combined with a lithium battery pack slide the switch to LIT 09 To find the accessories available for the 12 volts see...

Page 5: ...he test light in the front of the camera see above will flash for 60 seconds to allow the user to leave the area without being videoed SET TEST Allows the user to test the detection system of the camera When the SET TEST mode is selected no picture or video is recorded Walk perpendicularly in front of the camera When the camera detects movement the light blinks to indicate that normally a photo or...

Page 6: ...efore the camera records the next photo or video Additional setting It is possible to decrease the delay between detections to 10 seconds instead of 1 minute by using the following procedure Note that the battery life will be affected Turn OFF the camera Press and hold the UP button turn the camera on 10_S appears on the screen meaning the 1 minute delay has been replaced by a 10 second delay To r...

Page 7: ...ults If no SD slot is built into the computer a multi card reader RD25 1 sold separately must be used TROUBLESHOOTING No person animal on photos 1 Rising sun or sunset can trigger sensor Camera must be reoriented 2 At night motion detector may detect beyond range of the IR illumination Reduce distance setting 3 Small animals may be triggering unit Reduce distance setting and or raise height of cam...

Page 8: ...tery pack is a handy spare Water resistant battery box KIT 12V Water resistant battery box Includes a 12 volt rechargeable battery charger 12 foot power cable and carrying strap 12ft power cable PW 12FT Spare 12 ft power cable fits with KIT 12V 12 volt rechargeable battery and charger BATT 12V To allow using external rechargeable battery to power the camera 12 volt power cable CB 12FT A 12 ft cabl...

Page 9: ...tarting from its original date of purchase The sales receipt is your proof of purchase and must be presented if warranty service is needed This warranty does not cover any GG Telecom product whichhas been subjected to misuse neglect and accidents or has been improperly used or maintained Any modification or tampering of the product will affect its operation performance durability and void this war...

Page 10: ...ème de surveillance SPYPOINT I 6 Ce manuel d utilisation vous permettra d utiliser votre nouvel appareil de façon optimal Pour la plus récente version du manuel d utilisateur ou pour toutes informations additionnelles consultez notre site web au www spypoint com ...

Page 11: ...ur USB 2 0 Alimentation accessoires vendus séparément voir section Options disponibles Piles alcalines ou au lithium 6x AA Bloc pile lithium Bloc pile rechargeable LIT 09 LIT C 8 Externe Prise 12V Batterie 12 volts KIT 12V BATT 12V Adaptateur 12 volts AD 12V Système de détection Détecteur de mouvement PIR Angle de détection 30 Distance de détection Réglable de 2 à 15 mètres Délai entre chaque déte...

Page 12: ...e 12 volts BATT 12 KIT 12V vendu séparément ou un adaptateur 12 volts AD 12V vendu séparément Lors d un branchement 12 volts il est suggéré de retirer les piles AA pour éviter une surcharge Lors d un branchement 12 volts glisser le commutateur du compartiment des piles à ALK c à d alcaline Si ce branchement est combiné à un bloc pile lithium glisser le commutateur à LIT 09 Pour connaître les acces...

Page 13: ...devant de l appareil voir figure plus haut clignote durant 60 secondes pour permettre à l utilisateur de quitter les lieux sans être filmé SET TEST Permet de tester la caméra afin de déterminer si elle détecte bien à l endroit désiré Lorsque le mode SET TEST est sélectionné aucune photo ou vidéo n est enregistrée Passer devant la caméra de façon perpendiculaire Lorsque la caméra détecte un mouveme...

Page 14: ...t puisse enregistrer la prochaine photo ou vidéo Réglage additionnel Il est possible de réduire le délai minimum entre les détections à 10 secondes au lieu de 1 minute en suivant la procédure suivante À noter que la durée de vie des piles sera affectée Éteindre la caméra Maintenir enfoncé le bouton UP et remettre la caméra à ON 10_S apparait à l écran signifiant que le délai de 1 minute est rempla...

Page 15: ...nt de la caméra et de l insérer dans la fente SD de l ordinateur Si aucune fente SD n est présente sur l ordinateur utiliser un lecteur de cartes mémoire RD25 1 vendu séparément DÉPANNAGE Aucune personne ou aucun animal sur les images 1 Vérifier si l appareil est pointé vers le lever ou le coucher du soleil ce qui peut faire déclencher l appareil 2 La nuit le détecteur de mouvement peut détecter a...

Page 16: ... alcalines Ce type de pile est moins influencé par les variations de température La capacité de la pile au lithium atteint jusqu à 3 fois la capacité des piles alcalines Pile lithium supplémentaire LIT 09 Pile permettant d avoir en sa possession une pile de rechange en tout temps en combinaison de l achat de l ensemble LIT C 8 Boîtier d alimentation 12 volts KIT 12V Boîtier d alimentation 12 volts...

Page 17: ...vec la plupart des produits SPYPOINT GARANTIE LIMITÉE Le système SPYPOINT I 6 conçu par GG Telecom est couvert d une garantie d un 1 an incluant les pièces et la main d œuvre à compter de la date d achat Le coupon de caisse est la preuve d achat et devra être présenté si la garantie est applicable La garantie ne couvre pas les produits de GG Telecom ayant subi des abus de la négligence des acciden...

Page 18: ...as Überwachungssystem SPYPOINT I 6 entschieden haben Diese Bedienungsanleitung wird Ihnen dabei helfen Ihr neues Gerät optimal zu nutzen Die aktuellste Version des Benutzerhandbuches und weitere Informationen finden Sie auf unserer Website unter www spypoint com ...

Page 19: ...omversorgung Zubehör separat erhältlich siehe Optionen Alkaline oder Lithiumbatterien 6 x AA Lithium Akku Aufladbarer Akku LIT 09 LIT C 8 Extern 12V Anschluss 12 Volt Batterie KIT 12V BATT 12V 12 Volt Adapter AD 12V Erfassungssystem Bewegungsmelder PIR Erfassungswinkel des Hauptsensors 30 Erfassungsbereich Einstellbar von 1 5m bis 15m Verzögerung zwischen jeder Erfassung Einstellbar von 1 bis 15 M...

Page 20: ...lich betrieben werden Bei der Benutzung einer 12 Volt Verbindung empfehlen wir die Alkali Batterien zu entfernen um ein Überladen zu verhindern Stellen Sie beim Anschließen einer 12 Volt Batterie den Schalter im Batteriegehäuse auf ALK d h Alkali Wenn Sie einen Lithium Akku benutzen stellenSiedenSchalterauf LIT 09 Diefür12Voltverfügbaren Zubehörteile finden Sie im Abschnitt OPTIONEN SPEICHERKARTE ...

Page 21: ...MODUS FOTO Zum Aufnehmen von Bildern Wenn der Modus Foto ausgewählt wurde blinkt die Testleuchte an der Vorderseite der Kamera siehe unten 60 Sekunden lang damit der Benutzer sich von der Kamera entfernen kann ohne fotografiert zu werden VIDEO Zum Aufnehmen von Videos Wenn der Modus Video ausgewählt wurde blinkt die Testleuchte an der Vorderseite der Kamera siehe unten 60 Sekunden lang damit der B...

Page 22: ...Exit Kehrt zur Bildschirmanzeige zurück Neumond Zunehmender Mond Erstes Viertel Zunehmender Dreiviertelmond Vollmond Abnehmender Dreiviertelmond Letztes Viertel Abnehmender Mond VERZÖGERUNG DELAY Ermöglicht die Auswahl des Zeitintervalls zwischen den Erfassungen bevor die Kamera das nächste Foto oder Video aufnimmt Zusatzeinstellung Es ist möglich mit der folgenden Methode die Verzögerung zwischen...

Page 23: ...oftware Klicken Sie auf Arbeitsplatz Computer und wählen Sie Wechseldatenträger Klicken Sie dann auf DCIM und 100DSCIM dort finden Sie alle Ihre Fotos und Videos Zum gleichen Ergebnis gelangen Sie wenn Sie die SD Karte aus der Kamera herausnehmen und sie in den Anschluss am Computer einsetzen Sollte Ihr Computer nicht über einen Kartensteckplatz verfügen können Sie das Multicard Lesegerät RD25 1 v...

Page 24: ...erät arbeitet mit 25 verschiedenenTypen von Speicherkarten und ist mit SD Karten kompatibel Bildbetrachter PV 2 4 Digitalkamera Bildbetrachter mit SD Kartensteckplatz 2 4 Zoll Bildschirm 2 GB internem Speicher MP3 Radio Kopfhörer Leder Transporttasche aufladbarem Lithium Akku Ladegerät und USB Kabel im Lieferumfang Foto und Video Betrachter PV 9 Foto und Video Betrachtungsgerät 2 5 Zoll Bildschirm...

Page 25: ...htloses Infrarotmodul mit 100 unsichtbaren LEDs mit bloßem Auge nicht erkennbar mit dem der Benutzer die Infrarotbeleuchtung nachts für klarere Aufnahmen verstärken kann Metall Sicherheitsbox SB 91 Metallbox zum Sichern der Kamera gegen Diebstahl Schützt die Kamera außerdem vor Beschädigungen durch Bären oder andere Tiere Befestigungsarm MA 360 Verstellbarer Befestigungsarm kompatibel mit genormte...

Page 26: ...tion und Lebensdauer und haben das Erlöschen dieser Garantie zur Folge REPARATURSERVICE Leistungen für Schäden die nicht von der Gerätegarantie abgedeckt sind werden in Rechnung gestellt Für technische Unterstützung wenden Sie sich bitte an info eurohunt de Beschreiben Sie Ihr Problem und hinterlassen Sie eine Telefonnummer unter der Sie erreichbar sind WICHTIG EUROHUNT akzeptiert keine Rücksendun...

Reviews: