© 2004 SPX Corporation
Sheet No.
Issue Date:
Rev. B, 6/07/04
Operating Instructions
To raise the jack,
1. Insert handle into handle base.
2. Turn release valve (turn the knob clockwise until resistance is felt); do not over tighten.
To lower the jack,
1. SLOWLY turn the release valve counterclockwise. IMPORTANT: When lowering a fork lift truck, keep the rate of
lowering under your control. Do not lower the fork lift until the area is free of personnel, tools, and equipment.
Stay clear of the rear wheels on the jack; the wheels will move backward when the jack is lowered.
Recommended Method to Raise a Vehicle
1. Lower the forks on the fork lift. Remove any load. Clear personnel
from the area.
2. Carefully select a lifting point on the fork lift. It must be strong enough
to resist the lifting force without damage to the fork lift.
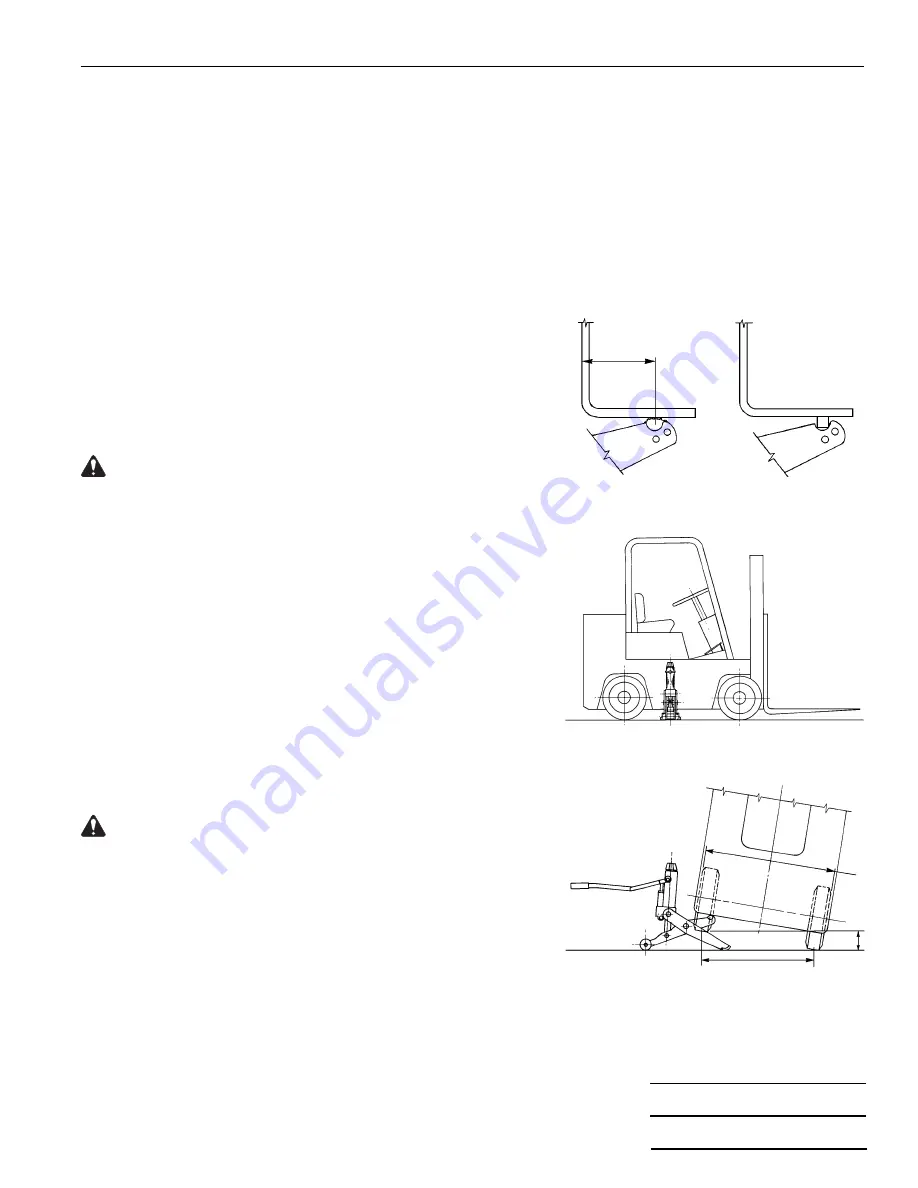
3. Cradle a support point in the notch at the end of the lift arm. See
Figure 2-B. Use the serrated pad to raise a vehicle with a flat
underside. See Figure 2-A.
CAUTION: To prevent injury or equipment damage,
•
Use only the serrated lifting pad or the notch in the end of the
lifting arm as the means of lifting. Do not use any other part of
the jack as a lifting contact point.
•
Do not tilt the vehicle more than 15
°
when using the serrated
pad. Tilting the vehicle too far may result in the jack kicking out
suddenly and dropping the load.
•
Do not use cribbing under the jack or on top of the lift pad. The
jack must remain in direct contact with the floor; the lift pad or
notch must be in direct contact with the fork lift.
4. Position the lift pad at least 3" inward toward the center of the vehicle
from the beginning of the flat surface. See Figure 2-A.
Lifting from the Side
1. Position the jack closer to the rear wheels than the front wheels to
maintain balance. See Figure 3. If the fork lift seems heavier at one
end, lower the jack and move it closer to the heavy end.
CAUTION: When lifting narrow fork lift trucks (less than 40"
wide) from the sides, the height between the floor and the bottom
of the raised tire cannot be more than one fourth (1/4) the tire tread
width. (Tread width is measured from centerline to centerline of the
tire treads.) If this height is exceeded, the fork lift truck could tip
over or the jack could drop the load. See Figure 4.
Example: If tread width is 36", the bottom of the vehicle tire may
never be more than 9" off the floor.
Figure 2
Figure 3
A
B
3" min. flat
tread width
ht
Figure 4
3 of 4
Parts List & Operating Instructions
Form No. 525814
Summary of Contents for OTC 1540
Page 8: ......


