background image


15-3/5”Mi

n


INSTALLATION INSTRUCTIONS 

 
Before Using Your Appliance 


  Remove the exterior and interior packing materials. 

  Before connecting the appliance to the power source, let it stand upright for approximately 4 hours. 

This will reduce the possibility of a malfunction in the cooling system from improper handling during 
transportation. 

  Clean the interior surface with lukewarm water using a soft cloth.  


Free-Standing Installation 


  This


appliance is designed to be 

installed built-in or free standing

.


  Locate  the  appliance  away  from  direct  sunlight  and  sources  of  heat  (stove,  heater,  radiator,  etc.). 

Direct sunlight may affect the acrylic coating and heat sources may increase electrical consumption.  
Ambient  temperature  below  68°F  (20°C)  or  above  90°F  (32°C)  will  hinder  the  performance  of  this 
appliance.  

This unit is not designed for use in a garage or any other outside installation. 

  Avoid locating the appliance in moist areas.  

  Plug  the  appliance  into  dedicated,  properly  installed-grounded  wall  outlet.  Do  not  under  any 

circumstances cut or remove the third (ground) prong from the power cord. Any questions concerning 
power  and/or  grounding  should  be  directed  toward  a  certified  electrician  or  an  authorized  service 
center.  

This unit is not designed to be installed in an RV or used with an inverter. 

  After  plugging  the  appliance  into  a  wall  outlet,  allow  the  unit  to  cool  down  for  3  ~  4  hours  before 

placing wine bottles or beverage cans in the appliance. 


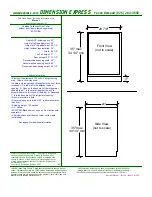
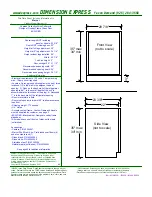
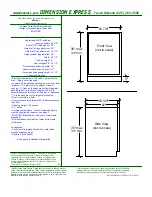
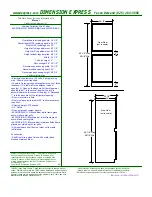
Built-In Installation 

 
The cutout dimension illustrated in figure (A) 
allows for door swing and access to the pull-out 
shelves when installed as a built-in appliance.  If 
installing between frameless cabinets, a 

½

” wide 

filler strip or side panel may be needed on hinge 
side.  The filler strip will act as a spacer between 
the appliance case and adjacent cabinet door 
swing.  The width of the opening must include 
the filter panels.   

 
Note:  

The door should protrude at least 1” beyond the 
surrounding cabinets.   


Fig. A 

Summary of Contents for WC-30U

Page 1: ...MANUAL UNDERCOUNTER WINE BEVERAGE COOLER 32 bottles capacity MODEL WC 30U To ensure proper use of this appliance and your safety please read the following instructions completely before operating thi...

Page 2: ...UIDES 3 COMPONENTS AND PARTS 4 SPECIFICATIONS 4 ELECTRICAL CONNECTION 5 INSTALLATION INSTRUCTIONS 6 Before using your appliance Free standing installation Built in installation APPLIANCE FEATURES 7 OP...

Page 3: ...y to comply with federal and local regulations when disposing of this product Never clean appliance parts with flammable fluids The fumes can create a fire hazard or explosion Do not store or use gaso...

Page 4: ...al shock or death Do not attempt to repair or replace any part of your appliance unless it is specifically recommended in this material All other servicing should be referred to a qualified technician...

Page 5: ...on Fan 4 Handle 5 Door 6 Security Lock 7 Front Grille 8 Leveling legs 9 Large Wine Shelves x 5 10 Small Wine Shelf x 1 SPECIFICATIONS Model WC 30U Unit Dimensions Inches mm Width Depth Height 15 380mm...

Page 6: ...rating matching that of the appliance as indicated on the unit s rating label This provides the best performance and also prevents overloading the circuits that could cause a fire hazard Never unplug...

Page 7: ...ion Avoid locating the appliance in moist areas Plug the appliance into dedicated properly installed grounded wall outlet Do not under any circumstances cut or remove the third ground prong from the p...

Page 8: ...ed for durability and energy saving Engaged Wine Shelves Any of the shelves can be removed to accommodate larger bottles To Remove a Shelf Remove all bottles or cans from the shelves Gently lift the s...

Page 9: ...3 seconds LIGHT Interior light To turn the interior light on or off There is no timer or auto shut off The light will remain illuminated if not turned off UP and DOWN keys To set the internal temperat...

Page 10: ...ith mild detergent and warm water Dry the interior and exterior with a soft cloth Dust or vacuum the vent Anything blocking the vent may hinder the unit s cooling efficiency Vacation Time Short vacati...

Page 11: ...or is opened too frequently Warm air enters the appliance every time the door is opened Try to open the door less frequently The door is not closed completely The door gasket does not seal properly P...

Page 12: ...cement parts will be new or reconditioned Parts which are replaced become the property of Sunpentown The warranty applies for the use of the product in the USA only What is NOT COVERED Warranty does n...

Reviews: