background image

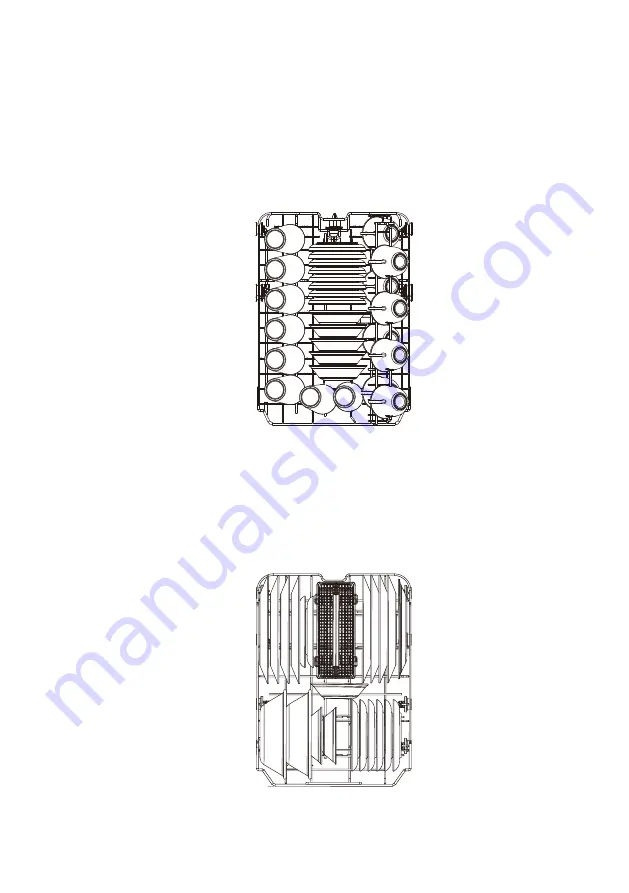
Loading the upper basket

 (

)

8 place setting

Loading the lower basket

 (

)

8 place setting

18

The upper basket has been designed for small plates, mugs, glasses, and plastic items 
marked “dishwasher safe”. Load your plates into the dishwasher in two half rows, so 
that the front of each plate faces the back of the plate in front of it, and the open sides 
of the plates at the center of the dishwasher face each other.
When loading dishes, pull the upper basket out sufficiently so you can load it without 
striking the counter.

The lower basket has been especially designed for dinner dishes, soup bowls, plates,

pots, lids, casserole

dishes, and plates.

Load large items such as pans and pots into the dishwasher so their open sides face 
downwards. 

Summary of Contents for SD-9263SS

Page 1: ...SD 9263SS SD 9263W Please read this manual carefully before using the dishwasher and Keep this manual for future reference...

Page 2: ...rol Panel Function Of The Rinse Aid And Detergent Filling The Rinse Aid Reservoir Filling The Detergent Dispenser Basket Used Tips Preparing And Loading Dishes Loading The Baskets 10 10 12 13 14 15 16...

Page 3: ...e the problems by yourself please ask for help from a professional technician The manufacturer following a policy of constant development and updating of the product may make modifications without giv...

Page 4: ...nd user maintenance shall not be done by children without supervision This appliance is not intended for use by persons including children with reduced physical sensory ormental capabilities or lack o...

Page 5: ...ikely to damage the door seal 2 Warning Knives and other utensils with sharp points must be loaded in the basket with their points facing down or placed in a horizontal position Some dishwasher deterg...

Page 6: ...packaging is manufactured from recycled paper and should be disposed in the waste paper collection for recycling By ensuring this product is disposed of correctly you will help prevent potential negat...

Page 7: ...read all operating instructions before using it for the first time IMPORTANT NOTE Dispenser Filter assembly Lower spray arm Inner pipe Upper spray arm Upper basket Cup rack Lower basket Cutlery baske...

Page 8: ...pter plug with this appliance Do not under any circumstances cut or remove the earthing connection from the power cord The installation of the pipes and electrical equipments should be done by profess...

Page 9: ...faucet Connect the unicouple to the faucet 1 Turn off hot water 2 Relieve water pressure from the unicouple assembly before disconnecting it from the faucet by depressing the red pressure relief butto...

Page 10: ...ss than 100 cm maximum from the bottom of the dish The water drain hose should be fixed If you need a drain hose extension make sure to use a similar drain hose It must be no longer than 4 meters othe...

Page 11: ...ted program indicator will be lit 2 3 Delay start Press the Delay button to increase the delay start time Delay a cycle for up to 24 hours in one hour increments After setting the delay time press the...

Page 12: ...y and glass To show the reminding time delay time error code etc Pre wash Main wash Rinse Drying Program end Progress indicator 8 The progress light that corresponds to the current operation turns on...

Page 13: ...When the rinse aid container is full the indicator will be fully dark The size of the dark dot decreases as the rinse aid diminishes You should never let the rinse aid level be less than 1 4 full Full...

Page 14: ...spenser whilst avoiding it to overflow Adjusting the rinse aid reservoir Adjust lever Rinse Filling The Rinse Aid Reservoir 13 Turn the rinse aid indicator dial to a number between 1 and 4 The higher...

Page 15: ...d wash loads also add some detergent into the smaller cavity B for the pre wash cycle Close the cover and press on it until it locks into place Push latch to open B A A A Filling The Detergent Dispens...

Page 16: ...steps 4 1 Pull out the upper basket 2 Remove the upper basket 3 Re attach the upper basket to upper or lower rollers Push in the upper basket lower position upper position Basket Used Tips 15 Folding...

Page 17: ...luminum parts have a tendency to discolor during washing Glazed patterns may fade if machine washed frequently For washing the following cutlery dishes Are not suitable Are of limited suitability 16 R...

Page 18: ...is designed to hold more delicate and lighter dishware such as glasses coffee and tea cups Long bladed knives stored in an upright position are a potential hazard Long and sharp items of cutlery such...

Page 19: ...t of each plate faces the back of the plate in front of it and the open sides of the plates at the center of the dishwasher face each other When loading dishes pull the upper basket out sufficiently s...

Page 20: ...lower racks To prevent water dripping from the upper basket into the lower basket we recommend that you empty the lower basket first followed by the upper basket Removing the dishes WARNING Items wil...

Page 21: ...Main wash 50 Rinse 1 Rinse 2 Last Rinse 62 Drying Pre wash 1 Pre wash 2 Main wash 65 Rinse 1 Rinse 2 Last Rinse 68 Drying Pre wash 1 Pre wash 2 Main wash 45 60 Rinse 1 Rinse 2 Last Rinse 65 Drying Pr...

Page 22: ...been running for a short time otherwise the detergent may have already been released and the dishwasher may have already drained the wash water If this is the case the dishwasher needs to be reset and...

Page 23: ...low the instructions below 1 Open the door a little to stop the dishwasher after the spray arm stop working you can open the door completely 2 Add the forgotten dishes 3 Press the Start Cancel button...

Page 24: ...tion of water into the door lock and electrical components do not use a spray cleaner of any kind Never use abrasive cleaners or scouring pads on the outer surfaces because they may scratch the finish...

Page 25: ...ing brush Reassemble the filters in the reverse order of the disassembly replace the filter insert and rotate clockwise to the close arrow Do not over tighten the filters Put the filters back in seque...

Page 26: ...ssary to clean the spray arms regularly for hard water chemicals will clog the spray arm jets and bearings To clean the spray arms follow the instructions below 2 3 To remove the lower spray arm pull...

Page 27: ...the socket No solvents or abrasive cleaning To clean the exterior and rubber parts of the dishwasher do not use solvents or abrasive cleaning products Only use a cloth with warm soapy water To remove...

Page 28: ...perly closed Make sure to close the door properly and latch it Water not pumped Twisted or trapped drain hose Filter clogged Kitchen sink clogged Check the drain hose Check the kitchen sink to make su...

Page 29: ...The items should be corrosion resistant Knocking noise in the dishwasher A spray arm is knocking against an item in a basket Interrupt the program and rearrange the items which are obstructing the spr...

Page 30: ...o get them clean Problem Possible Causes What To Do The dishes are not clean Black or grey marks on dishes Aluminium utensils have rubbed against dishes Use a mild abrasive cleaner to eliminate those...

Page 31: ...se items Cutlery or dishes of this type are not suitable for washing in the dishwasher Possible Causes What To Do Codes Meanings Possible Causes Longer inlet time Not reaching required temperature Ove...

Page 32: ...TECHNICAL INFORMATION Height H Width W Depth D1 Depth D2 905mm 448mm 600mm with the door closed 1175mm with the door opened 90 W W W D1 D1 D1 H H H 32 D2 D2 D2...

Reviews: