background image

10

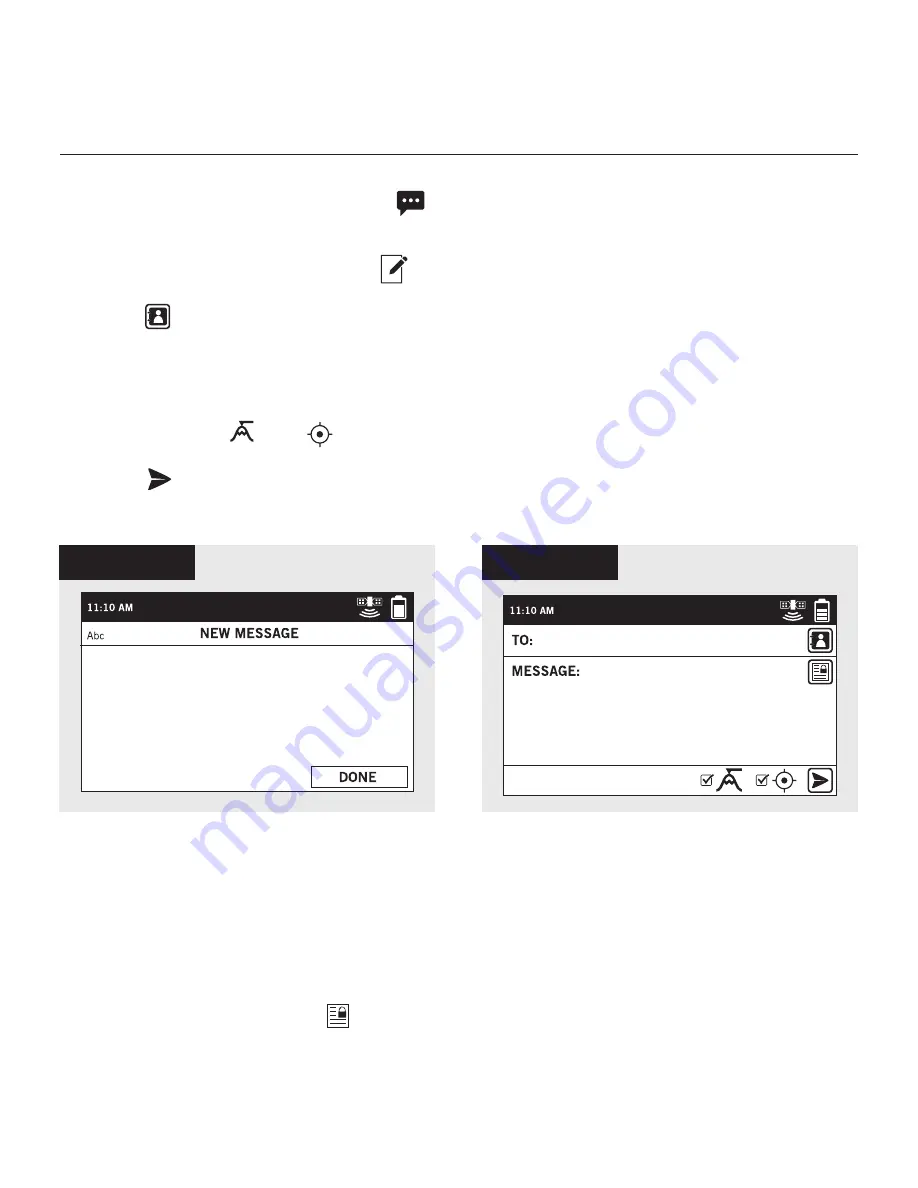
FIGURE 4

FIGURE 5

PREDEFINED MESSAGES

Make messaging even easier by sending a Predefined Message. These messages can 

only be created in your 

SPOT MY ACCOUNT

 and up to 14 Predefined Messages can be 

stored on your SPOT X. Syncing SPOT X with your SPOT MY ACCOUNT is required for 

Predefined Messages to appear on your device.

To send a Predefined Message, simply create a new message and select the 

Predefined Messages

 button   to access the Predefined Messages you have created. 

2-WAY MESSAGING

CREATE & SEND A MESSAGE

1.  On the 

Main Menu

 screen, select 

 to display the 

Messages

 screen, and then    

 select 

Inbox

.

2.  On the 

Messages

 screen, select 

 to compose a new message.

3. Select 

 to add contacts.

4.  Once you have selected a contact, select the 

Message:

 field to display the 

New   

 Message

 screen (Figure 4). Enter a message of up to 140 characters and select 

Done.

  NOTE: You can include your 

Elevation 

and/or 

GPS Coordinates 

by clicking on the  

  box next to the    and 

 icons (Figure 5).

5. Select   to send your message.

Summary of Contents for SpotX

Page 1: ...QUICK START GUIDE ...

Page 2: ...SCRIPTION TO COMMUNICATE SPOT X FEATURES INCLUDING S O S WILL NOT WORK WITHOUT FIRST ACTIVATING YOUR DEVICE IF YOU ENCOUNTER ISSUES DURING ACTIVATION PLEASE VISIT FINDMESPOT COM SPOTXSUPPORT FOR ASSISTANCE CHARGING YOUR SPOT X Connect the Micro USB Data Power Cable to the SPOT X USB Data Power Port and connect to either a computer or the AC Power Adapter The battery with the lightning bolt icon wi...

Page 3: ...isting SPOT customers should login to their current SPOT account and select Add New SPOT Device 3 Follow the onscreen instructions to create an account choose a service plan and additional services for your SPOT X Confirm your order to finish the SPOT MY ACCOUNT activation process ONCE YOU COMPLETE THE SPOT MY ACCOUNT ACTIVATION MAKE SURE YOUR DEVICE IS UPDATED WITH THE LATEST FIRMWARE SYNCING SPO...

Page 4: ... to Social Fetches New Messages Opens Tracking Screen Opens Navigation Screen Opens System Settings Initiates S O S with GEOS IERCC DEVICE OVERVIEW Power Backlight Power LED Display Screen S O S Button Directional Pad Track Button Back Button QWERTY Keyboard USB Power Data Port 1 2 3 4 5 6 7 8 9 SPOT X AT A GLANCE 1 2 3 4 5 6 7 8 ...

Page 5: ...vigate to and highlight a section on the screen Quick press the Back button to navigate to the previous screen Use the keyboard to create messages contact names and other manual entries as required The SPOT X Display screen allows for interaction with the Main Menu sub menus and other onscreen features Used to connect a Micro USB Cable to the SPOT X USB Port to charge the SPOT X device and to sync...

Page 6: ... Active Suspended Tracking TIME 12 Hour Format 24 Hour Format MENU DISPLAY ICONS MESSAGES Create New Message Send Message Reply to Message Predefined Messages CONTACTS Contact List Create New Contact GPS Include Elevation with Message Include GPS Coordinates with Message Create New Waypoint Navigate to Location OTHER Delete Save Back CONTACTS Email Contact Mobile Contact Group Contact SENT MESSAGE...

Page 7: ...e as the antenna is located on the top portion of the device Before heading off the grid we strongly recommend that you send a test message to ensure your device was activated properly You can view your sent messages in your account at FindMeSPOT com MyAccount IMPORTANT SPOT X TIPS MAY NOT FUNCTION PROPERLY CORRECT RESTRICTED VIEW OF THE SKY CLEAR VIEW OF THE SKY FIGURE 1 SPOT X OPERATING TEMPERAT...

Page 8: ...8 ...

Page 9: ...Contact screen Figure 2 3 Enter the required information and select to save the contact to your SPOT X device If both Email and SMS TEXT fields are filled in the SPOT X will create two separate contacts one for each field 4 Additionally the sync required icon Figure 3 will appear next to the new contact s name and in the Status Bar This indicates that the SPOT X will need to sync with SPOT MY ACCO...

Page 10: ...t the Predefined Messages button to access the Predefined Messages you have created 2 WAY MESSAGING CREATE SEND A MESSAGE 1 On the Main Menu screen select to display the Messages screen and then select Inbox 2 On the Messages screen select to compose a new message 3 Select to add contacts 4 Once you have selected a contact select the Message field to display the New Message screen Figure 4 Enter a...

Page 11: ...tes The Check In message will include a link to Google MapsTM containing the SPOT X s location The Check In messages can be created and assigned to contacts via SPOT MY ACCOUNT at any time SENDING A CHECK IN MESSAGE On the Main Menu screen simply select and the pre programmed message will be sent to your pre assigned contacts ...

Page 12: ... For full details about GEOS IERCC please visit FindMeSPOT com GEOS INITIATING S O S 1 Power on device lift cover long press the S O S button for 3 seconds or until S O S screen is displayed or select S O S from the Main Menu screen and follow the onscreen instructions 2 The S O S icon should appear on the Status Bar to indicate that S O S has been initiated Figure 6 3 Once S O S is initiated GEOS...

Page 13: ... Mode and you will not be able to send messages to anyone other than GEOS IERCC until S O S is cancelled 6 While S O S is active the SPOT X should remain outside in clear view of the sky with no obstructions in order to maintain network connectivity CANCELLING S O S Lift cover long press the S O S button for 3 seconds and follow the onscreen instructions or select Cancel S O S from the S O S scree...

Page 14: ...ending upon your service plan you can select from tracking intervals of 2 5 10 30 or 60 minutes On the Main Menu select then scroll to and select Tracking Interval and choose from the list of available intervals All non subscribed tracking intervals will be grayed out FIGURE 11 Link your social media accounts to your SPOT X directly from your SPOT My Account Once you ve linked your accounts you wi...

Page 15: ... instructions FIGURE 12 2 Once your GPS position is acquired SPOT X will send your tracks in accordance with the tracking interval you have selected until you manually stop tracking the SPOT X detects no movement or you power off the SPOT X device 3 While Tracking is active SPOT X should remain outside in clear view of the sky with no obstructions in order to maintain network connectivity CANCELLI...

Page 16: ... com SPOTXSupport to access the latest version of the SPOT X Quick Start Guide and for more information on how to use SPOT X 2018 SPOT LLC All Rights Reserved All SPOT products described on FindMeSPOT com are the products of SPOT LLC and its affiliates which are not affiliated in any manner with SPOT Image of Toulouse France or SPOT Image Corporation of Chantilly Virginia ...

Reviews: