background image

ASSEMBLY AND INSTALLATION:

SITE PREPARATION

1. Your spa should always be installed on a structurally sound, relatively smooth and
level surface.
2. Your spa should be connected to a grounded out
let within eight feet of the spa.
3. Make sure that there are no sharp objects under the spa.

INDOOR INSTALLATION:

Take special consideration to the following issues when installing your spa indoors.
1. Make sure the floor can support the total spa filled weight of 1500lbs.
2. Install your spa on a water resistant, non-slip floor.  The floor should have a drain to
remove water splashed from the spa.  Do not install the spa on carpet or other material
that will be damaged by moisture.
3. Allow enough clearance around the spa for full access to the spa equipment for 
service.
4. Avoid installing the spa indoors on a second story above finished living space due to
the possibility of water and humidity damage.
5. Take into consideration the room humidity which will exist due to high temperatures.
Providing ventilation in the room will help maintain comfort and minimize moisture 
damage to the surrounding environment.

OUTDOOR INSTALLATION:

You may install your spa on any smooth, level surface that is strong enough to support
the filled unit.  The following considerations must be taken when installing your spa 
outdoors.
1. Check local code requirements for restrictions such as fencing, enclosures, 
childproof gates, etc.
2. Verify that there is adequate room to place the spa and permit safe access.
3. Do not install the spa on grass or dirt, as this will greatly increase the amount of
debris entering the spa.  An 8’x8’ stone or solid wood surface, 5 to 9 inches in height is
recommended.
4. Take into consideration the positioning of the Spa for draining purposes.

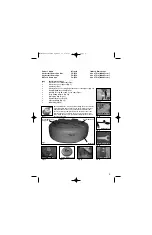
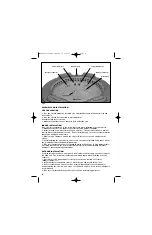
Massage Jet Outlet

Bubbler Floor

Drain Valve

Floor Valve

Massage Jet Outlet

Pump/Filter Outlet

Pump/Filter Inlet

Bubbler Hose

Fig 2

6

SpaManual-latest update 07  2/2/07  4:15 PM  Page 6

Summary of Contents for 54-1552

Page 1: ...O NOT RETURN this product to the store Contact us TOLL FREE 888 814 8833 USA 8am 5pm CST Monday Friday Congratulations on your new purchase Sportsstuff prides itself in making the most innovative infl...

Page 2: ...water may cause damage to the fetus Limit use to 10 minutes at a time Consult your physician before using WARNING Prevent drowning WARNING To reduce the risk of injury A The water in a spa should neve...

Page 3: ...DANGER Risk of Injury Replace damaged cord immediately by the manufacturer its service agent or similarly qualified persons DANGER Risk of Electric Shock Always use the cord mounted GFCI connected to...

Page 4: ...all instructions and warnings contained in that material prior to using this product You additionally agree that you will ensure any additional or subsequent users of this product will read and under...

Page 5: ...er Cartridge Fig 1g 1 GFCI Plug Fig 1h Hose Fitting Wrench Protective Cover Support Spa Body Speed Safety Valve A hybrid valve utilizing the best of both the Oversized Safety Valve and the Speed Valve...

Page 6: ...ty of water and humidity damage 5 Take into consideration the room humidity which will exist due to high temperatures Providing ventilation in the room will help maintain comfort and minimize moisture...

Page 7: ...DO NOT RUN THE UNIT WITHOUT WATER FOR MORE THAN 15 MINUTES NOTE INFLATION VALVES ARE NUMBERED ON ITEM IN ORDER OF INFLATION 4 Locate floor valve Using the air hose inflate until firm Close valve comp...

Page 8: ...cross thread the fitting Hand tighten the nut Use the Hose Fitting Wrench Fig 1d if needed 10 Line up the hose connections on the back of the pump with the fittings on the side of the spa Fig 10 11 A...

Page 9: ...filter pump into the electrical outlet Press the Filter On button located on the Pump Filter control panel Fig 15 The pump will turn on and begin pumping water Water should flow from the small pump f...

Page 10: ...ace as needed Select heat level by pressing the HEAT ON LEVEL button on the Pump Filter control panel CONTROL PANEL OPERATION 1 FILTER ON OFF Turns filter unit on off Circulates and filters water 2 HE...

Page 11: ...y open and remove the drain plug by turning it in a counter clockwise direction Fig 20b NOTE IF WATER STARTS TO LEAK THE INNER VALVE IS OPEN AND NEEDS TO BE SHUT BEFORE CONTINUING 6 Attach a standard...

Page 12: ...rd into the power outlet 2 Press the RESET button on the GFCI 3 Turn on the massage air blower 4 Push the TEST button on the GFCI located at the end of the power cord The GFCI light should go out and...

Page 13: ...n for heat to function NOTE WHEN USING IN TEMPERATURES UNDER 32 F HEATER MUST BE RUNNING AT ALL TIMES 3 AIR PUMP BLOWER Turns on the massage air blower The massage air blower will automatically shut o...

Page 14: ...he spa by turning both valves counter clockwise 9 Open the Air Purge Valve on the top of the Main Power Unit 10 Allow the filter tank to bleed air for approximately one minute or until water drips fro...

Page 15: ...d for the spa If power is available to the spa test the GFCI using the instructions supplied in the Maintenance section If the GFCI is working properly and the Main Power Unit does not function the Ma...

Page 16: ...16 SpaManual latest update 07 2 2 07 4 15 PM Page 16...

Page 17: ...tuff warrants to the original purchaser only that their high performance products when used for normal recreational purposes are free from defects in material and workmanship for a period of ninety 90...

Page 18: ...18 SpaManual latest update 07 2 2 07 4 15 PM Page 18...

Page 19: ...cto a la tienda Ll menos a nuestro N MERO GRATUITO 888 814 8833 EE UU de lunes a viernes de 8 a m a 5 p m hora del Centro de Estados Unidos Felicitaciones por la compra de su nuevo producto Sportsstuf...

Page 20: ...ado al entrar o salir del spa o ba era de hidromasaje ADVERTENCIA No consuma alcohol ni ning n otro tipo de drogas durante el uso de este producto ADVERTENCIA No utilice el producto durante m s de 15...

Page 21: ...a de la manguera Un nivel de agua insuficiente puede provocar un mal funcionamiento de la bomba o sistema de filtrado y anular la garant a PELIGRO Riesgo de ahogamiento accidental Mantenga cualquier a...

Page 22: ...a la inversa Esto podr a provocar gases o reacciones nocivas y rociaduras qu micas peligrosas ADVERTENCIA Los menores de 6 a os NO deben usar este producto ADVERTENCIA Jam s deje solos a los ni os co...

Page 23: ...anto por su parte como por la de cualquier tercero al que usted deje utilizar de cualquier manera este producto en lo referente a cualquier responsabilidad relacionada con p rdidas da os lesiones y ga...

Page 24: ...Fig 1g 1 Enchufe GFCI Fig 1h Llave para el ajuste de la manguera Soporte para cubierta de seguridad Spa V lvula de seguridad de velocidad Una v lvula h brida que utiliza lo mejor de la V lvula de segu...

Page 25: ...a temperatura El mantenimiento de una ventilaci n adecuada en la habitaci n servir para garantizar la comodidad y para reducir al m ximo el da o que la humedad pueda provocar INSTALACI N EN EXTERIORES...

Page 26: ...NCIONAR LA UNIDAD SIN AGUA DURANTE M S DE 15 MINUTOS NOTA LAS V LVULAS DE INFLADO EST N NUMERADAS SEG N EL ORDEN DE INFLADO 4 Tome la v lvula del piso y mediante manguera de aire proceda al inflado ha...

Page 27: ...correctamente el enroscado de la v lvula Ajuste manualmente la tuerca Utilice la llave para el ajuste de la manguera Fig 1d en caso de ser necesario 10 Nivele las conexiones de la manguera de la parte...

Page 28: ...corriente Pulse el bot n Filter On que se encuentra en el panel de control del filtro bomba Se encender la unidad y comenzar a bombear el agua Aseg rese de que el agua se distribuye desde la salida pe...

Page 29: ...ot n HEAT ON LEVEL CALENTAR TEMPERATURA situado en el panel de control de la bomba filtro FUNCIONAMIENTO DEL PANEL DE CONTROL 1 FILTER ON OFF Activa o desactiva la unidad de filtrado Filtra y circula...

Page 30: ...a v lvula de drenaje lentamente gir ndola en el sentido contrario de las agujas del reloj Figura 20b NOTA LAS FUGAS DE AGUA SE DEBEN A QUE LA V LVULA INTERIOR EST ABIERTA Y POR LO TANTO TENDR QUE CERR...

Page 31: ...SET restablecer en el GFCI 3 Active la bomba de aire para el masaje 4 Presione el bot n TEST prueba en el GFCI que se encuentra en el extremo del cable de corriente La luz del GFCI deber apagarse y la...

Page 32: ...funcione el filtro debe estar activado NOTA CUANDO SE USE EN TEMPERATURAS DE MENOS DE 0 C 32 F EL CALENTADOR DEBER USARSE DE MANERA CONTINUA 3 AIR PUMP BLOWER Activa la bomba de aire para masajes La...

Page 33: ...ntrario de las agujas del reloj 9 Abra la v lvula purgadora de aire situada en la parte superior de la unidad de alimentaci n principal 10 Deje que el tanque de filtrado purgue el aire por aproximadam...

Page 34: ...l spa Si la corriente el ctrica se suministra al spa correctamente compruebe el GFCI siguiendo las instrucciones incluidas en la secci n de mantenimiento de este manual Si a pesar de que el GFCI funci...

Page 35: ...entaci n puesta a tierra Reajuste el GFCI Llame al servicio de atenci n si no se reajusta Configure la temperatura al m xi mo Limpie o cambie el filtro A ada agua hasta la l nea del agua Desenchufe la...

Page 36: ...ndientes P LIZA DE GARANT A Sportsstuff Inc garantiza exclusivamente al comprador original que sus productos de alto rendimiento cuando se utilizan con prop sitos recreativos normales est n libres de...

Page 37: ...ce spa au magasin Contactez nous SANS FRAIS au 888 814 8833 tats Unis de 8 h 17 h HNC du lundi au vendredi F licitations pour l achat de votre nouveau produit La soci t Sportsstuff est sp cialis e da...

Page 38: ...t risque de blessure soyez tr s prudent lorsque vous entrez dans le spa ou le jacuzzi et que vous en sortez AVERTISSEMENT Ne consommez pas d alcool ou de substances narcotiques lorsque vous utilisez l...

Page 39: ...ue dans le spa est suffisant Le niveau de l eau doit se situer au dessus de l entr e du tuyau de prise d eau Un niveau d eau insuffisant pourrait endommager le syst me de pompe filtration et annuler l...

Page 40: ...chimiques l eau mais il ne faut jamais ajouter de l eau aux produits chimiques Cela risque de produire d paisses fum es des r actions chimiques violentes et des vaporisations chimiques dangereuses AV...

Page 41: ...oi le permet vous ainsi qu un tiers autoris utiliser le produit de quelque mani re que ce soit exon rez Sportsstuff de toute responsabilit pour la perte les dommages les blessures ou les d penses que...

Page 42: ...e la terre Photo 1h Cl pour raccords de tuyaux Support de b che de protection Toile du spa Valve de s curit pour gonflage rapide Valve hybride ayant les caract ristiques de la valve de s curit surdime...

Page 43: ...t produite par de hautes temp ratures Ainsi il est n cessaire d quiper la pi ce d un syst me d a ration afin de pr server le confort int rieur et de r duire les dommages caus s par l humidit l espace...

Page 44: ...ES SELON L ORDRE DANS LEQUEL ELLES DOIVENT TRE GONFL ES 4 Localisez les valves au sol Gonflez les l aide du tuyau air jusqu obtenir une toile solide Refermez la valve fond Photo 6 Lancez le gonflage...

Page 45: ...e ne pas fausser le filetage des raccords Serrez les crous la main Utilisez la cl pour raccords de tuyaux Photo 1d si n cessaire 10 Alignez les raccords de tuyaux situ s au dos de la pompe avec les ra...

Page 46: ...valve d vacuation 4 Branchez la pompe filtrante une prise de courant Appuyez sur le bouton Filter On Filtre en marche situ sur le panneau de commande de la pompe filtre Ce bouton permet d actionner l...

Page 47: ...itu sur le panneau de commande de la pompe filtre FONCTIONNEMENT DU PANNEAU DE COMMANDE 1 FILTER ON OFF Filtre Marche Arr t Permet de faire fonctionner le filtre et de l arr ter Ce dernier filtre l ea...

Page 48: ...sens contraire des aiguilles d une montre Photo 20b REMARQUE SI DE L EAU S COULE DU ROBINET DE VIDANGE CELA SIGNIFIE QUE LA VALVE INTERNE EST OUVERTE VOUS DEVEZ LA REFERMER AVANT DE POURSUIVRE 6 Fixe...

Page 49: ...1 Branchez le cordon d alimentation 2 Appuyez sur le bouton RESET Red marrer du DDFT 3 Activez le ventilateur massant 4 Appuyez sur le bouton TEST du DDFT situ au bout du cordon d alimentation Le t mo...

Page 50: ...our que la fonction temp rature fonctionne il est n cessaire de mettre en marche le filtre REMARQUE LORSQUE VOUS R GLEZ LA TEMP RATURE EN DESSOUS DE 32 F LE R CHAUFFEUR DOIT TRE ALLUM EN PERMANENCE 3...

Page 51: ...e sur la partie sup rieure de la source d alimentation principale 10 Laissez l air sortir du r servoir de filtrage pendant peu pr s une minute ou jusqu ce que de l eau coule des raccords Tournez le ra...

Page 52: ...rant fonctionne testez le DDFT en suivant les instructions fournies dans la section Entretien Si le DDFT fonctionne normalement et que la source d alimentation principale ne fonctionne pas c est elle...

Page 53: ...Red marrez le DDFT Communiquez avec le service client le s il ne red marre pas R glez la temp rature sur un niveau plus lev Nettoyez ou remplacez le filtre Ajoutez de l eau jusqu atteindre la hauteur...

Page 54: ...re air 2 Trouvez l emplacement de la valve de gonflage Installez avec pr caution la chambre air en PVC l int rieur de la toile de rev tement dans l emplacement pr vu cet effet 3 Alignez la valve de la...

Page 55: ...ion is enclosed in this manual Please read these materials prior to assembling and using this product Keep for future reference Contact us TOLL FREE 888 814 8833 USA 8am 5pm CST Monday Friday SpaManua...

Reviews: