Sportsman GEN85KIDF Instruction Manual Download Page 21

Item # GEN85KIDF Portable Dual Fuel Invertor Generator  


21 

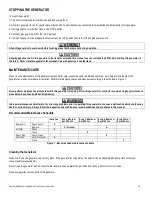
Checking the Oil Level 

 
It is important to check the oil level in the engine crankcase before each use to ensure that there is a sufficient quantity. 
 
To check the oil level: 
1. Verify that this generator is shut down and on a level surface. 

2. Unscrew the oil filler/dipstick cap from the engine. 

3. With a dry cloth, wipe the oil off of the dipstick that is located on the inside of the cap. 

4. Insert the dipstick as if replacing the cap and then remove again. There should be oil on the dipstick. If there is no oil on the dipstick, or oil is 

visible only at the very end of the dipstick, add oil until the engine crankcase is filled. 

5. Confirm that the oil filler/dipstick cap is properly in place when finished verifying the oil level.


Changing/Adding Oil 

 
The oil level in this generator should be checked before each use. When the oil level is low, add oil until the level is sufficient to operate this 
generator. (See Figure 8B) 

 
The break-in oil should be changed after the first 5 hours of operation, then the oil should be changed following the first 20 hours of operation. 
Subsequently, the oil should be changed every 6 months, or for every 100 hours of use, or when the oil has become contaminated with water 
and/or dirt. 
 

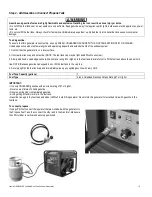
To drain the oil from this generator: 
1. Place a bucket underneath this generator to catch oil as it drains. 

2. Unscrew the oil drain plug located on the crankcase underneath the oil filler/dipstick cap using 17 mm hex wrench. Figure 8A 

3. Allow all the oil to drain from this generator. 

4. Replace the oil drain plug and tighten using 17 mm hex wrench.


NOTE: Never dispose of used motor oil in the trash, down a drain or on the ground. Put oil in a sealed container and contact your local 
recycling center or auto garage to arrange oil disposal. 


THIS GENERATOR REQUIRES AT LEAST 33.8 OUNCES OF OIL (SAE10W-30) TO RUN.  
 

ADD OIL UNTIL IT IS ALMOST OVERFLOWING. THE LOW-OIL SENSOR IS VERY SENSITIVE AND THE ENGINE 
WILL NOT RUN IF THE OIL IS LOW. START WITH 33.8 OUNCES, THEN ADD MORE UNTIL ALMOST 

OVERFLOWING. 

 
TROUBLESHOOTING: IF THE GENERATOR WILL NOT START, DOUBLE CHECK THAT THE OIL LEVEL IS 

COMPLETELY FULL AND ALMOST OVERFLOWING. 


Figure 8B – Adding oil


Figure 8A – Use 17mm hex wrench to REMOVE bolt and drain oil 

Summary of Contents for GEN85KIDF

Page 1: ...website http www buffalotools com or call customer service at 1 866 460 9436 Monday Friday 8 AM 4 PM Central Time A copy of the sales receipt is required IF THERE IS ANY QUESTION ABOUT A CONDITION BE...

Page 2: ...not for use with gasoline ethanol blends with over 15 ethanol Do not use E85 fuel 3 600 RPM USB Port Battery Cable Included Used for Electric Start Battery Power Pack sold separately Mobility Kit Not...

Page 3: ...il Level 13 Step 2 Verify Gas Level 13 Step 3 Ground The Generator 14 STARTING THE GENERATOR 15 USING THE GENERATOR 16 AC Usage 16 DC Usage 17 USB Usage 17 INVERTER GENERATOR 18 BREAK IN PERIOD 18 STO...

Page 4: ...ian to come to the owner to make the warranty repair or pay for the repair to be made at a local non authorized service center The provisions of this paragraph apply only for the contiguous states exc...

Page 5: ...is generator to provide power for emergency medical equipment or life support devices Carbon Monoxide Gas When in operation the exhaust from this generator contains poisonous carbon monoxide gas Carbo...

Page 6: ...l tank cap Loosen the cap slowly to relieve pressure in the fuel tank Avoid spilling fuel Do not fill the fuel tank above the upper limit line Gasoline may expand during operation Do not fill to the t...

Page 7: ...Item GEN85KIDF Portable Dual Fuel Invertor Generator 7...

Page 8: ...Item GEN85KIDF Portable Dual Fuel Invertor Generator 8 In addition to the previously described safety information familiarize yourself with all safety and hazard placards on this generator...

Page 9: ...included STOP If there are missing items call 1 866 460 9436 Monday Friday 8 AM 4 PM Central Time for customer service Item List DC connector wires for charging 12 Volt automotive type batteries Spar...

Page 10: ...lt DC Outlet 11 DC Circuit Protector 12 USB Port 13 Alert Indicator 14 Engine Power Switch 15 Economy Switch 16 LP gas inlet 17 Carburetor Choke Lever 18 Power Supply Port 19 120 240 Volt RV Outlet 20...

Page 11: ...OST OVERFLOWING TROUBLESHOOTING IF THE GENERATOR WILL NOT START DOUBLE CHECK THAT THE OIL LEVEL IS COMPLETELY FULL AND ALMOST OVERFLOWING This generator requires engine oil to function Engine oil is a...

Page 12: ...el tank cap may be tight and difficult to unscrew 3 Slowly add fresh unleaded gasoline with an octane rating 87 or higher to the fuel tank Be careful not to fill the fuel tank above the upper limit li...

Page 13: ...crankcase before each use to ensure that there is sufficient quantity 1 Verify that this generator is on a level surface 2 Unscrew the oil filler dipstick cap from the engine 3 With a dry cloth wipe...

Page 14: ...th an octane rating of 87 or higher Never use old and or contaminated gasoline Never use a mixture of oil and gasoline Avoid getting dirt and or water in the fuel tank Never store generator for extend...

Page 15: ...engine 2 Confirm that this generator is properly grounded See Ground the Generator section of this manual 3A If using gasoline select GAS LP switch to GAS then turn the fuel switch to the on position...

Page 16: ...l have a total wattage less than or equal to the rated wattage for the generator This generator can run at its surge wattage capacity for only a short time Connect electrical devices requiring a rated...

Page 17: ...r several minutes after it has been started before plugging in a USB cable for charging Engine Overload Indicator Light If the engine overload indicator light comes on the generator s wattage amperage...

Page 18: ...an avoid small engine problems if you follow the break in procedure below Because the pistons and rings wear into the engine s walls small pieces of metal can flake off into the oil It s important to...

Page 19: ...200 NR 500 300 200 125 7 5 900 1800 NR 350 200 125 100 10 1200 2400 NR 250 150 100 50 15 1800 3600 NR 150 100 65 NR 20 2400 4800 175 125 75 50 NR 25 3000 6000 150 100 60 NR NR 30 3600 7200 125 65 NR N...

Page 20: ...reduce air pollution Perform maintenance checks and procedures according to the schedule in Figure 7 Never perform maintenance procedures while this generator is running Allow this generator to cool...

Page 21: ...urs of operation then the oil should be changed following the first 20 hours of operation Subsequently the oil should be changed every 6 months or for every 100 hours of use or when the oil has become...

Page 22: ...g If it is cracked and or chipped discard and install a new spark plug F6RTC spark plug such as NGK BPR6ES is recommended 4 Measure the spark plug electrode gap with a gauge The gap should be 0 031 0...

Page 23: ...Care section Turn the fuel valve to the off position Disconnect the spark plug Do not obstruct any ventilation openings Do not drop or strike this generator while moving it Store this generator in a c...

Page 24: ...off Pull the fuel line off The carburetor will slide off Turn the carburetor upside down and remove the 10mm bolt on the bottom of the bowl Remove the pin that holds the float on Pull the float up Ins...

Page 25: ...ng Remove two screws on AVR from back of generator Turn it around to see the backside Adjust the small brass screw with a flat jewelers screwdriver Have a voltmeter attached to determine the output 12...

Page 26: ...Item GEN85KIDF Portable Dual Fuel Invertor Generator 26 PARTS DIAGRAM...

Page 27: ...cket 1 15 B07020006047 Washer 6 4 50 B02210401227 Screw M4 25 8 16 B01310602067 Flange Bolt M6 20 4 51 B05210401607 Screw ST4 16 3 17 21010412900001 Oil Overflow Valve 1 52 22030410900000 Switch 1 18...

Page 28: ...Item GEN85KIDF Portable Dual Fuel Invertor Generator 28 ENGINE PARTS DIAGRAM...

Page 29: ...0133060166B Flange Bolt M6 16 2 66 27030129002004 Carburetor Assy 1 22 24010423003000 Ignition Coil 1 67 37020128001000 Carburetor Gasket 1 23 B04281015026 Flange Nut M10 1 5 1 68 37010128001000 Carbu...

Page 30: ...Item GEN85KIDF Portable Dual Fuel Invertor Generator 30 WIRING DIAGRAM...

Page 31: ...onsible for presenting your small off road engine to a Buffalo Corp distribution center or service center as soon as the problem exists The warranty repairs shall be completed in a reasonable amount o...

Page 32: ...ffalo Corp will not be liable to warrant failures of warranted parts caused by the use of a non exempted add on or modified part 11 The manufacturer issuing the warranty shall provide any documents th...

Reviews: