background image

Customer Service 1-888-707-1880 


  Dyaco Canada Inc. 2017 

Email: [email protected] 

32

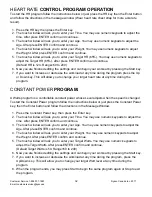
HEART RATE 

CONTROL PROGRAM OPERATION


To start the HR program follow the instructions below or just press the HR key then the Enter button 
and follow the directions in the message window (Wear heart rate chest strap for more accurate 
result). 
 

1.  Press the HR key then press the Enter key.   
2.  The touch window will ask you to enter your Time. You may use numeric keypads to adjust the 

time. After press ENTER confirm and continue. 

3.  The touch window will ask you to enter your Age. You may use numeric keypads to adjust the 

Age. After press ENTER confirm and continue. 

4.  The touch window will ask you to enter your Weight. You may use numeric keypads to adjust 

the Weight. After press ENTER confirm and continue. 

5.  The touch window will ask you to enter your Target HR (65%). You may use numeric keypads to 

adjust the Target HR (65%), after press ENTER confirm and continue. 


(Default HR is 124. Range=60 to 200) 

6.  Now you are finished editing the settings and can begin your workout by pressing the Start key. 
7.  If you want to increase or decrease the workload at any time during the program press the Up 

or Down key. This will allow you to change your target heart rate at any time during the 
program. 


CONSTANT POWER

 PROGRAM: 

 
A Watts program is a controllable constant power whose Level adjusts when the speed is changed. 
To start the Constant Power program follow the instructions below or just press the Constant Power 
key, then the Enter button and follow the directions in the Message Window.   
 

1.  Press the Constant Power key, then press the Enter key.   
2.  The touch window will ask you to enter your Time. You may use numeric keypads to adjust the 

time. After press ENTER confirm and continue. 

3.  The touch window will ask you to enter your Age. You may use numeric keypads to adjust the 

Age. After press ENTER confirm and continue. 

4.  The touch window will ask you to enter your Weight. You may use numeric keypads to adjust 

the Weight. After press ENTER confirm and continue. 

5.  The touch window will ask you to enter your Target Watts. You may use numeric keypads to 

adjust the Target Watts. After press ENTER confirm and continue. 
(Default Target Watts is 50. Range=50 to 200) 

6.  Now you are finished editing the settings and can begin your workout by pressing the Start key.   
7.  If you want to increase or decrease the workload at any time during the program, press the 

Up/Down key. This will allow you to change your target Watt level at any time during the 
program.   

8.  When the program ends, you may press Start to begin the same program again or Stop to exit 

the program.   


Summary of Contents for 16611608000

Page 1: ...OWNER S MANUAL MODEL NO 16611608000 Assembly Operation Trouble Shooting Parts Warranty CAUTION You must read and understand this owner s manual before operating unit...

Page 2: ...structions 8 Features 12 Operation of Your Elliptical 13 Maintenance 33 Exploded View Diagram 34 Parts List 35 Training Guidelines 38 Stretching 42 Manufacturer s Limited Warranty 44 Thank you for pur...

Page 3: ...ur experience more informed and any difficulties easier to remedy Please take a moment at this time to record the name of the dealer their telephone number and the date of purchase below to make any f...

Page 4: ...l may result Keep children away from the elliptical There are obvious pinch points and other caution areas that can cause harm Keep hands away from all moving parts Never operate the elliptical if any...

Page 5: ...plugged into an appropriate outlet that is properly installed and grounded in accordance with all local codes and ordinances DANGER Improper connection of the equipment grounding conductor can result...

Page 6: ...support when getting on or off the elliptical Make sure there is at least one meter of clearance between the elliptical and any fixed object The safety level of this elliptical can only be ensured if...

Page 7: ...ket Bolt 4 pcs 130 3 8 Flat Washer 4 pcs 129 3 8 Curved Washer 6 pcs 128 3 8 x 3 3 4 Button Head Socket Bolt 6 pcs 106 5 16 Flat Washer 2 pcs 126 5 16 x 15mm Socket Head Cap Bolt 2 pcs 97 M5 x 12mm Ph...

Page 8: ...cs 135 3 8 x 3 4 Hex Head Bolt W Loctite 2 pcs 136 M10 Nylon Nut 2 pcs 137 M10 x 14mm Shoulder Bolt 2 pcs 138 3 8 Flat Washer 2 pcs 134 3 5 x 12mm Sheet Metal Screw 14 pcs 97 M5 x 12mm Phillips Head S...

Page 9: ...the tube and 4 BOLTS 128 and 4 CURVED WASHERS 129 from the front of the tube Make sure all 6 BOLTS are tightened securely Install the CENTER ALUMINUM RAIL 89 with 2 BOLTS 128 and 2 CURVED WASHERS 129...

Page 10: ...CREWS 131 Slide the PEDAL ARM assembly 5 onto the crank axle of the main body Be careful not to force it because damage to the bearings can occur Secure with a BOLT 126 and WASHER 106 Install the COVE...

Page 11: ...the mainframe then locate the CONSOLE MAST 11 on its position and tighten three screws Now the last SCREW 132 must be with FLAT WASHER 107 to tighten to the screw hole Mount the CONSOLE MAST COVERS 8...

Page 12: ...e MAST with 4 SCREWS 97 Install 4 FRONT REAR HANDLEBAR COVERS 77 76 78 79 with 6 SCREWS 134 Install 4 CONNECTING ARM COVERS 74X2 75X2 to the ends of the PEDAL ARMS with 4 SCREWS 97 and 4 SCREWS 134 Be...

Page 13: ...ntified the inherent problem in elliptical designs and developed a solution to solve the problem What we found is that when you use an elliptical you tend to push outward during the power stroke and n...

Page 14: ...turned on the screen will show the initial image and then enter the ready mode which is the beginning of the console operation First page for you to operate by touching the icons Quick operating funct...

Page 15: ...ce the console will ask you if you want to end the workout If STOP button is pressed the third time the console will display your workout summary Heart Rate Feature The Pulse Heart Rate on the screen...

Page 16: ...he first selection When you press Language button on the first page HOME it enters the menu with all languages selection There are 12 languages to choose Touch the desired language button to set and t...

Page 17: ...e volume to change the sound volume If you want to be quiet touch Mute button Touch Max Screen to switch to full screen When you want to resume the original screen display just touch the image and the...

Page 18: ...e exercise When you want to pause just press Home button at left top or press Stop button once and the pause window will show up If you want to stop you can choose to end the program or press Stop but...

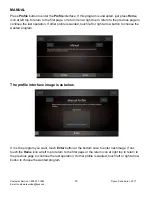
Page 19: ...o continue the last operation If other profile is wanted touch left or right arrow button to choose the wanted program The profile interface image is as below If it is the program you want touch Enter...

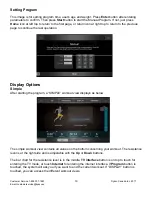
Page 20: ...e last operation Display Options Simple After starting the program a SIMPLE workout view displays as below The simple workout view contains all values on the bottom concerning your workout The resista...

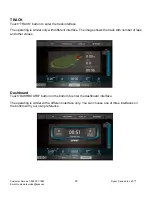
Page 21: ...face The operating is similar only with different interface The image shows the track with number of laps and other values Dashboard Touch DASHBOARD button on the bottom to enter the dashboard interfa...

Page 22: ...dyaco ca 21 Stop Button When pressing the STOP button the third time it enters the summary image On the summary image all accumulating values concerning the workout are displayed You can touch the Hom...

Page 23: ...in with only settings you have modified at that point The touch Age window will now be darken a value indicating your Age Entering the correct Age will affect the Heart rate bar graph accuracy and als...

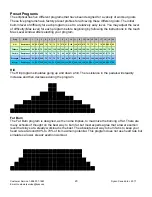
Page 24: ...100 100 100 100 100 100 100 100 100 100 100 100 100 100 75 50 Cardio Resistance 50 62 5 62 5 70 70 75 75 80 80 87 5 95 95 100 100 100 100 100 87 5 75 50 Strength Resistance 50 62 5 62 5 70 70 75 75 8...

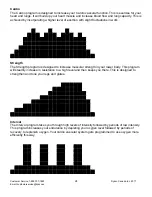
Page 25: ...ons in work Strength The Strength program is designed to increase muscular strength in your lower body This program will steadily increase in resistance to a high level and then keeps you there This i...

Page 26: ...re determined fixed work levels that are based on your heart rate readings as the test progresses The test will take anywhere between 6 to 15 minutes to complete depending on your level of fitness The...

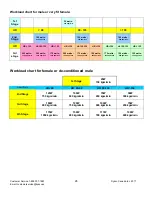
Page 27: ...atts 1350 kgm min 200 watts 1200 kgm min 175 watts 1050 kgm min 200 watts 1200 kgm min 175 watts 1050 kgm min 150 watts 900 kgm min 175 watts 1050 kgm min 150 watts 900 kgm min 125 watts 750 kgm min W...

Page 28: ...ors or wear a heart rate chest strap transmitter You must maintain a steady 50 RPM pedal speed If your pedal speed drops below 48 RPM or goes above 52 RPM the console will emit a steady beeping sound...

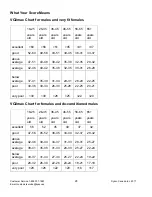
Page 29: ...46 40 42 35 38 32 35 30 31 26 28 below average 37 41 35 39 31 34 29 31 26 29 22 25 poor 30 36 30 34 26 30 25 28 22 25 20 21 very poor 30 30 26 25 22 20 VO2max Chart for females and de conditioned male...

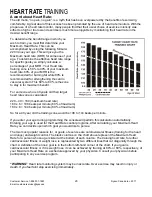
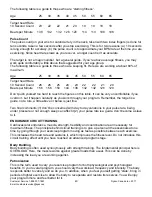
Page 30: ...old their target heart rate zone is calculated 220 40 180 maximum heart rate 180 x 6 108 beats per minute 60 of maximum 180 x 8 144 beats per minute 80 of maximum So for a 40 year old the training zon...

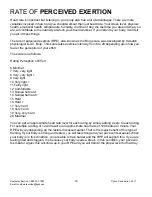
Page 31: ...The scale is as follows Rating Perception of Effort 6 Minimal 7 Very very light 8 Very very light 9 Very light 10 Very light 11 Fairly light 12 Comfortable 13 Somewhat hard 14 Somewhat hard 15 Hard 16...

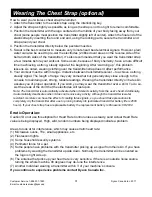
Page 32: ...e readings Wearing the transmitter directly on bare skin assures you of proper operation If you wish you may wear the transmitter over a shirt To do so wet the areas of the shirt that the electrodes w...

Page 33: ...ge your target heart rate at any time during the program CONSTANT POWER PROGRAM A Watts program is a controllable constant power whose Level adjusts when the speed is changed To start the Constant Pow...

Page 34: ...t build up on the rear rails and polyurethane wheels are also a source of noise Noise from build up on the rails can cause a thumping sound that you would swear is coming from inside the main body of...

Page 35: ...Customer Service 1 888 707 1880 Dyaco Canada Inc 2017 Email customerservice dyaco ca 34 EXPLODED VIEW DIAGRAM...

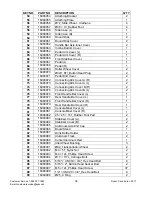
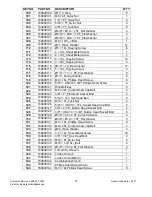
Page 36: ...16080029 Flywheel 1 30 16080030 15 7T_Magnet 1 31 16080031 Console Assembly 1 32 16080032 1600m m_CSAFE Connecting Wire 1 33 16080033 1600m m_TV Signal Cable 1 34 16080034 1600m m_network W Cable 1 3...

Page 37: ...er A L 2 74 16080074 Connecting Arm Cover B R 2 75 16080075 Connecting Arm Cover B L 2 76 16080076 Front Handle Bar Cover L 1 77 16080077 Rear Handle Bar Cover L 1 78 16080078 Front Handle Bar Cover R...

Page 38: ...ps Head Screw 6 120 160800120 5 16 UNC18 5 8 _Phillips Head Screw 2 121 160800121 Woodruff Key 2 122 160800122 M8 30L_Socket Head Cap Bolt 2 123 160800123 3 8 2 _Flat Head Socket Bolt 4 124 160800124...

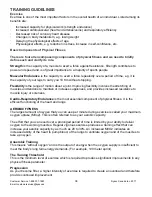
Page 39: ...olves the stretching of muscles and tendons to maintain or increase suppleness and provides increased resistance to muscle injury or soreness Cardio Respiratory Endurance is the most essential compone...

Page 40: ...nvolved later Stretching should be included in both your warm up and cool down and should be performed after 3 5 minutes of low intensity aerobic activity or callisthenic type exercise Warm Down or Co...

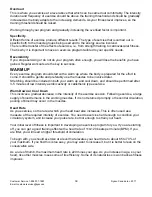
Page 41: ...ur program Remember the target is a guide not a rule a little above or below is just fine Two final comments 1 don t be concerned with day to day variations in your pulse rate being under pressure or...

Page 42: ...o cool Excessive clothing that causes you to perspire more than you normally would while exercising gives you no advantage The extra weight you lose is body fluid and will be replaced with the next gl...

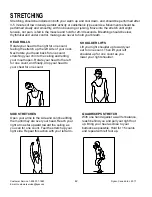
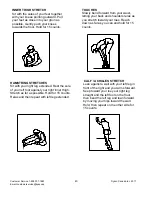
Page 43: ...ide of your neck Next rotate your head back for one count stretching your chin to the ceiling and letting your mouth open Rotate your head to the left for one count and finally drop your head to your...

Page 44: ...rd Pull your feet as close into your groin as possible Gently push your knees towards the floor Hold for 15 counts CALF ACHILLES STRETCH Lean against a wall with your left leg in front of the right an...

Page 45: ...first 24 months from date of purchase All other obligations or liabilities including liability for consequential damages are hereby excluded REPAIR PARTS AND SERVICE All of the parts for the elliptica...

Page 46: ...ation about our other brands and products manufactured and distributed by Dyaco Canada Inc www spiritfitnesscanada ca www dyaco ca www spiritfitnesscanada ca www dyaco ca www solefitness ca www dyaco...

Reviews: