


Getting Started
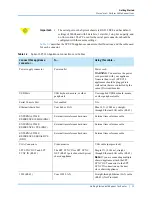
Procedure 8: Set the Chassis IP Address
42
|
Getting Started with Spirent TestCenter
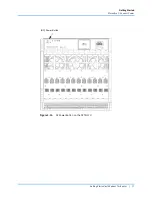
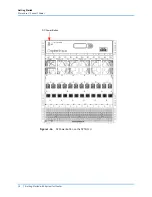
Setting the IP Address using the SPT-N4U, SPT-N11U, or SPT-N12U Direct Console
Connection
To set the IP address using the SPT-N4U, SPT-N11U, or SPT-N12U direct console
connection:
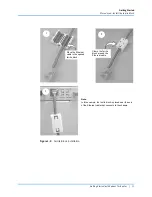
1
Connect a video monitor and USB keyboard and mouse to the chassis.
The chassis prompt appears:
login:
Password:
2
Access the chassis by logging in. Log in as
admin
to change chassis parameters (IP
address, gateway, netmask, etc.).
a
Type
admin
<enter>.
b
Type
spt_admin
<enter>
3
Enter a chassis command.
•
To view the chassis IP address, type the command
ipaddress
<no parameter>
•
To set the chassis IP address, type the command
ipaddress
<new ip address>
When log in is complete, you see the command prompt
admin>
Note:
At this time, you should change the netmask and default gateway if your controller
PC and chassis will be on different subnets. Refer to
“Setting the Netmask and Gateway
Values (all chassis)” on page 46
.
4
Apply and save the settings.
Enter the Spirent TestCenter command
activate
.
The settings will be applied and the controller will automatically reboot.
Note:
It may take up to several minutes for the new IP address to take effect after the
activate
command is issued.


