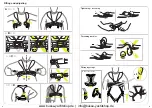
Green
retaining clip
2.
Unscrew and remove the CO2 gas cylinder
from the inflator and inspect its piercing
cap. If it has been pierced, replace it! (Fig.4).
3.
Make sure the manual lever is in the up and
ready position and insert the green retaining
clip if not already in place. Install the CO2
cylinder into the inflator by screwing it until
hand-tight (Fig.5).
4.
Check that the oral-inflation tube cap is
in stowed position B (Fig.6).
A
Dust cap in deflate position
B
Dust cap in stowed position
5.
Ensure the cord runs freely from the firing
head to the eyelet in the cover. Re-fasten the
zipper. If everything conforms to the preceding
instructions, your lifejacket is ready for use.
Re-run the zip back around the cover
to close (Fig.7).
Fig.4
Fig.5
Fig.6
Fig.7
14
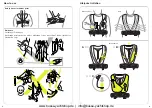
A
B
Auto
Know your lifejacket
Fig.2
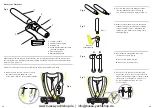
Check the components and how to assemble the inflator by following these steps:
1.
Break open zip at yelow section to expose
the inflator in the left-hand side of the
pouch (Fig.3). N.B. Do not run zip backwards.
Fig.3
13
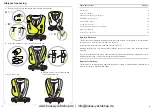
1
33 g CO
2
cylinder
2
Automatic firing capsule
3
Retaining clip
4
United Moulder Mk5i automatic
operating mechanism
5
Valve retaining nut
6
Manual firing lanyard
1
3
5
4
2
6
Examine the automatic capsule. Ensure that the cap is screwed hand tight onto the inflator. If the
green retaining clip is missing the automatic capsule mechanism may have been fired and must be
replaced. (Fig.3, page 13).
www.busse-yachtshop.de | [email protected]


