background image

PVR

EPG

Press the 

EPG

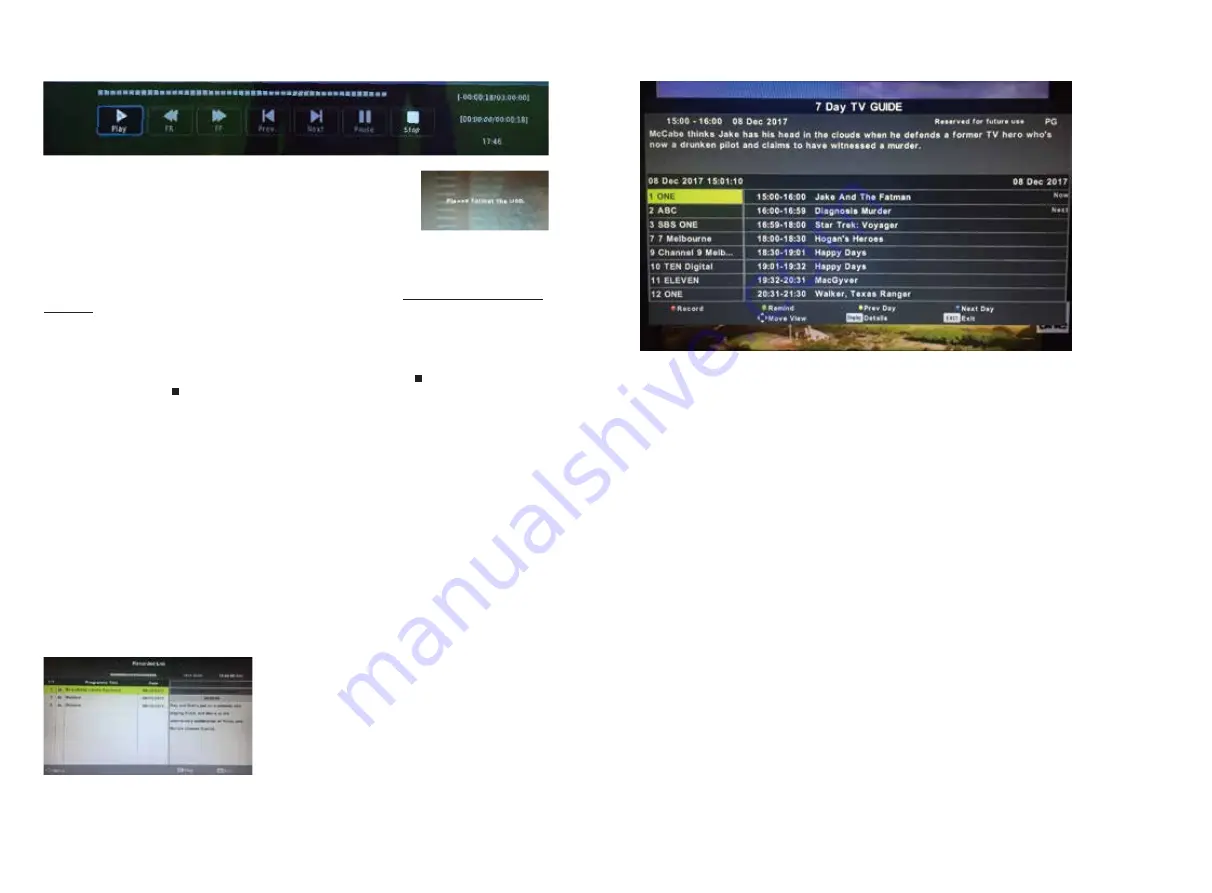
 button on the Remote control to access the Electronic Program Guide 

(DTV only)

Use the 

͌

/

͊

 keys on the remote to select a channel. The current programme on that channel 

will be displayed in the box on the right. You can then use the 

͌

/

͊

 keys to scroll up or down 

to select a programme. Note programmes will be displayed until midnight of the current day.

You need to move to the next day by pressing the blue button on the remote to view 

after midnight and for the next day. To view programmes from the previous day, press the 

yellow button on the remote.

Record

Press the 

RED

 button on the remote control to enter the Recording sub-menu. You can set the 

channel, start and end times of the program you want to record using the 

ŻŹD

nd

͌

/

͊


buttons. A USB drive must be inserted in the TV to record. For more information on recording, 

please see

more information on the PVR function.

Info

Press the 

GREEN

 button on the remote to display detailed information about the program.

Schedule

Press the

YELLOW

 button on the remote to display the Schedule List to display the

programmes you 

have scheduled to record or be reminded of.

Remind

Press the 

BLUE

 button on the remote control to set a reminder for a program you would like 

to watch at a later date. Note this reminder which consists of a popup on the screen will only be 

displayed if the TV is on and the source is DTV.

NOTE 1: 

If you select a channel in the EPG and the available programmes are not displayed, 

briefly exit the EPG and quickly tune in to the channel. This will ensure the programme is 

downloaded for that channel.

NOTE 2: 

The EPG for a particular channel will only work if you can tune in to the Channel 

based on your location and TV signal area.

18

19

RECORD Live TV

Ensure you have a correctly formatted USB drive inserted in the TV 

before recording. If the USB drive is not formatted properly, the TV 

will display a message advising that the USB drive needs to be 

formatted. To do this, go to the Option Menu, select PVR File 

System and follow the steps in the PVR File System sub-menu to 

format the USB Drive. Please ensure that you do not have any 

valuable data on the drive before you do this.

When watching TV, you can press the 

 Record button on the remote to start recording a 

programme. The Power light will also start flashing red/green

to confirm that recording is in 

progress. The TV will also display the recording control menu (shown above) when you 

commence recording. 

NOTE: 

If you want to display this menu at any time when recording, simply press the 

OK


button on the remote.

Stop Recording

Press 

OK

 on the remote to display the Record Menu then press the     button to stop recording. 

You can also press the     button twice to stop recording (the first press will bring up the 

Record Menu). The TV will then display a confirmation message to stop recording. Press 

Ż

on the remote to confirm. When the storage space of the USB drive is full, the TV will display a 

warning message then stop recording and return to normal broadcast Television.

Time Shift/Pause Live TV 

While watching DTV, press the “T.

SHIFT” button on the remote control to 

S

ause 

O

ive

TV plus bring up the time shift control menu. The time shift control menu is similar to the 

Record menu and you can perform various functions such as exit time shift, or fast forward

to catch up to the live program etc.

Pressing the “T.SHIFT” button again will continue the live program from where you 
 paused it (time shift).

NOTE: 

To display the Time Shift menu when the TV is either paused or on Time Shift 

playback, press the “

OK

” button on the remote control.

NOTE. The PVR function is only available for the TV channel that is being viewed. If you 

change the channel, the PVR function will stop. You cannot switch to another Source 

while recording. If you change the source, the recording will also be stopped.

To view programmes already recorded on the USB or view upcoming  reminders, press the 

R. List  button on the remote.

Summary of Contents for 8 Series

Page 1: ...Series 8 18 5 21 5 23 8 ...

Page 2: ...V LED TV LED TV The Manual Applies to below models S8LED185 S8LED185S S8LED215 S8LED215S S8LED238 S8LED238S Note The Smart TV OPTION models S8LED185S S8LED215S and S8LED238S include the HAKO Android TV box inside Bluetooth functions and Smart TV functions are available for these Smart Optioned models only The Smart TV box are available separately if you wish to option up your Non Smart TV at a lat...

Page 3: ... Time Menu Option Menu Lock Menu PVR EPG Photo Menu Music Menu Movie Menu Text Menu SMART TV SMART TV HAKO androidtv box connect Technical Specifications Remote Control System Connection Google Account Setup APPLE IOS Setup Android Setup Screen Shot Guide Home Menu Setting Menu DVD 7URXEOHVKRRWLQJ PSRUWDQW 6DIHW QVWUXFWLRQV DUUDQW QIRUPDWLRQ ...

Page 4: ...he TV to the wall please see Preparing the LED for Wall Mounting below for additional information Avoid installing the product in the kitchen bathroom or other places with high humidity The HDTV can either be kept on the stand or mounted to the wall for viewing If you choose to mount the HDTV to the wall please follow the instructions below Unplug all the cables and cords from your LED TV Place th...

Page 5: ... ĐŚŽŽƐĞ Ă ĚŝīĞƌĞŶƚ ĂŶŐůĞ s Ϳ E h WƌĞƐƐ ƚŽ ĐŚŽŽƐĞ Ă ĚŝīĞƌĞŶƚ ůĂŶŐƵĂŐĞ s Ϳ s dhW WƌĞƐƐ ƚŽ ĚŝƐƉůĂLJ ƚŚĞ s ƐĞƚƵƉ ŵĞŶƵ s D Eh WƌĞƐƐ ƚŽ ƌĞƚƵƌŶ ďĂĐŬ ƚŽ ƉƌĞǀŝŽƵƐ s ŵĞŶƵ ZĞĨĞƌ ƚŽ ƚŚĞ ƐĐƌĞĞŶ ƚŽ ƐĞĞ ŝƚƐ ĨƵŶĐƟŽŶ d yd WƌĞƐƐ ƚŽ ƚƵƌŶ ƚŚĞ dĞůĞƚĞdžƚ ŽŶ Žƌ Žī E y WƌĞƐƐ ƚŽ ƌĞƚƵƌŶ ƚŽ ƚŚĞ ŝŶĚĞdž ŝŶŝƟĂů ƉĂŐĞ Z s ZĞǀĞĂů Žƌ ŚŝĚĞ ƚŚĞ ŚŝĚĚĞŶ ǁŽƌĚƐ ŚĂŶŐĞ ƚŚĞ ƐŝnjĞ ŽĨ ĚŝƐƉůĂLJ ŝŶ ƚĞůĞƚĞdžƚ ŵŽĚĞ K WƌĞƐƐ ƚŽ ŚŽůĚ ŽŶ Žī ƚŚĞ ĐƵƌƌĞŶƚ ƉĂ...

Page 6: ...s menu and press EXIT button to exit the entire menu MAIN MENU Channel Menu When DTV is selected as the source Channel Picture Sound Time Option Lock Auto Tuning Press the buttons to select Auto Tuning After pressing the OK button the auto tuning interface will be displayed Auto Tuning can also be activated by pressing the AUTO TUNE button on the remote control while in DTV mode NOTE You will need...

Page 7: ...om the program list Red Press the selected channel this channel Blue button to skip the will be skipped when using channel up down on the remote Press the Fav button on the remote to add or remove the channel from your favourite list Signal Information This displays the current signal information of the TV Signal This option can be useful to help you position your RV s antenna 5V antenna power 3UH...

Page 8: ...Press OK to save the channel in the new position Skip Select a channel the press to skip 10 11 Picture Mode PresV ź Ÿ Euttons to select Picture mode and go into next interface by pressing the button Then you can change picture mode to standard mild dynamic personal using thH ź Ÿ Euttons Contrast Brightness Colour Tint Sharpness Note that you can only adjust the Contrast Brightness Colour Tint Shar...

Page 9: ...r It can also help reduce the volume of loud TV ads compared to TV shows The result depends greatly on the A V source so this function is set default to off To turn AVL on presV ź Ÿ Euttons to select Auto Volume and then press buttons to turn AVL on off Ż Ź Surround Sound This mode is ideal for movies and simulates multi speaker surround sound output Sound Menu cont d AD Switch SPDIF Mode AD Volum...

Page 10: ...me This setting allows you to set a specific time to turn the TV off Once you enter the menu this function can be set to operate once only Daily Mon Fri Mon Sat Sat Sun or Sunday only On Time As with the Off Time function this setting allows you to select a time to turn the TV on In addition to the day settings you can also select the source you would like selected when the TV turns on and your de...

Page 11: ... just DVD Default Source Default Source allows you to select which input source is selected when the TV is first turned on DTV Channel Type This allows you to set the default DTV channel when the TV Ls turned on Max Volume Max Volume limits the maximum volume that the TV can be turned up to Default Volume The Default Volume setting allows you to set the desired volume level for when the TV is turn...

Page 12: ...y the TV will display a message advising that the USB drive needs to be formatted To do this go to the Option Menu select PVR File System and follow the steps in the PVR File System sub menu to format the USB Drive Please ensure that you do not have any valuable data on the drive before you do this When watching TV you can press the Record button on the remote to start recording a programme The Po...

Page 13: ...he button to view the next image A menu with further options will also be displayed where you an use the arrow key to make further selections 4 Press the Exit button to exit 1 Select MUSIC with the buttons and then press the OK button to enter sub_menu Ż Ź 2 Select C then press the OK button to select the USB drive 3 Using the arrow keys select a specific song and press the button to play press th...

Page 14: ...enu Ż Ź 2 Select C then press the OK button to select the USB drive 3 Select the specific file and press the button to play press the button to play the previous file press the button to play the next file 4 Press the RED button to delete the selected file 5 Press the Exit button to exit 3M 3M 3M Velcro HAKO Android TV box connect ...

Page 15: ... Connect the USB cable to the TV box and the TV USB port Step3 Fix the TV box on the back of the TV with 3M Velcro using 3M Velcro to attach on the back of the TV and the front of the TV box Indicator Light ...

Page 16: ...ick Create account 3 Enter your name 4 Click Use my current email instead 5 Enter your current email address 6 Click Next 7 Verify your email address with the code sent to your existing email address 8 Click Verify Protect your account with recovery info If you forget your password or someone is using your account without your permission updated recovery info makes it much more likely you ll get y...

Page 17: ...gn up process Set up with Quick Start 1 When your TV says Quickly set up your TV with your Android phone use your remote to choose Continue or Yes 2 On your Android phone open the Google app 3 Type or say set up my device 4 Follow the instructions on your phone until you get a code Enter the code on your TV 5 On your phone tap the name of your TV when it shows up 6 To finish setup follow the instr...

Page 18: ...you selected Skip to sign in manually sign in per the on screen prompts Enter your credentials Read and accept terms and conditions Choose your Location Services preference Choose your Android Diagnostic information preference Continue Read Services and your privacy and select Continue ...

Page 19: ...nce Select your Recommended Apps preference These can be installed at a later date if preferred Follow on screen prompts Follow on screen prompts Follow on screen prompts Follow on screen prompts Welcome to the home page Here you can access the APP Store or browse your installed APPs ...

Page 20: ...apps and define permissions Device Preferences In this menu you can make general settings for the Android operating system System Update In this menu you determine whether updates should be carried out automatically or check whether an update is available TV Settings In this menu you can set the display HDMI CEC Audio Output and picture setting Remote Accessories In this menu you can pair an exter...

Page 21: ... System Select the color type as NTSC PAL AUTO TV type D There are four mode to choose STEREO MONO L MONO R MIX MONO 3 is to continue menu is displayed scroll through select The desired password The 36 37 ...

Page 22: ...rranty A Dead Pixel is a dark spot with no colour mostly seen on a White screen 2 or more Bright pixels Stuck pixels within the first 14days 4 or more Bright pixels Stuck pixels will warrant a replacement TV in the remainder of the 12 Ponths warranty A Bright Pixel Stuck pixel is a Bright spot of either White Red Green Blue colour mostly seen on a dark screen ...

Page 23: ...ntenance schedules 3 2 The claim listed in clause 3 1 may be made in person or the claim may be sent to the address listed on this form including the particulars required under clauses 3 1 i and 3 1 ii 3 3 The appropriate form for making a claim for warranty is as attached 4 DURATION OF WARRANTY 4 1 This warranty will cease i where the Goods are purchased already fitted in or as a component of a v...

Page 24: ...ided Receipt enclosed tick box Yes No Receipt No Description of defects Give as much detail as possible Use a separate page if required Date of purchase services provided I hereby declare that the information provided above is true and correct and to the best of my knowledge and belief and I have complied with all the conditions of the warranty Signed Name please print Dated Please note the issue ...

Reviews: