

1
5
auf Pos. „I“
*
DE
1.
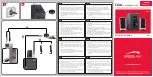
Schließen Sie das Stromkabel des Subwoofers an eine Steckdose (230V, 50-60 Hz ~) an. *
2.
Verbinden Sie den 3,5 mm Klinkenstecker des Subwoofers mit dem freien Anschluss der
Fernbedienung.
3.
Verbinden Sie den grünen Stecker der Fernbedienung mit dem Lautsprecheranschluss des
Computers und den schwarzen Stecker der Fernbedienung – je nachdem ob Sie ein Mikrofon
oder MP3-Spieler anschließen möchten – mit dem Mikrofon- oder dem Line In-Anschluss.
4.
Schließen Sie die Cinch-Stecker der Satelliten an den Subwoofer an.
5.
Nun können Sie den Hauptschalter am Subwoofer einschalten (auf Pos. „I“), die Bassstärke
am Subwoofer einstellen und die Lautstärke wahlweise am Subwoofer oder über die
Tischfernbedienung regeln.
*
Bei diesem Gerät sollte sich die Steckdose in der Nähe befinden und leicht zugänglich sein.
EN
1.
Plug the mains cable on the subwoofer into a mains socket (230V, 50-60Hz). *
2.
Plug the 3.5mm jack plug on the subwoofer into the socket on the remote control.
3.
Plug the green connector on the remote control into the computer’s speaker socket and the black
connector on the remote control – depending on whether you want to plug in a microphone or
MP3 player – into the microphone or Line In socket.
4.
Plug the phono plugs on the satellites into the subwoofer.
5.
Now you can switch the subwoofer on by setting the power switch to ‘I’, adjust the bass level on
the subwoofer and set the volume level either on the subwoofer itself or on the table top remote.
*
For this equipment the socket-outlet shall be installed closed by and shall be easily accessible.
FR
1.
Raccordez le câble d’alimentation du subwoofer à une prise de courant (230 V, 50-60 Hz ~). *
2.
Reliez le connecteur jack 3,5 mm du caisson de basses à la prise libre de la télécommande.
3.
Reliez la fiche verte de la télécommande à la prise haut-parleurs de l’ordinateur et la prise noire
de la télécommande (selon que vous souhaitez raccorder un microphone ou un lecteur MP3) à la
prise microphone ou Line In.
4.
Reliez la fiche cinch des satellites au caisson de basses.
5.
Vous pouvez à présent actionner l’interrupteur principal sur le caisson de basses (amener en
position « I »), régler les basses sur le caisson de basses et ajuster le volume sur le caisson de
basses ou avec la télécommande de table.
*
Pour cet appareil, la prise de courant doit se trouver à proximité et être aisément accessible.
NL
1.
Sluit de stroomkabel van de subwoofer aan op een stopcontact
(230V, 50-60 Hz ~). *
2.
Verbind de 3,5mm jackplug van de subwoofer met de vrije aansluiting van de afstandsbediening.
3.
Verbind de groene stekker van de afstandsbediening met de luidsprekeraansluiting van de
computer en de zwarte stekker van de afstandsbediening – naar gelang of u een microfoon of
een MP3-speler wilt aansluiten – met de microfoon- of met de line-in aansluiting.
4.
Sluit de cinch-stekker van de satellieten aan op de subwoofer.
5.
Nu kunt u de hoofdschakelaar op de subwoofer inschakelen (op stand „I“), de bassterkte op de
subwoofer instellen en het volume naar keuze via de subwoofer of via de tafelafstandsbediening
regelen.
*
Bij dit apparaat moet er een contactdoos in de buurt zijn die gemakkelijk toegankelijk is.
IT
1.
Collegare il cavo elettrico del subwoofer ad una presa (230V, 50-60 Hz ~). *
2.
Collegare il jack 3,5mm del subwoofer alla presa libera del telecomando.
3.
Collegare il connettore verde del telecomando all‘attacco degli altoparlanti del computer e il
connettore nero del telecomando all‘uscita microfono o Line In, secondo se si vuole collegare un
microfono o un lettore MP3.
4.
Collegare i connettori RCA dei satelliti al subwoofer.
5.
Azionare l‘interruttore principale sul subwoofer (in pos. „I“), regolare l‘intensità dei bassi sul
subwoofer e il volume sul subwoofer o attraverso il telecomando.
*
Si raccomanda di utilizzare per questo apparecchio una presa elettrica situata nelle immediate vicinanze e facilmente
accessibile.
ES
1.
Enchufar el cable de red del subwoofer a una toma de corriente (230V, 50-60 Hz ~). *
2.
Enchufar el conector de 3,5mm del subwoofer a la entrada libre del mando a distancia.
3.
Enchufar el conector verde del mando a distancia a la entrada para altavoces del ordenador y
el conector negro del mando a distancia, dependiendo de si quieres conectar el micrófono o el
reproductor MP3, al micrófono o al terminal Line-in.
4.
Enchufar el conector cinch/RCA de los satélites al subwoofer.
5.
A continuación encender el aparato con el interruptor que está en el subwoofer (posición “I”),
ajustar el control de graves en el subwoofer y el volumen en el subwoofer o en el mando a
distancia de sobremesa.
*
Al utilizar este aparato,la toma de corriente deberá estar cerca y ser fácilmente accesible.
RU
1.
Subwoofer elektrik kablosunu bir prize (230V, 50-60 Hz ~) bağlayın. *
2.
3,5mm’lik Subwoofer jakını uzaktan kumandanın boş bir bağlantısına bağlayın.
3.
Uzaktan kumandanın yeşil soketini bilgisayarın hoparlör bağlantısına ve uzaktan kumandanın
siyah soketini – mikrofon veya MP3 çalar bağlamak istemenize bağlı olarak – mikrofon veya Line
In bağlantısına bağlayın.
4.
Uyduların çinç soketlerini subwoofere bağlayın.
5.
Şimdi subwoofer ana şalterini devreye alabilir (Poz. „I“), subwoofer bas gücünü ayarlayabilir
ve ses seviyesini isteğe bağlı olarak subwooferde veya masa uzaktan kumanda üzerinden
ayarlayabilirsiniz.
*
Bu cihazda priz yakında bulunmalı ve prize erişim kolay olmalıdır.
TR
1.
Включите кабель питания сабвуфера в розетку (230 В, 50-60 Гц ~). *
2.
Соедините штекер на 3,5 мм сабвуфера со свободным разъемом блока дистанционного
управления.
3.
Соедините зеленый штекер пульта дистанционного управления с разъемом для динамиков
на компьютере, а черный штекер пульта дистанционного управления – в зависимости от
того, желаете ли вы подключить микрофон или MP3-плейер – с разъемом для микрофона
или Line In.
4.
Подключите штекер сателлитов к сабвуферу.
5.
Теперь можно включить главный выключатель на сабвуфере (в положение „I“),
отрегулировать басы на сабвуфере и громкость на сабвуфере или через настольный пульт
дистанционного управления.
*
Розетка должна находиться рядом с устройством и быть легко доступной.
OUTPUT
INTPUT
Microphone
Headphone


