

Spectra T50e Library
Quick Start Guide
P.N. 90970017 Rev. B
www.spectralogic.com
Page 2 of 2
Power On
and
Log In
Enter the
Option Keys
Create a
Partition
Load
Cartridges
Reboot
System and
Perform a
Backup
3
4
5
6
7
1.
Using the stylus, select
Menu
>
Configuration
>
Partitions
>
Automatically create a partition
>
New
.
2.
Use the wizard to create the partition, and then choose one of the following:
Save Library Configuration to USB (recommended)
Save Library Configuration to [email protected] (recommended)
Don’t Save Library Configuration (not recommended)
3.
Select
Next
and
Save
.
Note:
If you prefer to manually create partitions, see the
Spectra T50e User Guide
for instructions.
Load Cartridges
Use Bulk Load for the initial setup with
only
a single partition enabled. Refer to the
Spectra T50e User Guide
for more detailed information.
1.
Using the stylus, select
Menu
>
General
>
Import/Export
>
Bulk Load
. Both left-side magazines release.
2.
Remove the bottom left magazine and set it on a stable surface.
CAUTION!
Use caution while handling fully-loaded magazines as they are heavy!
3.
Load the cartridges sequentially starting at slot 1 and continue with the top left-side magazine, if needed. Reinsert the left-side magazine(s) and
continue with the right-side magazines, if needed. See the
Spectra T50e User Guide
for information about the expansion slots (slots 48 through 50).
4.
Gently push each magazine into the library until it is fully seated and press
Stop Importing
. The library performs inventory.
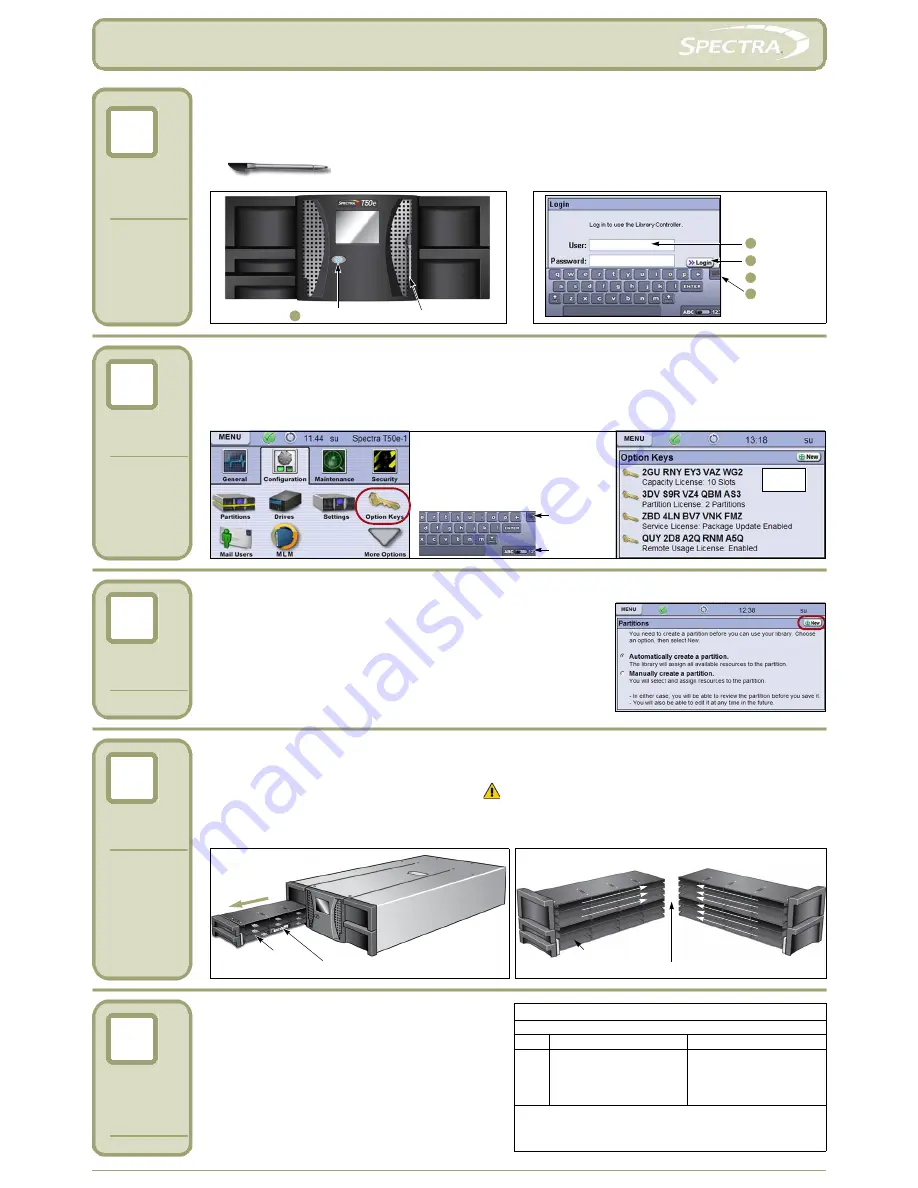
Power-on
1.
Press the front panel power button for two to three seconds.
2.
Wait while the library performs its power-on sequence,
which typically takes six to nine minutes.
Log Into the User Interface
After the power-on sequence completes, the login screen displays.
1.
Using the stylus, touch (to select) the
User
box and type
su
.
2.
Leave the password field blank, and select
Login
.
3.
Wait for the initialization process to complete.
4.
Close the keyboard by selecting its icon with the stylus.
Locate the document(s) containing the option key(s)—each is a sequence of numbers and letters—that came in your
Spectra Documentation Set
.
1.
Using the stylus, select
Menu
>
Configuration
>
Option Keys
>
New
.
2.
Select the
Enter Key
box.
3.
Open the keyboard and enter the option key.
4.
With the letters keyboard visible, select
Save
.
Reboot Your Host System
1.
Ensure that your SCSI HBA BIOS has LUN support enabled.
2.
Reboot your host system, if needed.
3.
Install your backup application, if it is not already installed.
4.
Configure the application to work with the Spectra T50e library.
Go to
www.spectralogic.com/downloads
to download device drivers
for the library.
Spectra Logic Technical Support
If you need assistance, contact us using one of these options.
Option US, Canada/Outside Europe
Europe, Middle East, and Africa
:
Web:
Phone
:
www.spectralogic.com/support
1.800.227.4637
1.303.449.0160
www.spectralogic.com/support
44.0.870.112.2185
Perform a Backup
Refer to the documentation that came with your backup application
for instructions.
Note:
Reference the Spectra
T50e User Guide
for comprehensive
instructions on how to operate your new library. Access the manual on
the Product CD or at
www.spectralogic.com/documents
.
Stylus—used to navigate in screens.
1 Press power button
Stylus in holder
1 Type “su”
3
4
Login
Close
Wait
su
2
keyboard
Notes:
Option keys are not case-sensitive.
Switch between the letter and number
keyboards using the Letter/Number icon.
Repeat the steps for each option key and
then close the keyboard.
Open/close
Letter/Number
keyboard
Example
screen
Slot 1 (bar code labels must face out)
Access port
Important!
Replace magazines
in the same locations.
Right
Left
Important!
Load cartridges sequentially starting at slot 1.
Top
Top
Bottom
2
3
4
7
11
8
23
20
12
24
5
6
15
9
10
16
19
27
32
36
44
28
47
35
31
39
40
43
1
Access port
50
49
48
Left-side magazines
Bottom
Right-side magazines
Expansion slots


