Speco Speco-NVR User Manual Download Page 43

User Guide Rev 1.0 

Page 43 

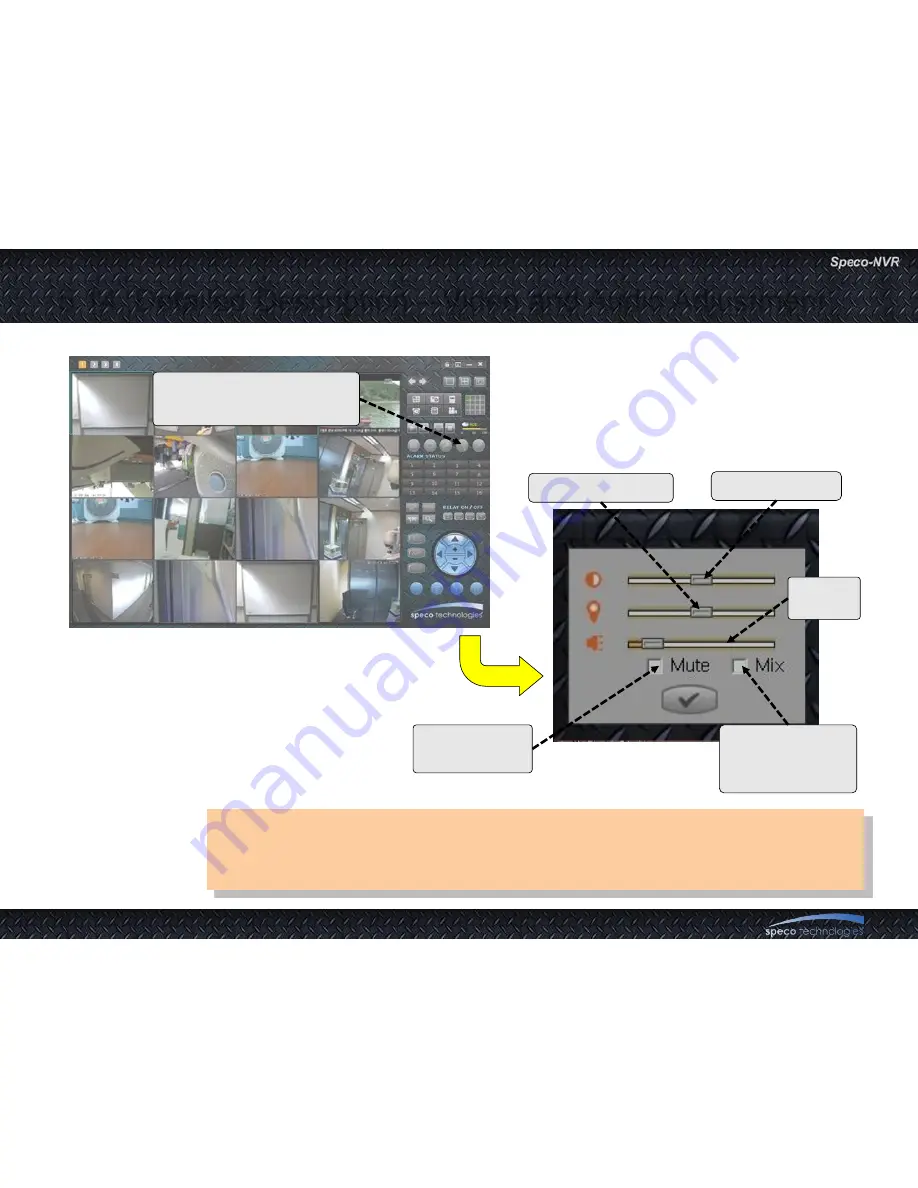
5.14. Detailed Description 

– Video and Audio Adjustment 

• Audio will be available only when the corresponding device is programmed 

to enable the audio. 

• Refer to the manual of the corresponding device. 

Click to launch Video/Audio 
adjustment bar. 

Check to mute 
the audio. 

Check to mix the 
sounds from all 
live channels. 

Contrast control 

Brightness control 

Volume 
control 

Summary of Contents for Speco-NVR

Page 1: ...Aug 2010 Rev 6...

Page 2: ...sor and Motion Alarm Indication 5 13 Remote Relay On Off 5 14 Video and Audio Adjustment 5 15 PTZ and Camera Control 5 16 Video crop 5 17 Digital PTZ 6 Event Log Management 6 1 Event Log Window 7 Remo...

Page 3: ...ws Upgrade Setting If you specify the time for the automatic upgrade of your windows operating system the automatic upgrade can cause reboot or system halt Automatic upgrade of the windows operating s...

Page 4: ...eco NVR shows the maximum stability and the performance when the PC is running no other application programs Basic screen of Speco NVR includes up to 16 videos Speco NVR supports all network cameras s...

Page 5: ...o 16 video windows Up to 4 basic display screens can be launched simultaneously to support up to 64 channels These screens can be shown on a single large screen or can be displayed on multiple display...

Page 6: ...clock of the PC precise The time which is displayed beneath each screen in white color for real time connection is the time information sent from the network camera Do not change the parameters relat...

Page 7: ...Level for proper recording and still video capture in Speco NVR and Web Viewer Follow through the details in this document to ensure the setting Windows Vista 1 UAC User Access Control configuration...

Page 8: ...age 8 1 1 Introduction for Windows Vista Windows Vista 2 Privilege Level Control 1 Select Speco NVR icon on the desktop 2 Click right mouse button and select Properties 3 Check Privilege Level in Comp...

Page 9: ...0 Page 9 1 1 Introduction for Windows 7 Windows 7 1 UAC User Access Control configuration 1 Double click User Accounts in control panel 2 Double click Change User Account Control setting 3 Set to Nev...

Page 10: ...0 Page 10 1 1 Introduction for Windows 7 Windows 7 2 Privilege Level Control 1 Select Speco NVR icon on the desktop 2 Click right mouse button and select Properties 3 Check Privilege Level in Compati...

Page 11: ...the recorded video file in Event Log Window icfPlayer program will be installed automatically upon the installation of Speco NVR For the sake of stability and improved performance Speco NVR is design...

Page 12: ...nels Displayed Screen Configuration Screen Lock Channel Status Indicator Remote Relay On Off Display Ratio Swap Full Screen Display Display Unit DU The smallest DU is called MDU Minimum display Unit T...

Page 13: ...ndicator Bidirectional Audio ON OFF RVS Control Virtual Controller for PTZ Camera E map Centering Move to Preset Position PTZ Parameter Set up Move to PTZ Home Audio Video Control Sensor and Motion In...

Page 14: ...med or not Assigned Not Assigned When the channel is in live connection the message area displays time and channel description The time displayed in the message area is the time set on the device send...

Page 15: ...Pop Up Menu Locate the cursor on each DU and press right mouse button to enable pop up menu Simple controls indicated on the right can be initiated for each channel Move the cursor to desired operatio...

Page 16: ...ction in selected Display Unit Video Cropping Select region size of video cropping RVS Control Run RVS control System Controller Run virtual keyboard controller PTZ Control Run additional PTZ actions...

Page 17: ...3 2 Screen Quick Controls View Original Size Select a channel 1 Select the View Original Size from pop up menu 2 A new window will pop up with original video size 3 The display window size follows set...

Page 18: ...Screen Quick Controls View fullscreen size Select a channel 1 Select the View Fullscreen Size from pop up menu 2 A new window will pop up with fullscreen video size 3 The display window size follows v...

Page 19: ...t loss Show all PACKET LOSS RATIO Turn on packet loss ratio on all channels in the screen Frame Rate Display the average frame rate per second Show all FRAME RATIO Turn on frame ratio on all channels...

Page 20: ...GINAL RATIO Turn on original ratio on all channels in screen Show status bar Display status bar on bottom of DU Show all STATUS BAR Turn on status bar on all channels in screen 3 3 2 Screen Quick Cont...

Page 21: ...channels in the display area following the settings of the display Connect and view or disconnect to the entire channels which are configured Start or stop recording of A V data from all connected ch...

Page 22: ...o the point where the mouse click is made Displays preset positions If one of the list is selected the camera moves to selected preset position A new control window for setting various PTZ parameters...

Page 23: ...trol of clone windows 2 3 4 Screen Lock When the screen is locked all the controls except for the display will be locked Enter the ID and password to unlock the screen Enlarge the screen to fill the m...

Page 24: ...ion to Live Video Install Speco NVR and connect your PC to the network 1 Set up IP information for the connection 2 Click on Play Button 3 For further information please refer to the remaining part of...

Page 25: ...a DU 2 Click on the corresponding MDU and move the cursor in diagonal direction while the mouse button is pressed 3 Release the mouse button when desired number of MDUs are merged to create a new Disp...

Page 26: ...s To assign set up parameters to the DUs for the new layout each DU is assigned with a number following the rule below DU at the top of the leftmost location has number 1 Number is increased as we mov...

Page 27: ...lected Address Group Open Stored Address Group Multi channel product set up button Address Group Address group in Green color is the selected address group Screen within an Address Group Address Group...

Page 28: ...ge 28 Locate the cursor on top of the corresponding Address Group and press right mouse button Select Activate This Address Group from the Pop up menu 1 2 Go back to the main screen Stop all connectio...

Page 29: ...ording the AV data in Speco NVR to store other files Speco assumes no responsibility caused by failure of observing the restriction 1 HDD is equivalent to one folder And the total capacity of the HDD...

Page 30: ...onding time to control recording Selected time zone is indicated as a box having different background color Click on the desired screen Selected screen is shown in yellow color Place the cursor on top...

Page 31: ...nnels Click on corresponding time to control recording Selected time zone is indicated as a box having different background color Click on the desired screen Selected screen is shown in yellow color P...

Page 32: ...layback of multiple channels Check during playback to display in original size Mark this button to select corresponding page If there is recorded file on the date types of the video files are summariz...

Page 33: ...User Guide Rev 1 0 Page 33 5 6 1 Detailed Description Playback Screen...

Page 34: ...ve Connection and Recording Click for live connection to all channels Camera information are programmed through IP assignment Click to stop all recording Click to record video and audio from all live...

Page 35: ...l audio communication with corresponding device Locate the cursor on the corresponding channel and click Activated channel is indicated by a blue rectangle surrounding the DU 1 2 Click to activate bid...

Page 36: ...the corresponding channel and click Activated channel is indicated by a blue rectangle surrounding the DU 1 2 Click to capture and store the still image from the corresponding live channel Captured v...

Page 37: ...User Guide Rev 1 0 Page 37 5 9 Detailed Description Still Image Capture A feature to capture and record still image from a live channel A window pops up and preview captured image before save it 4...

Page 38: ...capture and record still image from a live channel Select check box for Time Stamp It will display on Left Top 7 When all setting is done click OK to go next step 8 Select capture option 5 After check...

Page 39: ...on Rotating the Video Locate the cursor on the corresponding channel and click Activated channel is indicated by a blue rectangle surrounding the DU 1 2 Click to rotate the video by 180 degree 3 This...

Page 40: ...feature to manage the corresponding device over the network Locate the cursor on the corresponding channel and click Activated channel is indicated by a blue rectangle surrounding the DU 1 2 Click to...

Page 41: ...ion Alarm Indication If connected device generates alarm by sensor or motion detection the alarm condition is transmitted to the Speco NVR and state is shown on alarm status panel Click on the highlig...

Page 42: ...atus of relay can go back to the former status depending on the set up of the relay For example when relay is programmed for generating alarm signal the status will change spontaneously upon alarm con...

Page 43: ...available only when the corresponding device is programmed to enable the audio Refer to the manual of the corresponding device Click to launch Video Audio adjustment bar Check to mute the audio Check...

Page 44: ...n the corresponding device is equipped with such feature Refer to the manuals of the corresponding device for the details Move the cursor and click on the point to move the camera center to Click to a...

Page 45: ...tion Pan Tilt Zoom and Lens controls are available only when the corresponding device is equipped with such feature Refer to the manuals of the corresponding device for the details Click to activate m...

Page 46: ...er set up window 2 Adjust speed or step of PTZ 3 IRIS control Press each button for the control Wider auto narrower from the left Enable the Pan tilt device to continuously scan through the set up reg...

Page 47: ...1 Activate PTZ device to go back to home position Focus to farther position Auto focus Focus to closer position Zoom In Zoom Out Move the camera to the direction indicated by the arrow head Pan Tilt...

Page 48: ...lick Dragging Size of the cropped region Cropped video is available from channel 3 of the corresponding product Refer to Basic Setup from the corresponding product s manual Coordinate values in case o...

Page 49: ...al PTZ Select the Digital PTZ of pop up menu 1 Scroll the mouse wheel for video to zoom in out and drag mouse for video to move to left right up and down 2 Digital PTZ is feature that moves for video...

Page 50: ...uide Rev 1 0 Page 50 6 Event Log Management Event Log Window Event indicator is highlighted upon event Sensor Motion No Video and Video Recovered Click on the highlighted indicator to show Event Log W...

Page 51: ...at Speco NVR screen Description which was set during IP assignment IP Address which was set during IP assignment Channel number which was set during IP assignment Time of the event Yes means that the...

Page 52: ...User Guide Rev 1 0 Page 52 7 Remote Video Storage RVS Management Target Application Management of video storage in IP Camera and Video Server RVS Control Button...

Page 53: ...ed to control H 264 cameras servers having its own SD card Monthly recording information Connected device s storage information Timeline for recorded data Playback control buttons Recording Start Stop...

Page 54: ...Setting Set recording options Schedule Setting Set recording schedule Alarm Recording Setting Set alarm recording duration Download Setting Set the download folder and file format Display Option Sett...

Page 55: ...aximum duration for recording Enable Disable overwrite recording Format SD card Recording schedule display screen Select trigger type for recording Select day which you want apply recording Set the st...

Page 56: ...volume of playback Mute audio sound of playback Select file format for downloaded file Assign a folder for download recorded file Control video contrast of playback screen Control video brightness of...

Page 57: ...h 3 Select recorded time from timeline 2 Marked Color Recording Type Purple Panic Recording Red Time Recording Orange Motion Recording Green Sensor Recording Blue Audio Recording Select a day from cal...

Page 58: ...User Guide Rev 1 0 Page 58 7 6 RVS Control Playback Click Play button 2 Select target time that want to playback 1...

Page 59: ...User Guide Rev 1 0 Page 59 7 7 RVS Control Download Select a folder for downloaded file 1 Select file format 2 Set start time and end time to extract recorded video 3 Click button to start download 4...

Page 60: ...Virtual System Controller Please refer to Virtual System Controller User s Manual for the details Virtual System Controller is a program module that emulate keyboard controller for PTZ cameras This f...

Page 61: ...nd password are entered To assign new ID and password run program files NVR RegistNVRIDPwd Default value is empty Just click on the this button to initiate the termination Existing ID and password Ski...

Page 62: ...1 Click to lock the program The icon will be changed to 2 When is clicked after the program is locked Speco NVR will ask for ID and password to unlock the program 3 The icon will be changed to after u...

Page 63: ...ide Rev 1 0 Page 63 10 E MAP Map Data is not provided Mad data should be provided by the installer E Map is a feature to position the cameras and video from them on map images E Map Controller Initiat...

Page 64: ...reen circle indicates a camera not connected Bright green circle indicates camera connected Map Window Location of the cameras are shown on the map image Camera List The cameras registered in the Spec...

Page 65: ...0 2 E Map Addition and Deletion of Map Image 1 Move to other map Double click on the map data 2 Addition and deletion of map Select a map to add or delete and choose Menu File New Map or Delete Map 3...

Page 66: ...0 Page 66 10 3 E Map Placing Map Icon Multi Map Select a map data from the map information window and then perform Drag Drop to place a Map Icon on the Map window The Map Icon can be double clicked to...

Page 67: ...User Guide Rev 1 0 Page 67 10 4 E Map Placing Camera Icon Select a camera data from the camera list and then perform Drag Drop to place a camera Icon on the Map window...

Page 68: ...User Guide Rev 1 0 Page 68 10 5 E Map Locking Unlocking the locations of the Icons Select Drag Lock or Drag Unlock from Menu Icon to lock or unlock the location of the icons...

Page 69: ...tatus Indication 1 Camera status Dark Green circle indicates a camera not connected Bright green circle indicates a camera connected 2 Information Display Locate the cursor on top of the Icon to show...

Page 70: ...e Camera for Live View 1 Pop up menu Clink on the right button after placing the cursor on the Camera Icon for the pop up menu 2 Live Pop up Double click the Camera Icon or select View from the pop up...

Page 71: ...User Guide Rev 1 0 Page 71 10 8 E Map Event Display The list of events are displayed in this window...

Page 72: ...e Rev 1 0 Page 72 10 8 E Map Event Display 1 Double click on the file path to playback the alarm event on a pop up window 2 Up to 1000 events are stored and the oldest event will be removed to record...

Page 73: ...User Guide Rev 1 0 Page 73 10 9 E Map Relocating the Functional Windows Use Drag Drop for relocating the functional windows...

Page 74: ...I Radeon Chipset CPU Graphics Card CPU Resolution Video rate frame rate Max Ch RAM i7 2600 1600x1200 4M 15fps 16 4GByte or Above 1280x720 3M 30fps 20 704x480 1M 30fps 64 i5 2500 1600x1200 4M 15fps 12...

Page 75: ...User Guide Rev 1 0 Page 75 Appendix B HDD Space Calculation Use storage calculator in selection guide for calculation of the space...

Page 76: ...ter from program menu 2 Click Select Source and select ICF format file 3 Click Convert button to convert file format to AVI 4 When the converting is complete a window pops up Click OK and check the co...

Reviews: