O
O
i
i
M
M
D
D
1
1
U
U
s
s
e
e
r
r
’
’
s
s
G
G
u
u
i
i
d
d
e
e
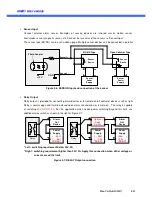
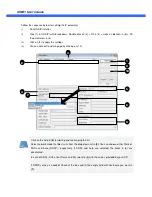
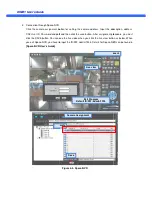
2. Connection through Speco-NVR
Click the camera assignment button for setting the camera address. Input the description, address,
Ch#, User ID, Password and port and then click the save button. After assignment procedure, you must
click the SAVE button. You can see the live video when you click the live view button as below. When
you exit Speco-NVR, you have to input the ID/PW, admin/1234. Details for Speco
[Speco-NVR User’s Guide]
.
Example
Click the camera assignment button for setting the camera address. Input the description, address,
Ch#, User ID, Password and port and then click the save button. After assignment procedure, you must
can see the live video when you click the live view button as below. When
NVR, you have to input the ID/PW, admin/1234. Details for Speco-NVR can be found in
Figure 4-4. Speco-NVR
Camera Assignment
Live view
Exit Program
Default ID/PW: admin/1234
Camera Assignment
Example
Save
Click the camera assignment button for setting the camera address. Input the description, address,
Ch#, User ID, Password and port and then click the save button. After assignment procedure, you must
can see the live video when you click the live view button as below. When
NVR can be found in
Camera Assignment


