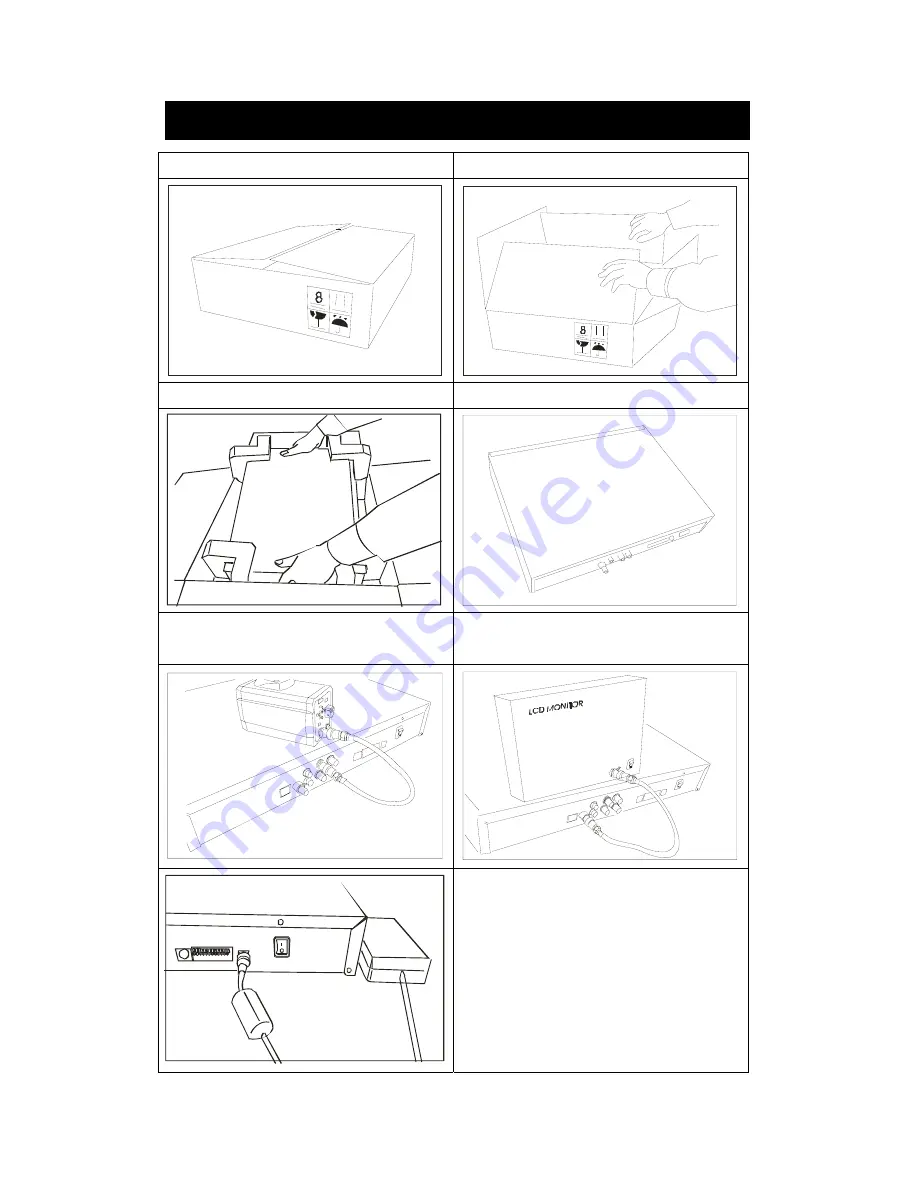
Speco EZVR8 User Manual Download Page 5


5


1. The package 

2. Un-packed 

MODEL NO.:

SER NO.:

MADE IN TA

IWAN

MODEL NO.:

SER NO.:

MADE IN TAIWAN

3. Take the unit out from the package 

4. Put on a flat desk 

5. Connect your camera cables to the BNC 

connectors on the rear. 

6. Connect your monitor cable to the BNC 

connector labeled “Monitor” on the rear. 


INSTALLATION 

7. Connect the power adaptor.   

8. Turn on the “Power” switch after the 

cameras are installed. The EZVR8 will 

then “boot” up and begin recording. 

Summary of Contents for EZVR8

Page 1: ...EZVR8 User s Manual Speco Technologies 200 New Highway Amityville NY 11701 800 645 5516 www specotech com...

Page 2: ...ce of important operational and maintenance servicing instructions in the literature accompanying the appliance WARNING TO PREVENT FIRE OR SHOCK HAZARD DO NOT EXPOSE UNITS NOT SPECIFICALLY DESIGNED FO...

Page 3: ...e unit 5 For questions and technical assistance of this product contact your local dealer Strong recommendation on installation of the unit 1 Confirm that electricity at the place you want to install...

Page 4: ...stalled and used in accordance with the instructions may cause harmful interference to radio communications However there is no guarantee that interference will not occur in a particular installation...

Page 5: ...the package 4 Put on a flat desk 5 Connect your camera cables to the BNC connectors on the rear 6 Connect your monitor cable to the BNC connector labeled Monitor on the rear INSTALLATION 7 Connect the...

Page 6: ...0H 480 hour recording mode 14 960H 960 hour recording mode 15 REC Press this button to start recording Press again to stop 16 MENU Press this button to display the menu setup 17 SEARCH Press this butt...

Page 7: ...7 REAR PANEL Power cord in 12VDC 5A Power Switch ON OFF Camera 1 8 input BNC type Main monitor output Audio channel input x 1 and output x 1 RCA Type Alarm Relay connector RS485...

Page 8: ...8 Booting Up Detecting the hard disk Indicator Live Playback Recording Overwrite Alarm Input Alarm Output HDD installed Live screen Live mode Video loss Key lock Forward Reverse Pause...

Page 9: ...9 Remote controller The keys on the remote control have the same functions as the front keyboard of the unit...

Page 10: ...ht buttons to select the item you wish to adjust then press ENTER to change the value 3 Press MENU to return to the previous screen and move the cursor to Apply 4 Press ENTER to confirm 5 Select On or...

Page 11: ...11 Main MENU Audio Record Use direction buttons to select Audio Record Press ENTER to select On or Off Diagram RCA Audio In Line Level RCA Audio Out Line Level Microphone Speaker RCA Cable...

Page 12: ...oose the type of sensor input Normally Open NO or Normally Closed NC To disable the alarm mode switch to the Off position Main MENU Alarm Output Use direction buttons to select Alarm Output Press the...

Page 13: ...Signal type depends upon the Alarm Sensor polarity defined as NO Normal Open or NC Normal Close Alarm Output Relay NO COM or NC COM Door closed Door open Relay NO Normal open Alarm trigger NO COM NC C...

Page 14: ...o Record is set to On the EZVR8 will start recording again after 2 minutes of inactivity after being manually stopped Main MENU Overwrite HDD Use direction buttons to select Overwrite Enable Press the...

Page 15: ...select ON or Off If set ON the status bar will show date time and status icons If set Off the status bar will hide date time and status icons Main MENU Language Use direction buttons to select Langua...

Page 16: ...Instructions appear on the screen after selecting Search Press SEARCH to enter the playback mode Press ENTER to select a date and time Use the left or right arrows to select the item you wish to chan...

Page 17: ...ge When the event you wish to backup appears on the screen press the BACKUP button to select the start time Press the BACKUP button a second time to select the end of the copy The unit will detect the...

Page 18: ...18 Player Software Main Screen Click icon to select the file to play It will be in vvf format...

Page 19: ...Frame 11 Quad Screen mode 5 Pause 12 Split Screen mode 6 Next Frame 13 Export to AVI format 7 Play AVI Button vvf file export to avi format Select export channel s and click audio if included Browse f...

Page 20: ...100 fps PAL Recording Play Function Compressed Picture M JPEG Recording Control Auto manual Playback Mode Date Time search Other Function Operation Mode Record Play Backup Triplex operation Alarm Alar...

Reviews: