background image

42 


4-8-2. DDNS 

Dynamic Domain Name System (DDNS) allows a DNS name to be constantly synchronized with a 

dynamic IP address. It allows those using a dynamic IP address to be associated with a static 

domain name. 

Once the setting is completed, the DDNS address will be:   

http://hostname.ddns.specoddns.net   

For example, if you enter the host name 

as “SPECOHD”, then the address will be: 

http://specohd.ddns.specoddns.net   

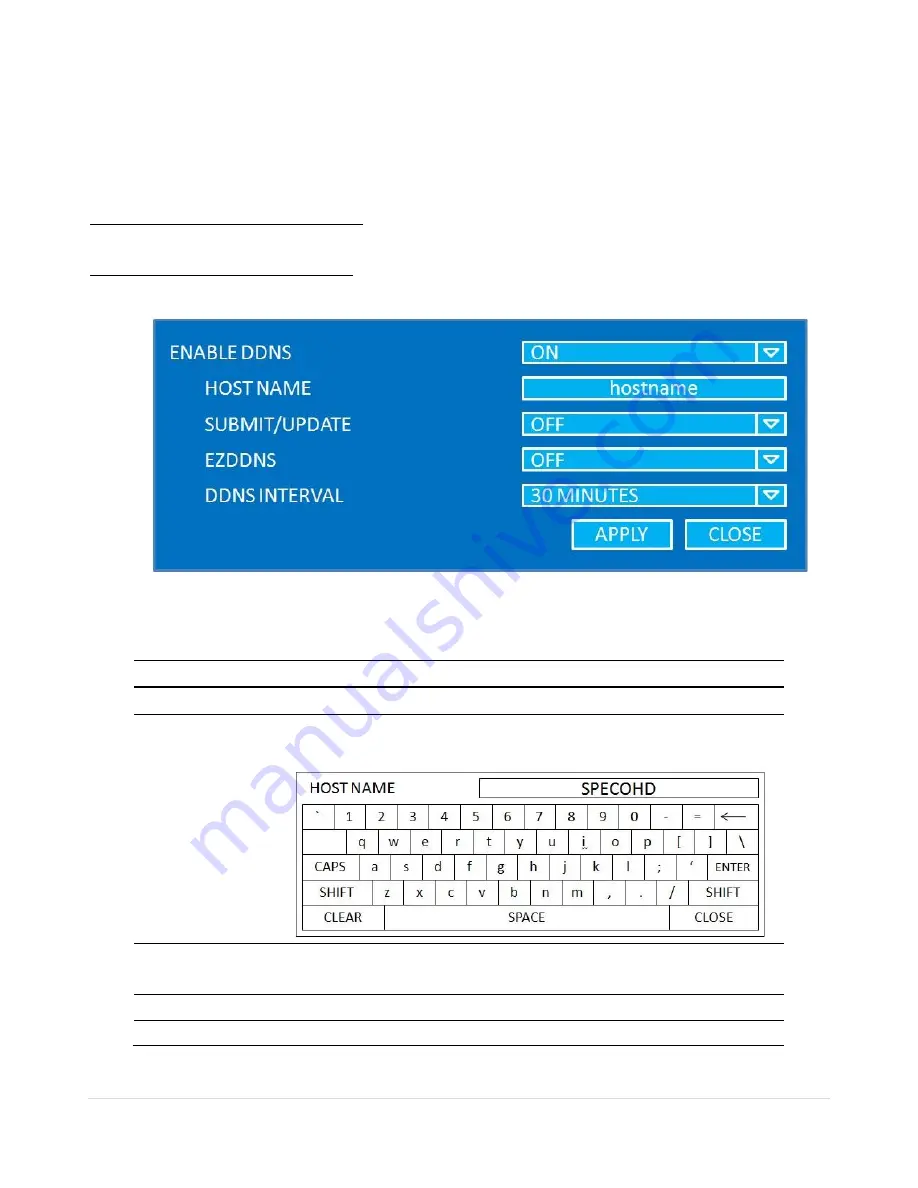
Select NETWORK>DDNS. The menu displays as below. 


Figure 4.8.2. Network Setup Screen 

– DDNS 


Table 4.8.2. DDNS 

Item 

Description 

ENABLE DDNS 

Enable/disable the Dynamic Domain Name Service.


HOST NAME 

This  item  allows  the  user  to  setup  a  domain  name  manually, 

using virtual keyboard displays as shown. 


SUBMIT/UPDATE 

When manual host name input is done, move the cursor to this 

item and select ON to submit the settings.


ezDDNS 

Enable/disable ezDDNS to register the host name automatically.


DDNS INTERVAL 

Select the interval time to communicate with DDNS.


Summary of Contents for DVR82HD

Page 1: ...de Ver 1 7 Model DVR82HD 2 Channel HDcctv 8 Channel Full D1 Digital Video Recorder About This User s Guide Before operating the unit please read this user s guide thoroughly and retain it for future r...

Page 2: ...or explosion Replace only with the same or equivalent type battery recommended by the manufacture Discard used batteries according to manufacturer s instructions This symbol indicates the presence of...

Page 3: ...so can damage the unit Installation and servicing should be performed only by qualified and experienced personnel Turn off the power of the DVR when connecting Cameras Audio or Sensor Cables The manu...

Page 4: ...mponents are included as specified below DVR Unit Client Software CD Remote Control Battery1 5V AAA x 2EA User s Guide HDD SATA Cable 4 EA HDD Mounting Brackets 2 EA HDD Mounting Screws 16 EA HDD Moun...

Page 5: ...5 Hard Drive Installation 1 Remove the screws and the top cover as specified below 2 Fix the supplied HDD mounting bracket to the hard disk using the supplied mounting bracket screws...

Page 6: ...he hard disk NOTE HDD2 SATA port is the main HDD port When installing more than 2 HDDs connect HDD SATA cables in sequential order from HDD2 NOTE Please mount all HDDs which you want to use when insta...

Page 7: ...ntinuous Audio Recording 10 Channel Audio On HDD LEVEL 5 H LEVEL 4 LEVEL 3 LEVEL 2 LEVEL 1 L day s hour s day s hour s day s hour s day s hour s day s hour s 250GB 0 15 0 19 1 2 1 7 1 14 320GB 0 20 1...

Page 8: ...352x240 Recording Quality Grade 4 Levels Recording Mode Continuous Schedule Motion Sensor Manual Motion Detection Setup by Grid Pre Recording 15 Seconds to 20 Minutes Post Recording 10 Seconds to 60 S...

Page 9: ...S Day Light Saving YES Internal Beep By Alarm Motion Video Loss HDD Error Multi Language Yes Software Upgrade By USB Flash Drive Network Remote Upgrade NTP Network Time Protocol YES Digital Zoom YES R...

Page 10: ...7 4 4 Setup DEVICE 28 4 4 1 ALARM OUT 29 4 4 2 Controller PTZ Setup 30 4 4 3 Spot Out 31 4 4 4 Motion Zone Setup 32 4 5 Setup STORAGE 33 4 6 Setup SYSTEM 35 4 7 Setup SECURITY 38 4 8 Setup NETWORK 40...

Page 11: ...5 Search and Playback Window 63 8 5 1 Main User Interface 63 8 5 2 Main Control Panel 63 8 6 Setup of SpecoTech Multi Client 66 8 6 1 General 66 8 6 2 Event 67 8 6 3 Record 68 8 6 4 Display 69 8 6 5...

Page 12: ...12 10 1 3G App Viewer for iPhone 89 10 2 3G App Viewer for Android Phone 91 APPENDIX Network Connection LAN 93 APPENDIX Network Connection Internet and DDNS 95 APPENDIX E SATA CONNECTION 99...

Page 13: ...aphic User Interface Simple Scheduler Simple Schedule HDMI Output VGA Output Network software supports 10 100 1000Mbps USB 2 0 port for video clip exporting and easy firmware upgrade via USB Flash Dri...

Page 14: ...Setting 2 1 Booting the DVR and Basic Time Setting 1 During the first start up the following logo and message will be displayed 2 After the system initializing is completed select the language and se...

Page 15: ...ving Time To enable Daylight Saving feature NTP synchronization take the following steps 1 Enter the SETUP mode The default Password is 1111 2 Go to SETUP SYSTEM SET DATE TIME 3 Select ON from the DAY...

Page 16: ...o be syncronized with NTP Network Time Protocol set SETUP SYSTEM NTP ON 2 Select proper TIME ZONE time Table2 3 1 GMT Time Zone State Standard Time Daylight Saving Time AL Alabama GMT 6 GMT 5 AK Alask...

Page 17: ...as GMT 6 GMT 5 KS Kansas W GMT 7 GMT 6 KY Kentucky E GMT 5 GMT 4 KY Kentucky W GMT 6 GMT 5 LA Louisiana GMT 6 GMT 5 ME Maine GMT 5 GMT 4 MD Maryland GMT 5 GMT 4 MA Massachusetts GMT 5 GMT 4 MI Michiga...

Page 18: ...a W GMT 7 GMT 6 TN Tennessee E GMT 5 GMT 4 TN Tennessee W GMT 6 GMT 5 TX Texas GMT 6 GMT 5 TX Texas W GMT 7 GMT 6 UT Utah GMT 7 GMT 6 VT Vermont GMT 5 GMT 4 VA Virginia GMT 5 GMT 4 WA Washington GMT 8...

Page 19: ...el 10 press the 0 key For channel 11 press the 10 and 1 key For channel 16 press the 10 and 6 key REW Press to rewind the footage in playback mode F REW Jump Step backward In playback mode the positio...

Page 20: ...red menu item or to store the setup value ESC Press for temporary storage of the changed value or to return to the previous menu screen USB Port To archive still image or video into a USB memory or up...

Page 21: ...e connection Provides simple On Off switching by using relay 0 5A 125V 1A 30V 3 3 Remote Control RECORD Manual recording DISPLAY Display of Full Quad 9 or 16 split screen F REW Jump 60 seconds backwar...

Page 22: ...button and select setup from the submenu or press the setup button on the front panel or the remote control Table 4 1 1 Setup Menu Tree When the DVR prompts the LOG IN window enter the PASSWORD using...

Page 23: ...2 1 Menu Items in DISPLAY Mode Setup Item Description OSD Enable disable on screen display Select ON Show it on the screen Select OFF Disappear on the screen OSD CONTRAST Set the visibility level of...

Page 24: ...HDcctv channels 9 10ch HUE Change the hue value of the specified channel 0 100 It is for analog channels 1 8ch only and is not for HDcctv channels 9 10ch SATURATION Change the saturation value of the...

Page 25: ...hannel for applying the following settings using the mouse or the control button on the remote control RESOLUTION Set the resolution for the specified channel Analog Channel 1 8 Ch D1 Half D1 and CIF...

Page 26: ...E RECORD Enable disable pre event recording Pre event recording time is 15 seconds to 20 minutes Selectable POST EVENT RECORD Set the post event recording time duration for the specified channel 10 60...

Page 27: ...AREA To copy a schedule to a different channel select the channel from the COPY SCHEDULE menu Figure 4 3 2 Schedule recording setup screen NONE Disable recording CONTINUE CONTINUOUS recording Highligh...

Page 28: ...n ALARM OUT Set the sensor motion and video loss for triggering alarm relay HDD Error and Video Loss can trigger beeping CONTROLLER PTZ Set the PTZ baud rate protocol and ID CHANNEL Select specified c...

Page 29: ...LOSE 4 4 1 ALARM OUT Figure 4 4 2 ALARM OUT Setup Screen Table 4 4 2 Menu Item in ALARM OUT Setup Screen Item Description ALARM OUT Select an Alarm out number SENSOR IN Enable Alarm Out by Sensor from...

Page 30: ...3 Menu Item in Controller PTZ Control Setup Screen Item Description CHANNEL Select Channel number that the PTZ is connected to CAMERA Select the protocol type of the PTZ camera that is connected SPEED...

Page 31: ...SPOT ON EVENT Enable Disable display of the channel when an event is active SPOT EVENT DWELL TIME Set the dwell time for the display of the event activated channel 3 10sec SEQUENCE Enable disable seq...

Page 32: ...ON SENSITIVITY FULL ZONE The motion sensor is active on the whole screen PARTIAL ZONE The motion sensor is active in the set detection frame Select the motion detection position using the mouse or the...

Page 33: ...le 4 5 1 Menu Items in STORAGE Setup Screen Item Description OVERWRITE When enabled the DVR will continue recording and overwrite the oldest existing recorded data once the hard drive is full When dis...

Page 34: ...odel name Temperature Power on time HDD Health status RECORDING LIMIT Enable disable recording limit RECORDING LIMIT DAYS Set the recording limit days 1 90 days If the RECORDING LIMIT DAYS is set to 1...

Page 35: ...the remote control and change the value of the menu item Figure 4 6 1 SYSTEM Setup Screen Table 4 6 1 Menu Items in SYSTEM Setup Screen Item Description DVR ID Set DVR ID using the mouse or the contro...

Page 36: ...ime zone If choosing EU or OTHERS set the applicable conditions The options are OFF Daylight saving is turned off USA Applies the USA daylight saving time EU Applies the EU daylight saving time Select...

Page 37: ...t their own time difference CONNECTON MODE Select NTP time server connection mode CONNECTION PERIOD 1 24 Hours SEND EMAIL TRANSMISSION MODE Sending an image of an event channel IP NOTIFICATION Enable...

Page 38: ...4 7 1 Menu Items in PASSWRORD Setup Screen Item Description USER AUTHENTICATION Only the Admin will have access to the menu PASSWORD CHECK Select the Checkbox to enable the functions or leave the Che...

Page 39: ...ol button on the remote control and press SEL button Select user type and enter the current password And enter a new password enter the same password again to confirm and select OK Then the message PA...

Page 40: ...rt number Default 80 NETWORK TYPE DHCP DVR will automatically retrieve an IP address from the network STATIC Network information must be manually configured IP Enter IP address that is assigned for th...

Page 41: ...uire an IP address 4 8 1 2 STATIC Figure 4 8 1 Network Setup Screen STATIC IP address Subnet Mask Gateway and DNS are manually assigned by the user IP ADDRESS The fixed IP address of the DVR unit SUBN...

Page 42: ...http specohd ddns specoddns net Select NETWORK DDNS The menu displays as below Figure 4 8 2 Network Setup Screen DDNS Table 4 8 2 DDNS Item Description ENABLE DDNS Enable disable the Dynamic Domain Na...

Page 43: ...aming If these ports are not opened properly you ca not access the DVR beyond a router o For live playback streaming for commands for remote backup Open the port number on NETWORK NETWORK PORT menu Th...

Page 44: ...tion Setup Screen Table 4 9 1 Configuration Setup Item Description SAVE SETUP TO A USB User can save the current configuration Setting values of the DVR to the USB flash drive Plug in the USB flash on...

Page 45: ...ings such as Language DVR ID Security User Authentication Security User P W Date format DLS settings Network settings HDD overwrite Limit recording HDD serial number and HDD ERROR time will not be inc...

Page 46: ...ve Viewing Screen Table 5 1 1 Status Indicator Icons in Live Viewing Screen Icon Description Indicates that the lock is set Audio mute To set audio mute press the Audio button on the front panel Singl...

Page 47: ...f a remote ID is not set the message ALL is displayed Displays the amount of recording on the hard disk from 0 99 Indicates that HDD is recycled Continuous recording in progress Manual recording in pr...

Page 48: ...to do a back up CAMERA PTZ Camera PTZ button Opens the PTZ control menu SEQUENCE Sequence button Click this button to use a sequence function MANUAL RECORD Manual Record button Click this button to en...

Page 49: ...left button of the mouse and drag to make rectangular shape 5 3 SEARCH Screen To enter the search screen menu select SEARCH menu on the screen using the mouse or press SEARCH icon on live screen Figu...

Page 50: ...ne Search Screen When the Timeline menu is selected the user can see a calendar which has the recorded data Select a specific date and time Use a drag and drop function of the mouse control User can s...

Page 51: ...Time You can access from the oldest recorded data on the DVR hard drive by selecting GO TO FIRST TIME on the SEARCH window Press the PREV to return to the SEARCH window 5 3 4 Go To Last Time You can...

Page 52: ...splay button to view the still image or the first frame of the selected video then the user can save the selected data 5 3 7 Log Search You can access the LOG list search screen by selecting LOG on th...

Page 53: ...ous menu screen search window or exit from the Menu Press to rewind the footage at 1x 2x and 4x speeds Reverse playback speed is shown as 1x normal 2x 2 times normal and 4x 4 times normal at the botto...

Page 54: ...D Select the OSD to enter the menu Control keys are Right Left UP Down Select Far REW KEY and Near FF KEY Press the ESC button to return to the main menu Press the PTZ button to escape from the OSD me...

Page 55: ...e7 1 1 Still Image Archiving and Backup Screen NOTICE For a backup using a USB Flash Drive the file format of the USB flash drive must be FAT32 7 2 Video Backup onto USB Flash Drive Video can be captu...

Page 56: ...the mouse or the control button or the remote control 2 Once you have selected the date press the NEXT button to open the list of stored data 3 Use the mouse or the control button on the remote contr...

Page 57: ...arch Screen 7 4 Playback of Backup Video H 264 format video can be played back using the player that the DVR copies on USB flash drive with video Digital Zoon Feature Use the mouse scroll to use digit...

Page 58: ...58 Figure 7 4 1 Playback Screen of HD Player...

Page 59: ...PC Requirements Minimum PC Requirements Recommended PC Requirements Before installing the program check the PC specifications The DVR remote software may not perform correctly if the PC does not meet...

Page 60: ...d double click SpecoTech Multi Client XXXX exe 2 Select a destination folder and click Next 3 Select the program folder and click Next 4 The installation status screen is displayed 5 After the install...

Page 61: ...rt the program 8 4 1 Main User Interface 8 4 2 Control Buttons Button Description LOCAL PLAYBACK Click this icon to run a playback window to search and play videos that are recorded in the local PC RE...

Page 62: ...n of UMS MULTI CLIENT CAPTURE Click this icon to capture a still image EVENT LIST Opens list of events logged by the UMS Multi Client PAUSE Click this icon to play pause live video ALARM ON Click this...

Page 63: ...k Remote Playback on the upper left of the Live Window 8 5 2 Main Control Panel Button Description LOCAL PLAYBACK Click this icon to run a playback window to search and play videos that are recorded i...

Page 64: ...pecoTech Multi Client CAPTURE Click this icon to capture a still image EVENT LIST Opens list of events logged by the UMS Multi Client MARK IN Click this icon to set the beginning time for backup of th...

Page 65: ...from 24 hours to 60 minutes The timeline shows recorded data in color on the bar You can adjust the timeline scale and move it to the time you wish to playback Then click the play icon to display the...

Page 66: ...rd You can also set the save path for capturing and backup Save Path Specify the location to save captured still image for Capture and Backup data Miscellaneous Automatic Reconnection If enabled the s...

Page 67: ...67 8 6 2 Event Event log can be archived and searched Event Log Specify the location to save event logs and select event to archive Event Search Event log can be searched from selected time...

Page 68: ...annels When you set the recording condition to event you can set event for motion or alarm with duration Record Local Storage Setup You can select the local disk to record and the amount of disk space...

Page 69: ...69 8 6 4 Display You can select the OSD On Screen Display to be displayed 8 6 5 About English French and Spanish is selectable...

Page 70: ...pen the submenu Then the following window is displayed as below Select the REMOTE SETUP Then the setup window is displayed The specified menu screen is displayed on the upper left of the screen Enter...

Page 71: ...the screen OSD Contrast Adjust the character contrast on the screen Sequence Setting for automatically switching the displayed video Sequence Dwell Time Sets the interval for automatically switching...

Page 72: ...d when an external sensor signal is input to the specified external sensor input terminal Pre Record Sets whether to perform or not pre recording Post Event Record Sets the duration of the event recor...

Page 73: ...r to output or not an alarm signal when the error condition occurs PTZ Sets the environment for remotely operating PTZ cameras connected to RS485 terminals Camera channel designation Camera Sets the p...

Page 74: ...recording data Overwrite To continue recording by overwriting when the hard disk becomes full check the checkbox Record Limit Sets whether to limit or not the recording data storage period Record Limi...

Page 75: ...e connection mode to NTP time server Connection Period Set the connection period Send E Mail Sets whether to enable disable e mail sending function TRANSMISSION MODE Sending an image only of the chann...

Page 76: ...server port number Network Type STATIC The address setting mode is manual Input IP Gateway Subnet Mask and DNS server IP DHCP The address setting mode is automatic Addresses and other information do n...

Page 77: ...77 8 7 7 Remote Upgrade Browse Select BROWSE to locate the firmware file Upgrade Select UPGRADE to upgrade the firmware of the DVR...

Page 78: ...ss Public IP address of a router that DVR is connected or Domain name o Port Number Default Port Number is 5445 o ID Input ID of DVR Default ID is admin o Password Input network password of DVR Defaul...

Page 79: ...of Sites 1 Select the site sites to modify from the directory window 2 Click NET FINDER button And then the following window will be displayed as below 3 Click MODIFY button And then the modified info...

Page 80: ...sites to connect from the directory window 2 Click CONNECT button and then site sites displays display as connected 8 8 2 2 Disconnect 1 Select site sites to disconnect from the directory window 2 Cli...

Page 81: ...to capture from the display screen Otherwise all channels will be captured 2 Click CAPTURE button And then a Capture window will be displayed as below 3 Set Save path File Name and File Format And the...

Page 82: ...dow will be displayed as below 2 Select Record and set the values 3 Select Disk and set the values 4 Click RECORD ON button And the color of button is changed 5 Live video data is recorded as set in R...

Page 83: ...t site sites to connect from the directory window 3 Click CONNECT button And then Green bar displays on Search calendar and timeline scale window 4 Move the marker on the timeline scale to where there...

Page 84: ...er the Live Window 2 Select the site to connect from the directory window 3 Click CONNECT And then Green bar displays on Search calendar and timeline scale window 4 Move the marker on the timeline sca...

Page 85: ...search calendar and timeline scale bar 3 Click MARK IN button on the timeline scale to select the beginning point of the backup 4 Click MARK OUT button on the timeline scale to select the ending point...

Page 86: ...window After selecting a channel for backup click the OK button The backup will begin 7 AVI video data is recorded as set in AVI Backup window AVI format video can be played back by Window Media Playe...

Page 87: ...Internet Explorer 1 Check the IP address of the DVR from SETUP SYSTEM DESCRIPTION IP ADDRESS or 2 Input the IP address or Domain name address that you pre registered 3 Click this bar Then the dialog b...

Page 88: ...ut IP address Public IP address of a router that DVR is connected or Domain name Port Number Default Port Number is 5445 ID Input ID of DVR Default ID is admin Password Input network password of DVR D...

Page 89: ...Search Speco Viewer in the App Store 3 Install the Speco Viewer app 4 Open the installed Speco Viewer App 5 Select the in the top right corner for site addition Notice SPECO VIEWER is for the DVR4RS...

Page 90: ...ve the Site Information 7 Select the saved site from My Site List 8 Select a channel s to view 9 After selecting a channel the app will display the channel s Notice 3G Data Usage applied without Wi Fi...

Page 91: ...for Android Phone 1 Enter the Android Market 2 Search Speco Viewer in the Android Market and iInstall the Speco Viewer app 3 Open the installed Speco Viewer App 4 Select the ADD in the top right corne...

Page 92: ...ct CONFIRM to save the Site Information 6 Select the saved site from My Device for network connection 7 The app will display the live streaming video Notice 3G Data Usage applied without Wi Fi connect...

Page 93: ...93 APPENDIX Network Connection LAN 1 Install the network client software from the supplied CD 2 Check the IP address from SETUP SYSTEM DESCRIPTION of DVR 3 Run network client software...

Page 94: ...escribes a site IP Address Input IP address Public IP address of a router that DVR is connected or Domain name Port Number Default Port Number is 5445 ID Input ID of DVR Default ID is admin Password I...

Page 95: ...namic IP address A current dynamic IP address is being associated with a static domain name 1 Go to SETUP NETWORK DDNS and set the DDNS SERVER to ON 2 Go to SETUP NETWORK DDNS HOST NAME Manually enter...

Page 96: ...tatus window will pop up 6 DDNS registration status can be checked from SYSTEM INFORMATION or SETUP SYSTEM DESCRIPTION 7 Check the network PORT Default 5445 WEB PORT Default 80 and the private IP Addr...

Page 97: ...rd on the connect window Site Name Input a name that properly describes a site IP Address Input IP address Public IP address of a router that DVR is connected or Domain name Port Number Default Port N...

Page 98: ...98 8 And select the OK button Then press button after checking the left check box...

Page 99: ...ta loss caused by improper usage Use ONLY a new HDD or a HDD that is pre formatted on a PC Turn off the DVR before plugging the E SATA HDD DO NOT disconnect the E SATA port while the DVR power is on T...

Reviews: