background image

7

Original instructions

EN


WARNING:

 When changing the gear ensure 

the power tool is switched off. 

  1. To select the low gear (low speed, high torque 

setting), push the gear selector (3) forward, towards 
the chuck. The digit 1 on the switch will be displayed.

  2. To select the high gear (high speed, low torque 

setting), push the gear selector (3) back, away from 
the chuck. The digit 2 on the switch will be displayed.

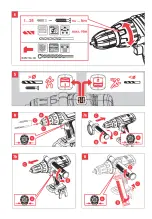
INSERTING AND REMOVING THE OPERATING 
TOOL
 (Fig. 6)


WARNING:

 Remove the battery or set the for-

ward/reverse switch (6) in central (neutral) position (A).

The drill is fitted with auto spindle lock which means if 

you try to rotate the chuck by hand the spindle will au-
tomatically lock. This means you only need to grasp the 

chuck and rotate the chuck housing to remove or fit the 

operating tool.


Hold the machine with one hand and rotate the chuck 

with the other hand.


- To open the chuck, rotate it anti-clockwise. (B)


- To close the chuck, rotate it clockwise. (D)


Insert the operating tool. (C)


Close the chuck.


Perform a test run to check that the operating tool is 

properly clamped in the centre.

FITTING AND REMOVING THE AUXILIARY 
HANDLE (BUR2 18LI HD)


WARNING:

 Remove the battery or set the for-

ward/reverse switch (6) in central (neutral) position (A).


To mount the auxiliary handle (12) refer to 

Fig.7a.  

(A, B, C, D).


To remove the auxiliary handle (12) refer to 

Fig.7b.  

(A, B, C).


To change the auxiliary handle position refer to 

Fig.8. 

(A, B, C, D).

Ensure that the auxiliary handle (12) is firmly tightened 

prior to starting operation.

DRILLING

Drilling metal


▪ For maximum performance, use high speed steel bits 

for metal or steel drilling.


Ensure that the torque adjustment collar (2) is at posi-

tion “drill bit”.


Begin drilling at a very low speed to prevent the bit 

from slipping off the starting point.


Always clamp sheet metal.


Support thin metal with a block of wood to avoid dis-

torting it.


Use a punch to mark the centre of the hole.


Use a suitable lubricant for the material you are work-

ing on.

Material

Lubricant

Steel

Oil

Aluminium

Turpentine or paraffin

Brass, copper or  
cast iron

Do not lubricate

Drilling plastics and plastic coated chipboard


Use high speed drill bits.


Refer to “Drilling wood” below.

Drilling masonry (BUR2 18Li HD)


▪ For  maximum  performance  use  carbide-tipped  ma

-

sonry impact bits when drilling holes in brick, tile, 
concrete etc. 


Turn the speed selector (3) to position “2”, then rotate 

the torque collar (2) to the impact drill position. 


Apply light pressure and medium speed for best re-

sults in brick. 


Apply additional pressure and high speed for hard ma-

terials such as concrete.


When drilling holes in tile, practice on a scrap piece to 

determine the best speed and pressure. 

Drilling wood


▪ For maximum performance, use high speed steel bits 

for wood drilling.


Ensure that the torque adjustment collar (2) is at posi-

tion “drill bit”.


Begin drilling at a very low speed to prevent the bit 

from slipping off the starting point. Increase the speed 
as the drill bites into the material.


When drilling through holes, place a block of wood 

behind the work piece to prevent ragged or splintered 
edges on the back side of the hole.

All drilling operations


Use only sharp drill bits.


Mark off the centre of the hole using a centre punch 

or nail.

SCREWING / UNSCREWING

Select the appropriate torque by placing one of the num-
bers, marked on the torque adjustment collar (2), against 
the arrow on the tool body.
Insert the necessary bit.


WARNING:

 Over-tightening can result in the 

screw breaking or damage to the end of the driver bit. 


WARNING:

  If the machine is held at an angle 

to the screw being tightened, the head of the screw 

may be damaged, or the specified torque may not be 

transmitted to the screw. Always keep the machine 
and the screw being tightened in a straight line.

pages BR2-BUR2-18Li HD-2017.indd   7

9.2.2018 г.   10:27:00

Summary of Contents for HD Professional BR2 18Li HD

Page 1: ...45 1 EN 60745 2 1 EN 60745 2 2 EN 55014 1 EN 55014 2 EN 50581 Il fascicolo tecnico viene custodito presso la SPARKY ELTOS AD 5500 Lovech via Kubrat n 9 Bulgaria DECLARACIÓN DE CONFORMIDAD Declaramos bajo nuestra exclusiva responsabilidad que el producto descrito en los Datos técnicos está conforme con todas las dispo siciones aplicables de la presente directrices aplicables y las correspondientes ...

Page 2: ...45 1 EN 60745 2 1 EN 60745 2 2 EN 55014 1 EN 55014 2 EN 50581 Il fascicolo tecnico viene custodito presso la SPARKY ELTOS AD 5500 Lovech via Kubrat n 9 Bulgaria DECLARACIÓN DE CONFORMIDAD Declaramos bajo nuestra exclusiva responsabilidad que el producto descrito en los Datos técnicos está conforme con todas las dispo siciones aplicables de la presente directrices aplicables y las correspondientes ...

Page 3: ......

Page 4: ......

Page 5: ......

Page 6: ...Quality Standards You will find your new tool easy and safe to operate and with proper care it will give you many years of dependable service WARNING Carefully read through this entire Instruction Manual before using your new SPARKY power tool Take special care to heed the Warnings Your SPARKY power tool has many features that will make your job faster and easier Safety performance and dependabili...

Page 7: ...s use Conforms to the relevant European Directives Conforms to the requirements of Customs Union regulations Refer to original instructions YYYY Www Production period where the variable symbols are YYYY year of manufacture ww calendar week number BR BUR CORDLESS DRILL DRIVER Recycle Li Ion battery packs Do not heat protect from direct exposure to sun and fire Do not wet protect from rain and water...

Page 8: ...to compare one tool with another It may be used for a preliminary assessment of exposure The declared vibration emission level represents the main applications of the tool However if the tool is used for dif ferent applications with different accessories or poorly maintained the vibration emission may differ This may signifi cantly increase the exposure level over the total working period An estim...

Page 9: ...e personal injuries c Prevent unintentional starting Ensure the switch is in the off position before connecting to power source and or battery pack picking up or carrying the tool Carrying power tools with your finger on the switch or energising power tools that have the switch on invites accidents d Remove any adjusting key or wrench before turning the power tool on A wrench or a key left attache...

Page 10: ...her than those mentioned in this Manual will be considered a case of misuse The user and not the manufacturer shall be liable for any damage or in jury resulting from such cases of misuse To use this tool properly you must observe the safety regulations the assembly instructions and the oper ating instructions to be found in this Manual All per sons who use and service the machine have to be acqua...

Page 11: ...o the left to clockwise rotation When the ON OFF switch 5 is depressed lever 6 can not be actuated WARNING Reversing can be performed only when the spindle is not rotating The direction of rotation of the chuck is blocked in cen tral neutral position A of forward reverse switch 6 This position shall be used during transport replacing the tool fitting and removing the auxiliary handle 12 BUR2 18Li ...

Page 12: ... thin metal with a block of wood to avoid dis torting it Use a punch to mark the centre of the hole Use a suitable lubricant for the material you are work ing on Material Lubricant Steel Oil Aluminium Turpentine or paraffin Brass copper or cast iron Do not lubricate Drilling plastics and plastic coated chipboard Use high speed drill bits Refer to Drilling wood below Drilling masonry BUR2 18Li HD F...

Page 13: ...ty and reliability repairs maintenance and adjustment including brush inspection and replacement should be performed by certified service centres or other qualified service or ganisations always using genuine replacement parts Warranty The guarantee period for SPARKY power tools is deter mined in the guarantee card Faults due to normal wear overloading or improper han dling will be excluded from t...

Page 14: ... вам в течение долгого времени ПРЕДОСТЕРЕЖЕНИЕ Прочтите внимательно и целиком инструкцию по эксплуатации перед использованием новоприобре тенного электроинструмента SPARKY Обратите специальное внимание на параграфы обозначенным словом Предостережение У Вашего электроинструмента SPARKY много качеств которые облегчают работу При разработке этого инструмента основное внимание было направлено на безоп...

Page 15: ... о пользовании Соответствует релевантным европейским директивам Соответствует требованиям правил Таможенного союза Ознакомьтесь с инструкцией по эксплуатации YYYY Www Период производства где переменные символы означают YYYY год производства ww очередная календарная неделя BR BUR АККУМУЛЯТОРНАЯ ДРЕЛЬ ШУРУПОВЕРТ Утилизация Li Ion батарей Не нагревать хранить вдали от солнечного света и и огня Не моч...

Page 16: ...енный согласно EN 60745 Показатель замеренных вибраций при ударном действии ah ID m s2 16 Неопределенность Кh ID m s2 1 5 Показатель замеренных вибраций ah D m s2 2 5 2 5 Неопределенность Кh D m s2 1 5 1 5 Вибрации замерены согласно п 6 2 7 EN 60745 1 Модели ударного действия Указанный в настоящую инструкцию уровень вибраций измерен в соответствии с установленную EN 60745 методику испытаний и може...

Page 17: ...ы которые могут воспламенить пыль или пары c Держите детей и посторонних лиц на рас стоянии когда работаете с электроинстру ментом Рассеивание может привести к по тере контроля с Вашей стороны 2 ЭЛЕКТРИЧЕСКАЯ БЕЗОПАСНОСТЬ a Штепселя электроинструментов должны соответствовать контактным гнездам Никогда не меняйте штепсель каким ли бо способом Не используйте какие либо адаптерные штепселя для электр...

Page 18: ...как начать любые настройки перед за меной принадлежностей или перед тем как убрать электроинструмент для хранения Эти меры предосторожности снижают риск невольного пуска электроинструмента d Сохраняйте неиспользованные электро инструменты в местах недоступных для детей и не позволяйте обслуживающему персоналу который не знаком с электроин струментом или инструкциями по эксплуа тации работать с ним...

Page 19: ...зультате неправильного употребле ния несет потребитель а не производитель Для правильной эксплуатации электроинстру мента необходимо соблюдать правила техники безопасности общие инструкции и указания по работе указанные здесь Все потребители долж ны ознакомиться с инструкцией по эксплоатации ипроинформироватьсяовсехвозможныхрисках связанных с работой электроинструмента Детям и физически ослабленны...

Page 20: ...ческие перегрузки Ин дикация активируется во время использования машины После включения защиты машина от ключается Чтобы восстановить нормальную работу освободите и вновь нажмите на выключатель 5 СВЕТОДИОДНОЕ ОСВЕЩЕНИЕ РАБОЧЕЙ ЗОНЫ Включение светодиодного осветления осуществля ется посредством нажатия на выключатель 5 Све тодиодное осветление рабочей зоны отключается автоматически через 5 секунд п...

Page 21: ...ю нейтральную позицию А Дрель оборудована блокирующимся шпинделем Это означает что при попытке повернуть патронник вручную шпиндель автоматически заблокируется Чтобы демонтировать или отрегулировать длину рабочего инструмента необходимо крепко сжимая патронник повернуть его корпус Удерживая инструмент одной рукой другой по верните патронник чтобы открыть патронник поверните его против часовой стре...

Page 22: ...отив стрелки на корпусе Вставьте необходимый наконечник ПРЕДУПРЕЖДЕНИЕ Слишком тугое за кручивание может привести к поломке шурупа или повреждению наконечника ПРЕДУПРЕЖДЕНИЕ Если держать ин струмент под углом к шурупу можно повредить головку шурупа или же момент вращения не бу дет полностью передан шурупу Всегда удержи вайте инструмент и шуруп на одной линии ПРЕДУПРЕЖДЕНИЕ Всегда носите за щитные ...

Page 23: ...полни тельной оплаты путем замены или ремонта Рекламации дефектного электроинструмента SPARKY принимаются в том случае если машина будет возвращена поставщику или специализиро ванному гарантийному сервизу в не разобранном первоначальном состоянии Замечания Внимательно прочитайте всю инструкцию по экс плуатации перед тем как использовать это изде лие Производитель сохраняет за собой право вносить в...

Reviews: