


Hardware Installation
SY-6VCA
45
Step 1.
Select [STANDARD CMOS SETUP]
Set [Date/Time] and [Floppy drive type], then set [Hard Disk Type] to
“Auto”.
Step 2.
Select [LOAD SETUP DEFAULT]
Select the “LOAD SETUP DEFAULT” menu and type “Y” at the prompt
to load the BIOS optimal setup.
Step 3.
Select [SOYO COMBO SETUP]
Move the cursor to the
[CPU Frequency]
field to set the CPU frequency.
Available [CPU Frequency] settings on your SY-6VCA Motherboard are
detailed in the following table.
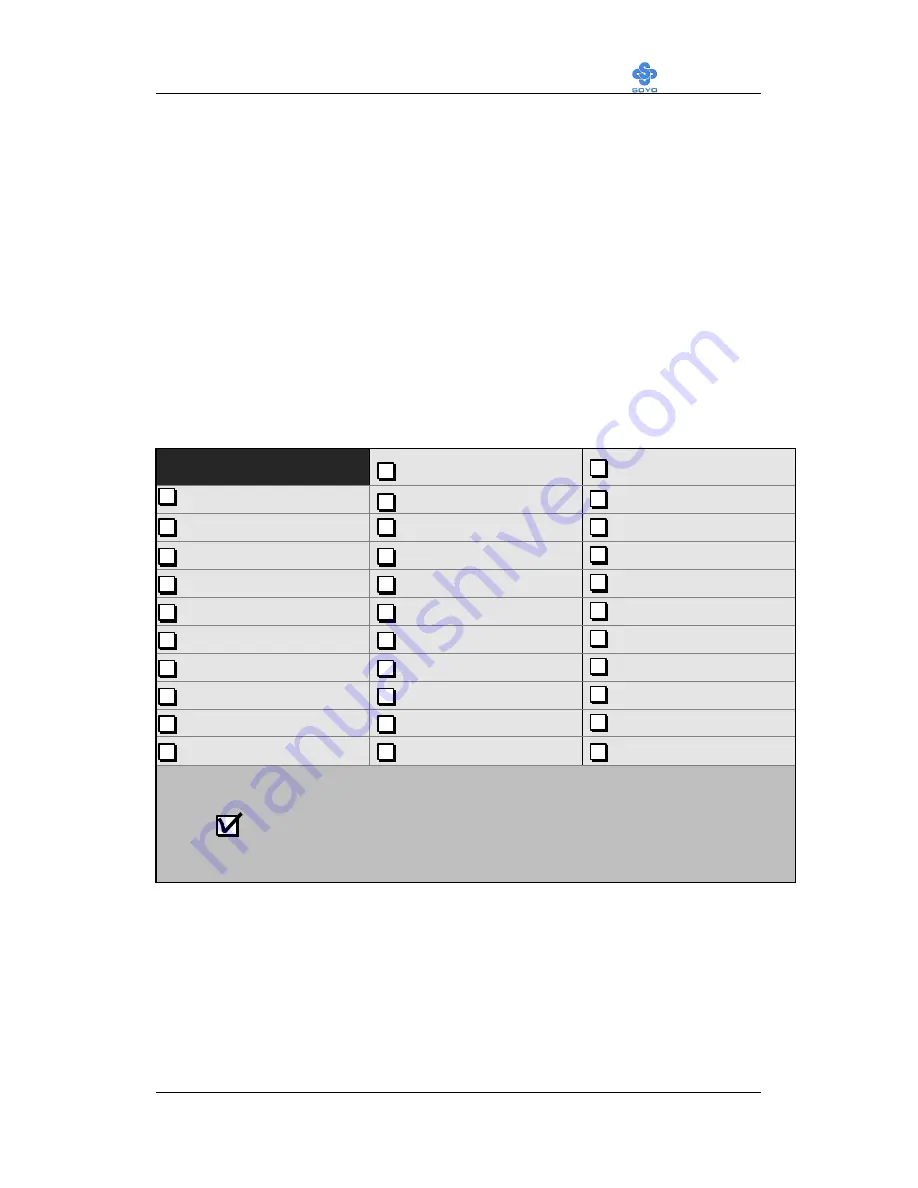
CPU Frequency (MHz)
500MHz( 66 x 7.5)
750MHz (100 x 7.5)
Manual
533MHz ( 66 x 8.0)
800MHz (100 x 8.0)
200MHz (66 x 3.0)
300MHz (100 x 3.0)
400MHz (133 x 3.0)
233MHz (66 x 3.5)
350MHz (100 x 3.5)
466MHz (133 x 3.5)
266MHz (66 x 4.0)
400MHz (100 x 4.0)
533MHz (133 x 4.0)
300MHz (66 x 4.5)
450MHz (100 x 4.5)
600MHz (133 x 4.5)
333MHz (66 x 5.0)
500MHz (100 x 5.0)
666MHz (133 x 5.0)
366MHz (66 x 5.5)
550MHz (100 x 5.5)
733MHz (133 x 5.5)
400MHz (66 x 6.0)
600MHz (100 x 6.0)
800MHz (133 x 6.0)
433MHz (66 x 6.5)
650MHz (100 x 6.5)
866MHz (133 x 6.5)
466MHz ( 66 x 7.0)
700MHz(100 x 7.0)
933MHz (133 x 7.0)
Select the working frequency of your Pentium
®
III,
Pentium
®
II, Celeron
processor
among these preset values.
Note:
Mark the checkbox that corresponds to the working frequency of your
Pentium
®
III,
Pentium
®
II, Celeron
processor in case the CMOS configuration
should be lost.
If you set this field to [Manual], you are required to fill in the next
two consecutive fields: (1) the CPU Host/PCI Clock, and (2) the CPU
Ratio.
Summary of Contents for SY-6VCA
Page 100: ...96...