SOYO SY-6ICA Quick Start Manual Download Page 8

SY-6ICA 

Quick Start Guide

8

Hardware Installation

Step 2. 

 Connections to the Motherboard

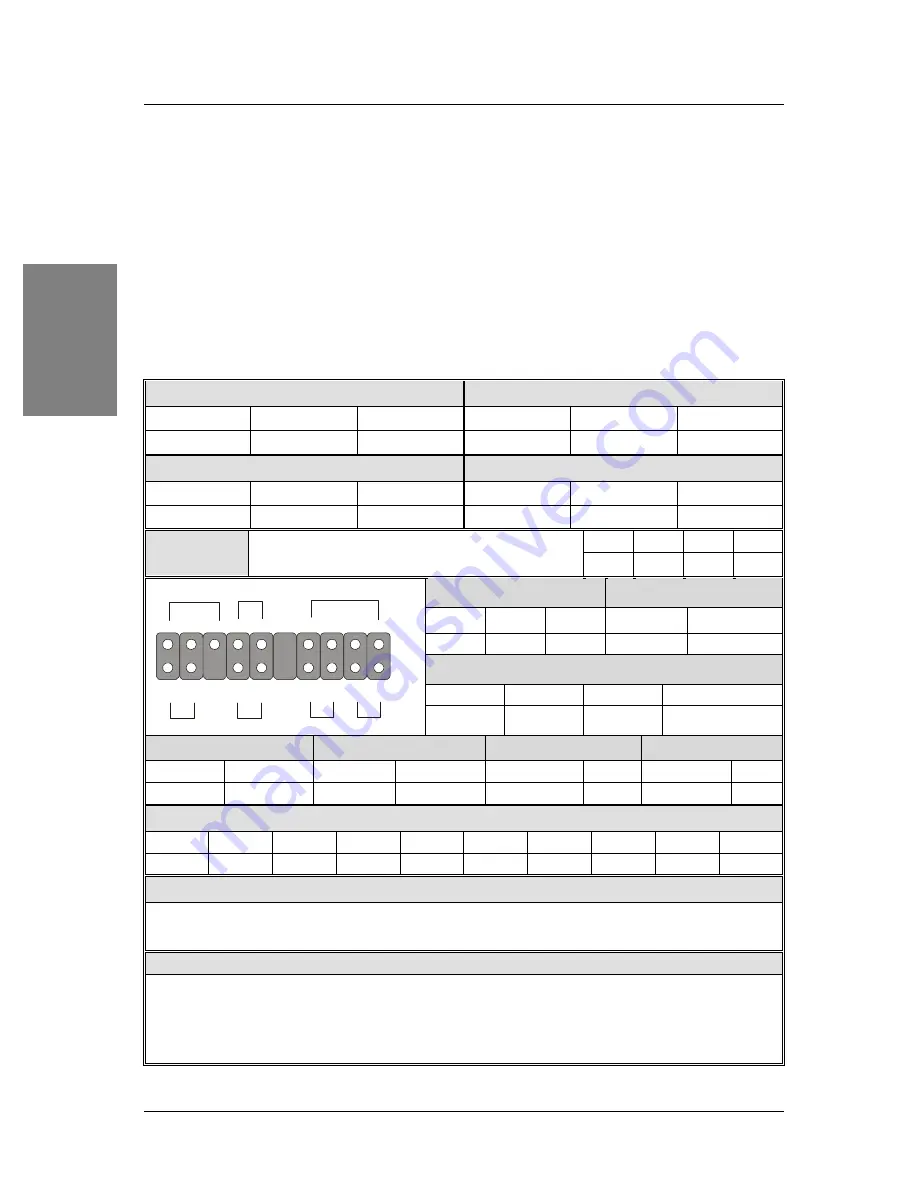
This section tells how to connect internal peripherals and the power supply to the Motherboard.

The internal peripherals consist of IDE devices (HDD, CD-ROM), Floppy Disk Drive, Chassis
Fan, Front Panel Devices (ACPI LED, Internal Speaker, Reset Button, IDE LED, and
KeyLock Switch.), Wake-On-LAN card, VGA card, Sound Card, and other devices.

For more details on connecting internal and external peripherals to your new SY-6ICA
Motherboard, please refer to 

SY-6ICA Motherboard User's Guide and Technical Reference

online manual on the CD-ROM.

Connectors and Plug-ins

Wake-On-LAN Header: JP44

CPU Cooling Fan: CPUFAN

Pin1

Pin2

Pin3

Pin1

Pin2

Pin3

5VSB

GND

MP-Wakeup

GND

12V

SENSOR

Chassis Fan: CHAFAN

Power Fan: PWRFAN

Pin1

Pin2

Pin3

Pin1

Pin2

Pin3

GND

12V

SENSOR

GND

12V

SENSOR

Pin1

Pin2

Pin3

Pin4

CD -IN: J10

Connect to your CD-ROM audio output.

R

G

L

G

Power LED

Keylock

Pin1

Pin2

Pin3

Pin1

Pin2

5V

NC

GND Control Pin

GND

Speaker

Pin1

Pin2

Pin3

Pin4

5V

NC

NC

Speaker out

HDD LED

ACPI LED

PWRBT

RESET

Pin1

Pin2

Pin1

Pin2

Pin1

Pin2

Pin1

Pin2

LED Anode LED Cathode LED Anode LED Cathode Power On/Off

GND

Power Good GND

IrDA (Infrared Device Header): IR1

Pin1

Pin2

Pin3

Pin4

Pin5

Pin6

Pin7

Pin8

Pin9

Pin10

VCC

None

IRRX

GND

IRTX

NC

NC

NC

NC

NC

ATX Power On/Off: PWRBT

Connect your power switch to this header (momentary switch type).

To turn off the system, press this switch and hold down for longer than 4 seconds.

ATX Power Supply: ATX PW

Attach the ATX Power cable to this connector. (This motherboard requires an ATX power supply, an AT
power supply can NOT be used.)

When using the Power-On by PS/2 Keyboard function, please make sure the ATX power supply is able to
provide at least 720mA on the 5V Standby lead (5VSB).

Power LED Key Lock

Speaker

Reset

PWRBT

ACPI LED HDD LED

+

+

+

+

 _

 _

 _

 _

1

1

1

Summary of Contents for SY-6ICA

Page 1: ...SY 6ICA Motherboard Quick Start Guide Hardware Installation Quick BIOS Setup Introduction The SOYO CD YAMAHA Sound Driver Installation...

Page 2: ...ribed in it from time to time without obligation to notify any person of such revision or amend The information contained in this manual is provided to our customers for general use Customers should b...

Page 3: ...further information please refer to the SY 6ICA Motherboard Uses Guide that came with your Motherboard Unpacking When unpacking the Motherboard check for the following items u The SY 6ICA FW82820 AGP...

Page 4: ...AW IDE 2 IDE 1 1 1 1 FDC ATX Power LINE OUT LINE IN MIC JACK JOYSTICK JP9 JP7 JP10 1 3 JP1 JP44 WOL Header 3 1 JP5 Jumper CMOS Clear RIMM 1 RIMM 2 1 1 2 CHAFAN COM2 PCI Slot 2 CODEC AC97 Speaker Keylo...

Page 5: ...Supports Suspend to RAM Supports onboard hardware monitoring and includes Hardware Doctor utility Fan speed control Battery Low voltage Detect Support 7 sets of voltage monitoring Supports multiple bo...

Page 6: ...ct method to install your new SY 6ICA Motherboard For detailed information please refer to the SY 6ICA Motherboard User s guide and Technical Reference online manual on in the CD ROM package that came...

Page 7: ...133x3 0 533MHz 133x4 0 667MHz 133x5 0 466MHz 133x3 5 600MHz 133x4 5 733MHz 133x5 5 CPU Mount Procedure To mount the processor that you have purchased separately follow these instructions Retention Mo...

Page 8: ...AN Pin1 Pin2 Pin3 Pin1 Pin2 Pin3 GND 12V SENSOR GND 12V SENSOR Pin1 Pin2 Pin3 Pin4 CD IN J10 Connect to your CD ROM audio output R G L G PowerLED Keylock Pin1 Pin2 Pin3 Pin1 Pin2 5V NC GND ControlPin...

Page 9: ...MHz Direct RDRAMs are supported At a FSB frequency of 133MHz 356 400MHz direct RDRAMs are supported providing up to 1 6GB sec of data transfer rate Memory Configuration Direct Rambus signals are daisy...

Page 10: ...area will need to be flashed to complete the BIOS upgrade procedure Setting JP9 to open will cause incomplete BIOS update in that case The FWH Boot Block Write Protect Locked Unlocked JP9 Setting open...

Page 11: ...Short pin 2 3 Step 8 CPU Core Voltage Adjust JP15 In case your CPU is running on a frequency higher then it is specified for increasing its core voltage can enhance its stability Over clocking your CP...

Page 12: ...ncy CPU Safe Mode Normal Force actual CPU Frequency JP7 Setting Open JP7 Close JP7 Note After properly booting up set JP7 back to open again Step 10 CMOS Clear JP5 After you have turned off your compu...

Page 13: ...oad Optimized Defaults menu and type Y at the prompt to load the BIOS optimal setup Step 3 Select Soyo Combo Feature Move the cursor to the CPU Frequency field to set the CPU frequency Available CPU F...

Page 14: ...Step 1 Insert the SOYO CD into the CD ROM drive The SOYO CD will auto run and the SOYO CD Start Up Menu will be as shown If you use Windows NT the SOYO CD will not detect your motherboard type In tha...

Page 15: ...whether or not you want to install it You must install the Acrobat Reader utility to be able to read the user s manual file Follow the instructions on your screen during installation then once the ins...

Page 16: ...on for other operating systems YAMAHA XGstudio program for Win 9x NT The Application program allows the user to make full use of the functionality that the Yamaha sound chip has to offer Make sure to...

Page 17: ...Enter the SOYO CD Click the Enter SOYO CD button to enter the SOYO HTML database The Start Up program will activate the default HTML browser installed on your system for example Internet Explorer or...

Page 18: ...ect properties driver update driver Now an update menu will be shown If windows asks you for the location of the driver give it the following directory d driv com yamaha win95 98vxd v4 06 1010 After t...

Page 19: ...ation please go to the following directory YAMAHA Codec Application Driver directory driv com yamaha Ystation v3 26 Setup exe and run the setup exe file This will install the application Wavetable for...

Page 20: ...erboard on the table to isolate it from the case with the CPU and speaker only and give it one more try I hear a series of beeps and I do not get anything from my monitor What could be wrong The follo...

Page 21: ...find the latest BIOS revision Hard disk floppy drive CD ROM etc When I boot up my new computer I got floppy boot failure and the LED on the floppy stays on Make sure the red wire of floppy ribbon cabl...

Page 22: ...takes IRQ5 then set IRQ5 to Legacy ISA Next install the south bridge driver for the motherboard The sound and everything else works fine except that the recorder and microphone do not work What is wr...

Page 23: ...pport mail soyo com tw SOYO Europe BV Signaalrood 19 2718 SH Zoetermeer The Netherlands Region Covered Europe except Germany Web Site www soyo nl www soyo europe com Sales Tel 31 69 3637500 Fax 31 79...

Page 24: ...Support tel 82 2 717 4392 fax 82 2 712 5853 e mail soyok chollian net SOYO Hong Kong Region Covered Hong Kong Web Site www soyo com hk Sales tel 852 27109810 fax 852 27109078 E mail soyo hkstar com Te...

Page 25: ......

Page 26: ...Edition February Version 1 0 SY 6ICA SERIAL...

Reviews: