Sovereign S-22-DGP-E-S Instructions Manual Download Page 5

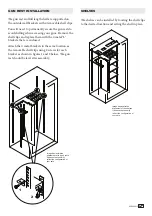
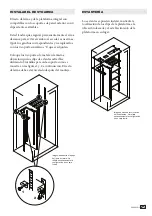
Reposition the safe and secure the safe with the lag 

bolts and gasket washers.  Replace the hole covers.

IMPORTANT:  When you drill out the fire resistant 

caulking from the mounting hole you must mount 

the safe to the floor using the lag bolts and gasket 

washers.  Failure to do so will void the fire rating 

and waterproof rating.

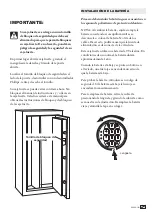
Place the safe in the desired location.  When your safe 

is open, you will find 2 plastic disks covering the 

mounting hole locations in the floor of the safe.  

Remove the plastic disks to uncover the mounting 

holes.  These holes are filled with fire resistant 

caulking which must be drilled out before mounting 

the safe to the floor.  Use a 3/8" diameter drill bit to 

drill out this caulking.  Continue to use this drill to 

mark the hole location on the floor.  Move the safe 

away.  Drill pilot holes in the floor as follows:  For a 

wood floor drill 5/16" diameter x 2-1/2" deep pilot 

holes.  For a masonry floor drill 7/16" diameter x 

2-1/2" deep pilot holes for the anchors.

You must remove the safe from the skid/legs and 

place the safe on the floor.  Failure to do so will void 

the fire and waterproof ratings.

The safe must be fastened to the floor using the lag 

bolts and gasket washer provided with this safe to 

insure the waterproof rating.  Failure to do so will 

void the waterprooof rating.

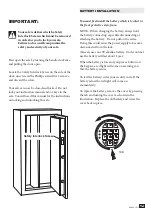
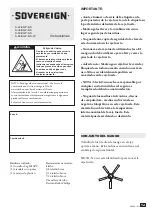
WARNING:  Because this safe is 

waterproof it will float if not secured.  

As the water level rises, the safe will 

begin to float and could fall over 

causing personal injury.
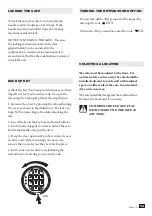
SECURING THE SAFE

NOTE:  This safe must be mounted to the floor.  

Failure to do so will compromise the safety and 

security of the safe.

NOTE:  This safe must be secured to the floor.  

Use the hardware provided.

40664-1511

5 18

Summary of Contents for S-22-DGP-E-S

Page 1: ...ons WARNING Tip Over Hazard A child or adult can tip the safe and be killed or seriously injured Failure to secure the safe as shown in these instructions can result in death or serious injury to chil...

Page 2: ...ight will come on momentarily To replace the battery remove the cover by pressing the tab and turning the cover as shown in the illustration Replace the old battery and screw the cover back in place I...

Page 3: ...ou write down your combination you must keep this information in a secure place away from children not inside the safe Then you should close and lock the safe When you open the safe in the future ente...

Page 4: ...w 1 Remove the cover by pressing the tab and turning the cover as shown in the illustration The lock can hang by the connecting cable while unlocking the safe 2 Insert the key in the key hole and turn...

Page 5: ...the hole location on the floor Move the safe away Drill pilot holes in the floor as follows For a wood floor drill 5 16 diameter x 2 1 2 deep pilot holes For a masonry floor drill 7 16 diameter x 2 1...

Page 6: ...brackets in the same location as the removable shelf clips using 2 screws for each bracket as shown in figures 1 and 2 below The gun rest should be level after assembly 1 2 SHELVES The shelves can be...

Page 7: ...key number and combination in a secure place separate from your safe To order a replacement key set follow the instructions on the attached form DOOR STORAGE Your door organizer provides a variety of...

Page 8: ...urchased___ ___ ____ Owner s Address ___________________________ Unit or Apt Number _________________ City ___________________________ State _______________ Zip Code________________ Telephone Number _...

Page 9: ...of the safe and its contents Any repair dismantling or tampering undertaken without the prior written approval or direction of Stack On will nullify this guarantee Personal property in the safe is not...

Page 10: ...nstrucciones WARNING Peligro de Vuelco Un ni o o un adulto puede volcar la caja fuerte y ser matado o herido gravemente El fracaso para asegurar la caja fuerte como se muestra en estas instrucciones p...

Page 11: ...a reemplazar la bater a retire la cubierta presionando la leng eta y girando la cubierta como se muestra en la ilustraci n Reemplace la bater a vieja y atornille la tapa en su lugar IMPORTANTE Su caja...

Page 12: ...roduce el c digo de seguridad incorrecto 3 veces usted tendr un bloqueo autom tico durante 20 segundos antes de poder probar su c digo de nuevo Si se introduce el c digo de seguridad incorrecto 3 vece...

Page 13: ...a presionando la leng eta y girando la cubierta como se muestra en la ilustraci n El bloqueo puede colgar por el cable de conexi n mientras que el desbloqueo de la caja fuerte 2 Introduzca la llave en...

Page 14: ...del agujero en el suelo Mueva la caja fuerte lejos Perforar agujeros piloto en el suelo de la siguiente manera Para un taladro piso de madera 5 16 de di metro x 2 1 2 agujeros piloto profundas para un...

Page 15: ...caci n que los clips de estantes extra bles utilizando 2 tornillos para cada soporte como se muestra en las figuras 1 y 2 a continuaci n El resto del arma debe estar nivelado despu s del montaje ESTAN...

Page 16: ...n un lugar seguro separado de su caja fuerte Para pedir un juego de llaves de repuesto siga las instrucciones en el formulario adjunto PUERTA DE ALMACENAMIENTO Su organizador puerta ofrece una varieda...

Page 17: ...pra___ ___ ____ Direcci n propietario _____________________________ No Interior _________________ Ciudad ________________________ Estado _______________ C P ________________ No Tel fono ____ _________...

Page 18: ...instalaci n de la caja fuerte y su contenido Cualquier reparaci n desmantelamiento o la manipulaci n realizada sin la aprobaci n previa por escrito o la direcci n de Stack On anular esta garant a La p...

Reviews: