SoundFreaq Sound Step SFQ-02RB User Manual Download Page 11

.10.

Playing back from iPad/iPhone/iPod

Playing back from iPad/iPhone/iPod

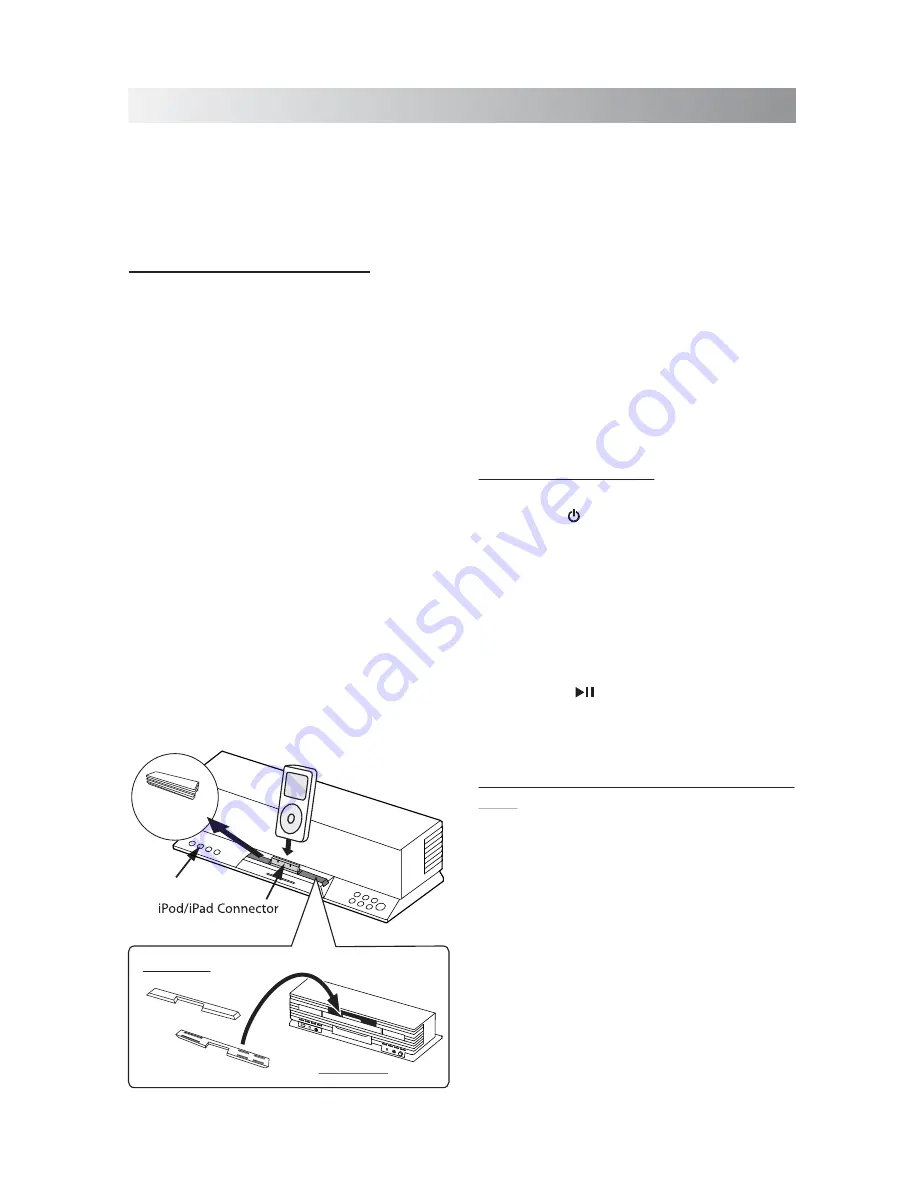
Setting an iPod on the Unit

 

Compatible  iPod  Players: 

  Most  Apple  iPod 

models  with  30-pin  dock  connectors  as 
follows:  iPad,  iPod  nano  6th  generation,  iPod 
nano  5th  generation  (video  camera),  iPod 
nano  4th  generation  (video),  iPod  nano  3rd 
generation (video), iPod nano 2nd generation 
(aluminum),    iPod  nano  1st  generation,  iPod 
4th generation (color display), iPhone, iPhone 
3G/3GS,  iPhone  4,  iPod  classic,  iPod  5th 
generation (video), iPod 4th generation, iPod 
touch  4th  generation,  iPod  touch  3rd 
generation,  iPod  touch  2nd  generation,  iPod 
touch 1st generation,  iPod mini. 

1.  Remove  the  rubber  cover  from  the  iPod 

connector.

2.    Connect  your  iPod.  Make  sure  the  connector 

plug  of  unit  is  firmly  inserted  into  the 
connector port of iPod.

Note

: 

In  this  user  manual, “iPod”  is  used  as  a 

general reference to functions on an iPod, iPhone 
or iPad, unless otherwise specified by the text or 
illustrations.

Listening to an iPod

1.   Press the "     " button to power on the system.
2.  Set an iPod on the unit and press the 

DOCK


button to switch to the iPod mode if the unit 
is not in the iPod mode.


Note:

 Before listening to a track from an iPod 

touch,  iPhone  or  iPad,  you  need  to  tap  the 
corresponding icons on the display to select 
a track.   

3.


Press the  “         ” button to play the track. 

Viewing  a  Video/Picture  from  an 

iPod

When  viewing  a  video/picture  from  your  iPod 
on  your  TV,  use  a  composite  video  cord  (not 
supplied)  to  connect  the 

VIDEO  OUT

  jack  on 

the unit and the composite video input on your 
TV.

DOCK

 Button

Rubber Cover

Rubber Pad

Back of Unit

Top

Bottom

Stick

Notes:

    I

f  you  are  docking  your  device  with  a  case, 

you can remove the rubber pad to secure a 
better  fit  and  connection.  Both  the  rubber 
cover  and  pad  can  be  conveniently  stuck 
anywhere along the ribs on the back of the 
Sound Step.

    Always    set    volume  to  the  minimum  when 

connecting  or  disconnecting  the  other 
equipment.

   When  you  connect  your  iPod  to  unit,  make 

sure you insert it all the way.

Summary of Contents for Sound Step SFQ-02RB

Page 1: ...SFQ 02RB Sound Step...

Page 2: ...has been damaged in any way such aspower supplycordorplugisdamaged liquid has been spilled or objects have fallen into the apparatus the apparatus has been exposed to rain or moisture does not operat...

Page 3: ...If this equipment does cause harmful interference to radio or television reception which can be determined by turning the equipment off and on the user is encouraged to try to correct the interference...

Page 4: ...posal of Old Equipment European Union This symbol indicates that the electricalandelectronicequipment should not be disposed as general household waste at its end of life Instead the product should be...

Page 5: ...Picture from an iPod Charging an iPod Playing back via Bluetooth Downloading the SoundFreaq App Using Multiple Bluetooth Devices Playing back from Macbook or Macbook Pro Playing back from PC Notebook...

Page 6: ...ll 2 Match the polarity on the Lithium Cell with a plus sign on the battery tray 3 Slide the tray with new battery into the battery compartment until you hear a click sound 1 2 Squeeze Pull C 2025 3V...

Page 7: ...rt to give off heat crack or start a fire Do not poke the battery with tweezers or similar tools Doing this may cause the battery to give off heat crack or start a fire Dispose of battery in the prope...

Page 8: ...ttery is low You must charge this unit for 12 hours before using for the first time Notes The battery cannot be replaced by the user It takes about 3 hours to charge the battery from empty to full Do...

Page 9: ...Cubed High Definition Wide Stereo sound effect Lights when the U Cubed is activated 2 DOCK button and indicator Switch to iPod mode Lights when the unit is in iPod mode 3 Bluetooth button and indicato...

Page 10: ...the AC adapter in order to maximize the battery life you cannot turn on the unit with the button on remote control 1 Standby button Switch power on mode to standby mode 2 Play Pause button Play pause...

Page 11: ...less otherwise specified by the text or illustrations Listening to an iPod 1 Press the button to power on the system 2 Set an iPod on the unit and press the DOCK button to switch to the iPod mode if t...

Page 12: ...ot touch or hit the iPod terminal pins or the connector pins directly It might cause damages to the connector part If the iPod does not play correctly please update your iPod software to the latest ve...

Page 13: ...nge the device name on your Bluetooth enabled device after the pair is successfully set up Playing back via Bluetooth Downloading the SoundFreaq App We have developed an App to give you full control f...

Page 14: ...ords remove it And then select Setup New Device again 3 Select Sound Pla and the type should be Audio in the latest SFQ 02RB unit Click the Continue to proceed pairing process 4 Once completed the pai...

Page 15: ...Auto Scan function and then release the button The frequency will be scanned automatically until a radio station is found Or press again to quit search while searching Presetting a Station Note Prese...

Page 16: ...ime you press the volume buttons to adjust the level the power indicator will blinks Playing back from External Source Listening to an External Audio Device Digital Music Player or Any Other Audio Sou...

Page 17: ...eck if the volume level is set to the minimum Check if the volume level of your Bluetooth device connected to the system is set to the minimum Check if the volume level is muted Press MUTE button on t...

Page 18: ...including remote control Model Type Support Bluetooth Support Profile Bluetooth 1 2 2 0 and 2 1 compliant Sound Step A2DP Input Sensitivity Impedance AUX Input 1200 mV Tuner Band Tuning Range Frequenc...

Page 19: ...Save this manual...

Reviews: