background image

ADVANCED OPERATION

20

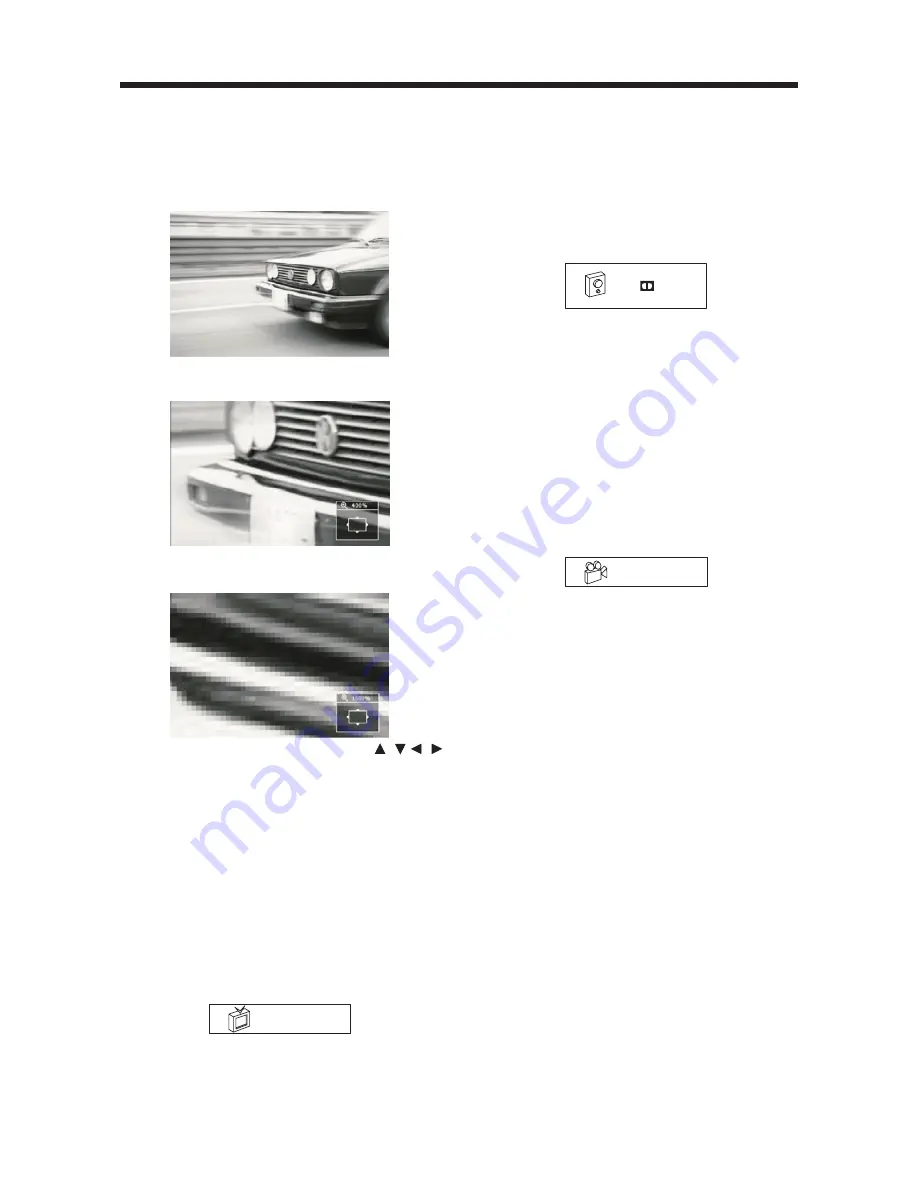
ZOOM FUNCTION

When playing DVD, VCD or some data
discs which including picture files, if you
want to view some parts of the picture
clearer:

1) Press 

ZOOM

 button to zoom in the

picture 4 times.

2) Press

 ZOOM

 button again to zoom in

the picture 16 times.

3) During zoom mode, pressing 

 /  ,   / 

 buttons will move pictures up, down,
left or right direction in order to find the
picture that you want to zoom in.

4) When the sale is 16 times, press 

ZOOM

button again to cancel the 

ZOOM

function.

SPECIAL FUNCTIONS FOR DVD

Multi-subtitle Language Function

Press 

SUB-T

 during playback. The

following information will be shown on
the screen.

OFF

Each time the button is pressed, the
subtitle language changes in sequential
order.
Notes:
- The language number is different

according to the disc.

- Some discs only contain one subtitle

language.

Multi-audio Language Function

Press 

AUDIO

 during playback. The

following information will be shown on
the screen.

1.ENG

 D

3/2.1

Each time the button is pressed, the
audio soundtrack language changes in
sequential order.
Notes:
- The language number is different 

according to the disc.

- Some discs only contain one 

soundtrack  language.

Multi-angle Function

Press 

ANGLE

 during playback. The

following information will be shown on
the screen.

1/1

Each time the button is pressed, the
angle changes in sequential order.
Notes:
- The angle number is different

according to the disc.

- The function only works for discs 

having scenes recorded at different
angles.

FREQUENTLY ASKED QUESTIONS

• When inserting a DVD disc, why it can’t

be played, just showing “region error”?
It is because that the DVD player and
the discs all have the “REGION CODE”.
If the region number described on the
DVD disc does not correspond to the
region number of this DVD player, the
unit cannot play the disc.

• When inserting a DVD disc, there is a

window shown on the screen that
requires entering 4 characters
password, why?
It is because that the current disc has
“Parental Control” level, and the player’s
parental level is set below the level of
the disc, you should enter the correct
password to play the disc normally.

Summary of Contents for SDVD550T

Page 1: ......

Page 2: ...ose the product to water or excessive moisture This could cause electrical shorts fire or other damage When Parked Parking in direct sunlight can produce very high temperatures inside your vehicle Give the interior a chance to cool down before starting playback Use the Proper Power Supply This product is designed to operate with a 12 volt DC negative ground battery system the regular system in a N...

Page 3: ...lay Operation 16 Radio Operation 17 Advanced Operation 17 Repeat Play Paragraph Repeat Play 17 PBC Menu Playback of VCD SVCD 17 On screen Display Function 18 PAL NTSC System Selection 19 Random Playing 19 Zoom Function 20 Special Function for DVD 20 Special Function for VCD 21 Data Disc and Audio CD Play Operation 21 Setup 23 Language Setup 23 Display Setup 24 Audio Setup 24 Lock Setup 25 Others S...

Page 4: ...IS DEVICE IS INTENDED FOR CONTINUOUS OPERATION This product incorporates copyright protection technology that is protected by method claims of certain U S patents and other intellectual property rights owned by Macrovision Corporation and other rights owners Use of this copyright protection technology must be authorized by Macrovision Corporation and is intended for home and other limited viewing ...

Page 5: ...d cleaners as they may mar the surface of the disc Note A disc may become somewhat scratched although not enough to make it unusable depending on your handle it and conditions in the usage environment Note these scratches are not an indication of any problem with the player Preparing New Discs with Rough Spots A new disc may have rough edges on its inside and outside edges If a disc with rough edg...

Page 6: ...NT REAR MOUNT This unit can be properly installed either from Front conventional DIN Front mount or Rear DIN Rear mount installation utilizing threaded screw holes at the sides of the unit chassis For details refer to the following illustrated installation methods 30 DIN FRONT MOUNT Method A Installation Opening This unit can be installed in any dashboard having an opening as shown below Installin...

Page 7: ...the other end of metal strap to a solid metal part of the vehicle under the dashboard This strap also helps ensure proper electrical grounding of the unit Note to install the short threading terminal of the mounting bolt to the back of the unit and the other long threading terminal to the dashboard Sleeve Dashboard Screwdriver Tabs INSTALLATION 10 Reconnect the cable to the vehicle battery s negat...

Page 8: ...the unit to the factory radio mounting brackets 1 Use a screwdriver to loose the hook s screws of the front left and right sides of the unit and remove the hooks 2 Align the screw holes on the bracket with the screw holes on the unit and then tighten the screws 5x5mm on each side Note the outer trim ring sleeve and the metal strap are not used for method B installation 8 Dashboard or Console Facto...

Page 9: ...hen handing 1 Do not drop the front panel 2 Do not put pressure on the display or control buttons when removing or installing the front panel 3 Do not touch the contacts on the front panel or on the main unit body It may result in poor electrical contact 4 If any dirt or foreign substances adhered on the contacts they can be removed with a clean and dry cloth 5 Do not expose the front panel to hig...

Page 10: ...OCKET BLACK RED WHITE ANTENNA CONNECTOR IGNITION SWITCH ACC CHOKE BOX FRONT Lch SPEAKER REAR Lch SPEAKER GREEN GREEN BLACK WHITE WHITE BLACK VIOLET VIOLET BLACK GREY GREY BLACK FRONT Rch SPEAKER REAR Rch SPEAKER BLUE RED YELLOW BLACK GROUND B POWER ANTENNA AUDIO R IN RED AUDIO L IN WHITE VIDEO IN YELLOW AV IN CABLE BLACK FRONT RCA CABLE BROWN Rch Lch RED WHITE DIVERSITY ANTENNA ...

Page 11: ...ND LOUD 12 EQ SW 13 DSP 14 TUNING knob 15 T DN 16 T UP 17 18 RPT 19 RDM 20 IR 21 Liquid Crystal Display 22 Disc Slot LOCATION AND FUNCTION OF KEYS THE PLAYER 11 When remove the front panel 23 RESET button 23 12 8 19 17 14 6 1 5 21 9 10 22 16 7 13 2 15 3 4 11 18 10 20 ...

Page 12: ...12 REMOTE CONTROL LOCATION AND FUNCTION OF KEYS 27 5 3 8 6 9 4 10 7 12 11 23 17 16 14 24 1 2 25 28 31 30 26 29 15 18 19 20 22 21 13 32 33 ...

Page 13: ...k motion 15 Press to play the disc 16 Press to search forward rapidly to search reverse rapidly 17 CH CH Press to skip to the next track press to skip back one track 18 Press it to stop playback 19 Press it to pause playback 20 0 9 Numeric buttons 21 3D LOC During disc playback press it to select normal or 3D surround effect mode In radio mode press and hold it for a long time to select between lo...

Page 14: ...gative terminals of the battery are oriented as indicated 3 Close the cover Battery One button cell lithium battery Using the Remote Control Point the remote control towards the player front face remote sensor IR remote control signal receiver Operation angle About 30 degree in each the direction of the front of the remote sensor REMOTE CONTROL 14 ...

Page 15: ...lity LOUDNESS Press and hold BND LOUD button on the front panel for several seconds or press LOUD button on the remote control to reinforce the bass output Press BND LOUD button on the front panel for several seconds again or press LOUD button on the remote control again to release this function SET THE CLOCK Press the DSP button on the front panel the clock is shown on the LCD display Then press ...

Page 16: ...hlight bars in the menu 3 Press OK button to confirm the selected item Normal Playback X2 X4 X16 X100 Normal Playback X2 X4 X8 X1 32 X1 16 X1 8 x1 4 x1 2 LIQUID CRYSTAL DISPLAY Exhibit current frequency and activated functions on the display of the front panel RESET FUNCTION RESET button is placed on the front panel and must be activated with either a ballpoint pen or thin metal object The reset b...

Page 17: ...n on the remote control to change between PBC ON and PBC OFF on the disc In PBC ON mode REPEAT RANDOM A B PROGRAM functions are unavailable Chapter Title Off DVD Track All Off VCD SVCD CD MP3 WMA SWITCHING TO RADIO MODE Press MODE button to select radio mode the radio mode appears in the display together with the memory band and frequency BAND For the unit with two bands only press BND LOUD button...

Page 18: ...unction Display the elapsed time you can input the time directly to the skip to the corresponding playback point Method Use numeric buttons to input time and confirm with OK button 4 1 ENG D 3 2 1 Item Audio Function Display the current audio soundtrack language and digital audio output it can switch to other audio soundtrack language and digital audio output Method buttons or press AUDIO button 5...

Page 19: ...current track number and total track number such as 1 16 and it can skip to the desired track number Method When in PBC OFF press buttons or use numeric buttons to input and confirm with OK button 2 0 01 45 Item Time Function Display the elapsed time you can input the time directly to the skip to the corresponding playback point Method In PBC mode it can t be changed In PBC OFF mode use numeric bu...

Page 20: ...NG D 3 2 1 Each time the button is pressed the audio soundtrack language changes in sequential order Notes The language number is different according to the disc Some discs only contain one soundtrack language Multi angle Function Press ANGLE during playback The following information will be shown on the screen 1 1 Each time the button is pressed the angle changes in sequential order Notes The ang...

Page 21: ...s menu In this way parents can control the content of films and there is no indication that any censorship has occurred The meaning of the levels 1 to 8 varies depending upon the country and the type of content on the disc The parental control levels are Unlock 1 Kid safe 2 G 3 PG 4 PG 13 5 PG R 6 R 7 NC 17 8 Adult SPECIAL FUNCTIONS FOR VCD For VCD discs there is one special function Program Play ...

Page 22: ...dle area and pressing OK to confirm it will start to display all the pictures in full screen in turn When show the picture in full screen the control bar will be shown on the screen 3 15 90º 90º Prev Next Stop Hide Press or button to rotate the picture 90 counter clockwise or clockwise Press button to skip to the previous or next picture Press button to stop slide show Press CLR button to hide or ...

Page 23: ...n Portuguese French and Russian Disc Audio is used to set a preset value for the playback language of the DVD When play a DVD disc if the disc has a language that matches with the preset value then it will play the language directly if the disc isn t including the language that matches with the preset or the disc has the compelling playback language itself then it will play the default language of...

Page 24: ...n the unit is connected to PAL TV Select AUTO format the player TV output format will be according to the DVD disc format AUDIO SETUP When you open the AUDIO menu you will see the following picture AUDIO Dolby Digital DTS DRC Digital Output Bitstream Bitstream On On Select Move Dolby Digtial means the Dolby digital out type There are Bitstream and PCM to be selected Bitstream When connecting to th...

Page 25: ... when the country code you set in the SETUP menu matches with the disc s own country code the parent level that you set will come into effect The detail operation is When you first set this item it will display NEW and require you to input a new password then input the password again to confirm it Then the first character of the country code will be selected you can use buttons to select upward or...

Page 26: ...rt station search Press CH button on the remote control or T DN button on the front panel to stop searching When you search the station the character SEARCH will appear on the front panel and connected monitor Selecting Channels Press CH button or CH button to choose channel upward or downward The numeric buttons 0 1 9 allow you to select the corresponding channel directly Volume Adjustment Press ...

Page 27: ... according to the TV set used PAL NTSC NO COLOR IN PICTURE The disc format is not according to the TV set used PAL NTSC DISC DOES NOT PLAY Ensure the disc label is upwards Clean the disc Check if the disc is defective by trying another disc NO SOUND Check audio connections If using a HIFI amplifier try another sound source THE PLAYER DOES NOT RESPOND TO THE REMOTE CONTROL Aim the remote control di...

Page 28: ...reble at 10 KHz 10 dB Maximum Output Power 4 x 60 watts Current Drain 5 Ampere max CD PLAYER Signal to Noise Ratio More than 55 dB Channel Separation More than 45 dB Frequency Response 20 Hz 20 KHz RADIO FM Frequency Coverage 88 to 108MHz IF 10 7 MHz Sensitivity S N 30 dB 8 μV Stereo Separation 25 dB AM Frequency Coverage 530 to 1710 KHz IF 450 KHz Sensitivity S N 20 dB 38 dBu ...

Page 29: ...spapers table cloths curtains etc No naked flame sources such as lighted candles should be placed on the apparatus The use of apparatus in tropical and or moderate climates Before scrapping the appliance remove the batteries and place them in the appropriate battery collection container This product incorporates copyright protection technology that is protected by method claims of certain U S pate...

Page 30: ......

Reviews: