background image

© Sortimo International GmbH

GA 00005 | 2017-09-04

7

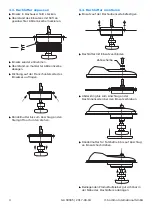
▶ Make sure that no roof elements, such as parts 

of the roof racking or similar, are positioned 
within the moving area of the roof vent.

▶ Do not cut into or through load-bearing parts, 

such as the hoops.

▶ Position the roof vent between 2 m and 4 m 

above ground level.

▶ Make sure that the contact surface of the vent 

is the highest section of the vent moving area.

▶ Make sure that there is a proper seal.

▹ Press the roof vent manually onto the 

preferred surface.

▹ Visually ensure that there are no gaps in the 

vent seal around the minimum contact 
surface.

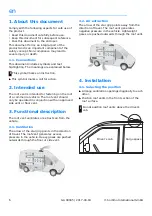
4.2. Cutting through the roof

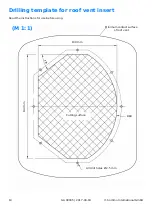
▶ Cut off the drilling template (See Page 10).
▶ Adhere the drilling template to the roof and 

note the direction of travel.

▶ Use a Ø 2.5 mm drill to make the holes.

▶ Use a jigsaw to cut the opening.

4.3. Adjusting the roof vent

▶ Place the insert in the roof opening.
▶ Use a pen to mark the excess length of the 

insert on the corresponding cutting notch.

▶ Remove the insert again.
▶ Saw off the excess length at the marked cutting 

notch.

▶ Attach the rubber sealing to the flanged 

underside of the insert.

i

Find another position if it is impossible to fit 
the vent at the selected position without there 
being gaps.

360° moving area

R17

8

Contact surface

Minimum contact 

surface

i

It is helpful if fabric tape is stuck to the outside 
roof edge of the cutting area.

Direction of travel

Summary of Contents for GA 00005

Page 1: ...o de www sortimo com Sortimo International GmbH Dreilindenstra e 5 D 86441 Zusmarshausen Dachl fter 80721099 GA 00005 2017 09 04 2 0 SAP VP100169 de Dachl fter Gebrauchsanleitung en Roof vent Instruct...

Page 2: ...n erkl rt Dieses Symbol kennzeichnet eine Handlungsaufforderung 2 Bestimmungsgem e Verwendung Der Dachl fter ist f r die Befestigung auf dem Dach eines Nutzfahrzeugs bestimmt Der Dachl fter darf nur i...

Page 3: ...ellen Dachl fter mit Handdruck auf die gew nschte Anschlussfl che andr cken Mit Sichtkontrolle vergewissern dass die L fterdichtung im Bereich der Mindestauflagefl che f r beide L fterstellungen l cke...

Page 4: ...g auf der Flanschunterseite des Einsatzes auftragen R ndelmutter bis zum Anschlag an den Sterngriff nach unten drehen 4 4 Dachl fter montieren Einsatz auf der Dachau enseite befestigen Dachl fter mit...

Page 5: ...inigen und Pflegen Dachl fter von witterungsbedingten Verschmutzungen freihalten i Bei folgenden Gasen muss bel ftet werden Argon Ar Propan C3H8 Kohlenstoffdioxid CO2 n Butan C4H10 Kohlenstoffmonoxid...

Page 6: ...roof vent should only be operated in conjunction with an approved side vent or floor vent 3 Functional description The roof vent ventilates or extracts air from the vehicle 3 1 Ventilation The arrow...

Page 7: ...e 4 2 Cutting through the roof Cut off the drilling template See Page 10 Adhere the drilling template to the roof and note the direction of travel Use a 2 5 mm drill to make the holes Use a jigsaw to...

Page 8: ...abels supplied close to the roof vent 5 Operation 5 1 Ventilation Turn the star grip until the arrow points to the direction of travel 5 2 Extraction Turn the star grip until the arrow points away fro...

Page 9: ...tional GmbH GA 00005 2017 09 04 9 Bohrschablone Dachl ftereinsatz Vor dem Gebrauch die Gebrauchsanleitung durchlesen Mindestauflagefl che Dachl fter Ausschnittfl che Alle Bohrungen 2 5 mm 109 mm R84 1...

Page 10: ...9 04 Sortimo International GmbH Drilling template for roof vent insert Read the instructions for use before using Minimum contact surface of roof vent Cutting surface All drill holes 2 5 mm 109 mm R84...

Reviews: