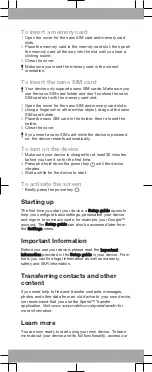
To insert a memory card
1
Open the cover for the nano SIM card and memory card
slots.
2
Place the memory card in the memory card slot, then push
the memory card all the way into the slot until you hear a
clicking sound.
3
Close the cover.
Make sure you insert the memory card in the correct
orientation.
To insert the nano SIM card
Your device only supports nano SIM cards. Make sure you
use the nano SIM card holder and don’t confuse the nano
SIM card slot with the memory card slot.
1
Open the cover for the nano SIM and memory card slots.
2
Using a fingernail or other similar object, drag out the nano
SIM card holder.
3
Place the nano SIM card in the holder, then re-insert the
holder.
4
Close the cover.
If you insert a nano SIM card while the device is powered
on, the device restarts automatically.
To turn on the device
1
Make sure your device is charged for at least 30 minutes
before you turn it on for the first time.
2
Press and hold down the power key until the device
vibrates.
3
Wait a while for the device to start.
To activate the screen
•
Briefly press the power key .
Starting up
The first time you start your device, a Setup guide opens to
help you configure basic settings, personalise your device
and sign in to some accounts, for example, your Google™
account. The Setup guide can also be accessed later from
the Settings menu.
Important Information
Before you use your device, please read the Important
information provided in the Setup guide in your device. From
here, you can find legal information as well as warranty,
safety and SAR information.
Transferring contacts and other
content
If you need help to find and transfer contacts, messages,
photos and other data from an old device to your new device,
we recommend that you use the Xperia™ Transfer
application. Visit
www.sonymobile.com/xperiatransfer
for
more information.
Learn more
You are now ready to start using your new device. To learn
more about your device and its full functionality, access our


