background image

15


GB

x

Troubleshooting

If you find any problem while viewing your TV, you can either use the
“Factory Settings” function (see page 14) or check the Troubleshooting guide
below. If the problem persists, contact your Sony dealer.

Snowy picture, noisy sound

• Check the antenna setup and other connections.
• Preset the channel manually again (see page 13).
• Set the “Signal Booster” to “Auto” (see page 13) or try using an external booster.

Distorted picture, noisy sound

• Set the “Signal Booster” to “Off” (see page 13), or turn off or disconnect any external

booster in use.

Good picture, noisy sound

• Select the appropriate “TV System” (see page 13).

No picture, no sound

• Check the power cord, antenna setup and other connections.
• Press 

4

/

(power) to turn on the TV.

• Press 

(main power) on the TV to turn off the TV for about five seconds, then turn it on

again.

Good picture, no sound

• Press 

+ to increase the volume level or press 


to cancel the muting.

Dotted lines or stripes

• Do not use a hair dryer or other equipment near the TV.
• Check the antenna setup.

Double images or “ghosts”

• Use the fine tuning (“Fine”) function (see page 13).
• Check the antenna setup or use a highly directional antenna.
• Turn off or disconnect any external booster in use.

No color

• Adjust the “Color” level from “Picture Adjustment” (see page 10).
• Select the appropriate “Color System” (see page 14).
• Check the antenna setup.

Picture slant

• Keep external speakers or other electrical equipment away from the TV.
• Adjust the “Picture Rotation” (see page 14).

Abnormal color patches

• Keep external speakers or other equipment away from the TV. Do not move the TV while

the TV is turned on. Press 

(main power) on the TV to turn off the TV for about 15

minutes, then turn it on again to demagnetize the TV.

The 

(standby) indicator on your TV flashes red several times after every three seconds.

• Count the number of times the 

(standby) indicator flashes. Press 

on the TV to turn it

off, disconnect the AC power cord and inform your dealer or Sony service center of how
the indicator flashes (duration and interval).

The TV screen sometimes goes blank for slightly longer than usual during channel change.

• The “Signal Booster” is functioning to detect a weak signal. This does not indicate a

malfunction.

TV cabinet creaks.

• Changes in room temperature sometimes make the TV cabinet expand or contract, causing

a noise. This does not indicate a malfunction.

A small “boom” sound is heard when the TV is turned on.

• The TV’s demagnetizing function is working. This does not indicate a malfunction.

Summary of Contents for wega kv-aw212

Page 1: ...0 12 1 Operating Instructions Before operating the unit please read this manual thoroughly and retain it for future reference Panduan Pengendalian Sebelum mengendalikan unit sila baca buku panduan ini dengan teliti dan simpan untuk rujukan masa depan GB MY M50 ...

Page 2: ...th the TV Do not allow children to climb onto it For your own safety do not touch any part of the TV the power cord and the antenna cable during lightning storms Do not place any objects on the TV The apparatus shall not be exposed to dripping or splashing and that no objects filled with liquids such as vases shall be placed on the apparatus Do not operate the TV if any liquid or solid object fall...

Page 3: ...ial Setup 5 Connecting optional components 6 Overview of Controls TV buttons and remote control 7 Menu Adjustment WEGA GATE navigator 9 Picture setting 10 Sound setting 11 Channel Setup setting 12 Setup setting 14 Additional Information Troubleshooting 15 Specifications Back cover ...

Page 4: ... batteries together Connect the antenna cable not supplied to 8 antenna input at the rear of the TV You can also connect your TV to other optional components see page 6 Plug in the power cord then press 1 on the TV to turn it on The 1 standby indicator flashes green for a few seconds when turning on the TV This does not indicate a malfunction x Getting Started Step 2 1 Step 1 Step 3 Step 4 ...

Page 5: ...e channels see page 12 4 Adjust the bars on the top and bottom of the menu if they are slanted 5 To prevent this Initial Setup menu from appearing again when you turn on the TV by pressing 1 select No To allow this menu to appear again select Yes You can immediately go to the end of the Initial Setup menu by pressing WEGA GATE Program Sorting Edit 01 02 03 04 Off Off Off Off Sorting Edit PROG Skip...

Page 6: ...e not supplied Connecting to the TV front L R 2 MONO WEGA PROG GATE R L L R 2 MONO Camcorder Audio Video cable Connecting to the TV rear If you connect a VCR to 8 antenna input preset the signal output from the VCR to the program number 0 on the TV see page 13 L R 1 MONO R L VCR DVD Player Antenna cable Audio Video cable ...

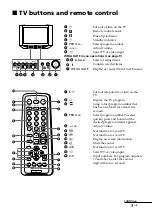
Page 7: ...6 8 9 0 w ql qg qs WEGA GATE 1 1 Turn off temporarily or turn on the TV 2 a Display the TV program 3 Jump to last program number that has been watched for at least five seconds 4 PROG Select program number To select quickly press and hold until the desired program number appears 5 2 Adjust volume 8 Not function for your TV 9 Not function for your TV 0 Display on screen information qa Mute the soun...

Page 8: ...g Set TV to turn on automatically according to the desired period of time Wake Up Timer max of 12 hours The indicator on TV lights up amber once you set the wake up timer If no buttons or controls are pressed for more than three hours after the TV is turned on using the wake up timer the TV automatically goes into standby mode qh Set TV to turn off automatically according to the desired period of ...

Page 9: ...age 5 select the inputs for the connected equipment see page 6 change the settings of your TV see page 10 14 How to use WEGA GATE 1 Press WEGA GATE to display or cancel the WEGA GATE menu Confirm Select WEGA GATE Settings External Inputs TV 2 Press or b to confirm your selection or go to the next level 4 Press RETURN to move to the previous level 3 Press V or v to select the desired item TV Confir...

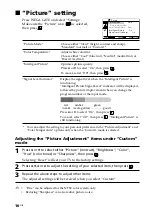
Page 10: ...ress V or v to select On then press To cancel select Off then press Intelligent Picture is still functioning You can adjust the setting to your personal preference in the Picture Adjustment and Color Temperature options only when the Custom mode is selected Adjusting the Picture Adjustment items under Custom mode 1 Press V or v to select either Picture contrast Brightness Color Hue color tones or ...

Page 11: ...alance Press v or B to emphasize the left speaker Press V or b to emphasize the right speaker Intelligent Volume Adjust the volume of all program numbers and video inputs automatically Press V or v to select On then press To cancel select Off then press Confirm End Sound Select Balance Intelligent Volume Off ...

Page 12: ...g mode 2 Press V or v to select the new program number position for your selected channel then press B d If you wish to edit the channels press to change to edit mode Press b until the mode that you wish to edit is highlighted Label Skip block symbol Then press 1 To label press V or v to select the alphanumeric characters for the label Then press 2 To skip the program number press V or v to select...

Page 13: ...s 2 Press V or v until the sound becomes normal then press 4 If you are not satisfied with the picture and sound quality you may be able to improve them by using the Fine tuning feature 1 Press V or v to select Fine then press 2 Press V or v to select Manual then press 3 Press V v B or b until the picture and sound quality are optimal then press The or icon on the menu flashes while tuning 5 If th...

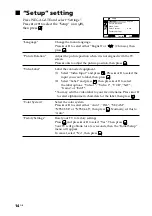
Page 14: ...elect Label and press then press V or v to select the label options Video 1 Video 2 VCR SAT Game or Edit You may edit the video label to your favorite name Press V or v to select alphanumeric characters for the label then press Color System Select the color system Press V or v to select either Auto PAL SECAM NTSC3 58 or NTSC4 43 then press Normally set this to Auto Factory Settings Reset your TV t...

Page 15: ...antenna Turn off or disconnect any external booster in use No color Adjust the Color level from Picture Adjustment see page 10 Select the appropriate Color System see page 14 Check the antenna setup Picture slant Keep external speakers or other electrical equipment away from the TV Adjust the Picture Rotation see page 14 Abnormal color patches Keep external speakers or other equipment away from th...

Page 16: ...V Untuk keselamatan diri jangan sentuh mana mana bahagian TV wayar kuasa dan kabel antena semasa kilat Jangan letak sebarang benda di atas TV anda Jangan dedahkan TV kepada titisan atau percikan cecair dan jangan letak sebarang benda yang mengandungi cecair seperti bekas bunga di atas TV anda Jangan pasang TV sekiranya terdapat sebarang tumpahan cecair atau pepejal yang terjatuh ke dalamnya Pemeri...

Page 17: ...yambung komponen pilihan 6 Gambaran menyeluruh untuk kawalan Butang TV dan alat kawalan jauh 7 Melaraskan Menu Penunjuk WEGA GATE 9 Aturan Picture 10 Aturan Sound 11 Aturan Channel Setup 12 Aturan Setup 14 Maklumat Tambahan Penyelesaian masalah 15 Specifications Muka surat terakhir MY ...

Page 18: ...ma sama Sambungkan kabel antena tidak dibekalkan kepada terminal 8 input antena yang terdapat di belakang TV anda Anda juga boleh menyambungkan komponen pilihan kepada TV anda rujuk halaman 6 Sambungkan wayar kuasa TV kemudian tekan 1 pada TV untuk memasangkan TV anda Penunjuk 1 standby berkelip kelip dengan warna hijau selama beberapa saat apabila anda memasang TV anda Ini tidak menandakan TV and...

Page 19: ...a menukar susunan saluran dan menyunting saluran rujuk halaman 12 4 Laraskan jaluran di atas dan di bawah menu jika ia senget 5 Untuk mengelakkan menu Initial Setup muncul lagi jika anda memasangkan TV dengan menekan 1 pilih No Untuk membolehkan menu ini muncul lagi pilih Yes Anda boleh terus ke paparan menu Initial Setup yang terakhir dengan menekan WEGA GATE Program Sorting Edit 01 02 03 04 Off ...

Page 20: ...ada TV hadapan L R 2 MONO WEGA PROG GATE R L L R 2 MONO Kamkorder Kabel Audio Video Menyambung kepada TV belakang Jika anda menyambungkan perakam pita video kepada 8 input antena aturkan output isyarat dari perakam pita video kepada nombor rancangan 0 pada TV rujuk halaman 13 Perakam pita video Pemain DVD Kabel antena Kabel Audio Video L R 1 MONO R L ...

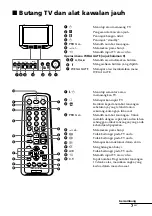
Page 21: ... qs WEGA GATE 1 1 Menutup sementara atau memasangkan TV 2 a Memaparkan input TV 3 Kembali kepada nombor rancangan sebelumnya yang telah ditonton sekurang kurangnya lima saat 4 PROG Memilih nombor rancangan Untuk memilih dengan cepat tekan dan tahan sehingga nombor rancangan yang anda kehendaki dipaparkan 5 2 Melaraskan paras bunyi 8 Tidak berfungsi pada TV anda 9 Tidak berfungsi pada TV anda 0 Mem...

Page 22: ...V supaya dipasang mengikut tempoh masa yang dikehendaki secara automatik maks 12 jam Penunjuk pada TV menyala dengan warna kuning jingga apabila anda sudah mengaturkan pemasa bangun tidur Jika tidak ada butang atau kawalan ditekan setelah tiga jam TV dipasang dengan menggunakan pemasa bangun tidur TV akan berada dalam keadaan standby secara automatik qh Setkan TV supaya ditutup mengikut tempoh mas...

Page 23: ... input peralatan yang disambungkan rujuk halaman 6 menukar aturan TV anda rujuk halaman 10 14 Cara menggunakan WEGA GATE 1 Tekan WEGA GATE untuk memapar atau membatalkan menu WEGA GATE Confirm Select WEGA GATE Settings External Inputs TV 2 Tekan atau b untuk mengesahkan pilihan anda atau pergi ke paras menu yang seterusnya 4 Tekan RETURN untuk pergi ke paras yang sebelumnya 3 Tekan V atau v untuk ...

Page 24: ... On kemudian tekan Untuk membatalkannya pilih Off kemudian tekan Intelligent Picture masih berfungsi Anda boleh melaraskan aturan mengikut citarasa anda dalam pilihan Picture Adjustment dan Color Temperature hanya apabila mod Custom dipilih Melaraskan butiran Picture Adjustment di bawah mod Custom 1 Tekan V atau v untuk memilih Picture kecerahan Brightness Color Hue keterangan warna atau Sharpness...

Page 25: ...uk memperkuatkan pembesar suara kiri Tekan V atau b untuk memperkuatkan pembesar suara kanan Intelligent Volume Melaraskan paras bunyi bagi semua nombor rancangan dan input video secara automatik Tekan V atau v untuk memilih On kemudian tekan Untuk membatalkannya pilih Off kemudian tekan Confirm End Sound Select Balance Intelligent Volume Off ...

Page 26: ...or rancangan yang baru untuk saluran yang dipilih kemudian tekan B d Jika anda ingin menyunting saluran tekan untuk menukar kepada mod menyunting Tekan b sehingga mod yang anda ingin menyunting dipilih label langkau simbol sekatan Kemudian tekan 1 Untuk melabel tekan V atau v untuk memilih abjad nombor untuk label tersebut Kemudian tekan 2 Untuk melangkau nombor rancangan tekan V atau v untuk memi...

Page 27: ...ga bunyi menjadi biasa kemudian tekan 4 Jika anda tidak berpuas hati dengan kualiti gambar dan bunyi anda mungkin boleh memperbaikinya dengan menggunakan ciri talaan terperinci Fine 1 Tekan V atau v untuk memilih Fine kemudian tekan 2 Tekan V atau v untuk memilih Manual kemudian tekan 3 Tekan V v B atau b sehingga anda berpuas hati dengan kualiti gambar dan bunyi kemudian tekan Lambang atau pada m...

Page 28: ...ekan kemudian tekan V atau v untuk memilih pilihan label Video 1 Video 2 VCR SAT Game atau Edit Anda boleh menyunting label video kepada nama yang anda gemari Tekan V atau v untuk memilih abjad nombor untuk label tersebut kemudian tekan Color System Memilih sistem warna Tekan V atau v untuk memilih Auto PAL SECAM NTSC3 58 atau NTSC4 43 kemudian tekan Biasanya aturkan kepada Auto Factory Settings M...

Page 29: ... Tutup atau cabutkan sebarang sambungan booster luaran yang sedang digunakan Tiada warna Laraskan paras Color dalam Picture Adjustment rujuk halaman 10 Pilih sistem warna Color System yang betul rujuk halaman 14 Periksa aturan antena Gambar senget Jauhkan pembesar suara luaran atau kelengkapan elektrik lain daripada TV anda Laraskan Picture Rotation rujuk halaman 14 Tompok warna yang luar biasa Ja...

Page 30: ...S1 to S41 Z1 to Z39 75 ohm external terminal 3 W 3 W Input 2 Phono jacks 1 Vp p 75 ohms Input 2 Phono jacks 500 mVrms 21 in 54 Measured diagonally 51 Measured diagonally 600 465 481 25 KV AW212M50 Note Design and specifications are subject to change without notice Power requirements Power consumption W Television system Color system Channel coverage B G I D K 8 Antenna Audio output Speaker Number ...

Reviews: