background image

50

Setting the Video Inputs

You can enjoy images (and sound) from optional
video equipment connected to this unit by selecting
the appropriate input. For details on connection, see
pages 24 through 35(Continued).

1

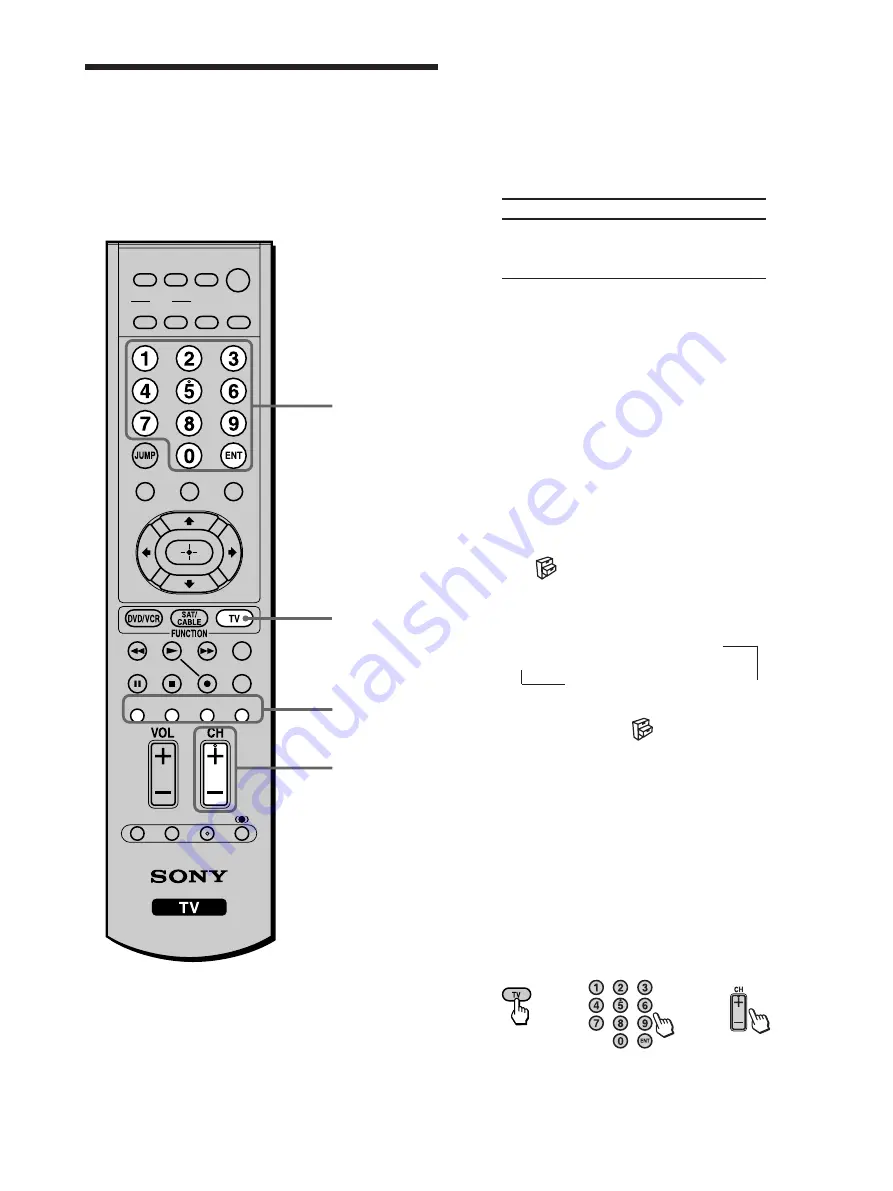
0-9 and ENT
(enter) buttons

CH +/–

1

For video input 1 and 2

Press VIDEO 1/2 repeatedly until the desired
video input appears.
Each time you press VIDEO 1/2, the input
changes as follows.

Select

• VIDEO 1 IN

• VIDEO 2 IN

For video input 3 (HD/DVD 3 IN)

Press VIDEO 3.
“Video 3”* indication appears.

For video input 4 (HDMI 4 IN)

Press VIDEO 4.
“Video 4”* indication appears.

* The type of picture signal (480i, 480p, 720p, or 1080i)

appears under “Video 3” and “Video 4.”

Tips

• When “Skip” is selected as a label using “Video Label” in

the 

 (Setup) menu, the selected input will be skipped

in the cycle (see page 51).

• You can also select the inputs by using the TV/VIDEO

button on the TV.

TV 

VIDEO 1 IN 

VIDEO 2 IN

 R

HDMI 4 IN 

HD/DVD 3 IN 

T

• When you have preset a label for each video input using

“Video Label” in the 

 (Setup) menu, the label will be

displayed (see page 51).

2

Operate the selected optional equipment.

For details, see “Using your Remote Controls
with Other Equipment” on page 18, or refer to
the instructions supplied with each equipment.

To return to watching the TV

Press TV, any of 0 - 9 and ENT (enter) or CH +/–.

Display indication

Video 1

R r

Video 2

or

or

TV

MUTING

PICTURE WIDE

FAVORITES

TV

VIDEO 1/2 VIDEO 3 VIDEO 4

F1

F2

MENU

SLEEP DISPLAY

MODE

SAT/

CABLE

POWER

RESET

MTS/SAP

GUIDE

TV/SAT

DVD/

VCR

TOP MENU

FREEZE

Summary of Contents for WEGA KLV 23M1

Page 1: ... 2004 Sony Corporation 2 176 244 12 1 LCD Color TV Operating Instructions KLV 23M1 ...

Page 2: ...garding this product Model No Serial No Contacting Sony If after reading the following instructions you have additional questions related to the use of your Sony TV please call one of the following numbers Customers in the continental United States contact the Direct Response Center at 1 800 222 SONY 7669 Customers in Canada contact the Customer Relations Center at 1 877 899 SONY 7669 ...

Page 3: ...ment off and on the user is encouraged to try to correct the interference by one or more of the following measures s Reorient or relocate the receiving antennas s Increase the separation between the equipment and receiver s Connect the equipment into an outlet on a circuit different from that to which the receiver is connected s Consult the dealer or an experienced radio TV technician for help You...

Page 4: ...d in the operating instructions or service manual WARNING To guard against injury the following basic safety precautions should be observed in the installation use and servicing of the unit Use Power Sources This unit should be operated only from the type of power source indicated on the serial model plate If you are not sure of the type of electrical power supplied to your home consult your deale...

Page 5: ...rioration s Always use commercially available chemical fibre cleaning cloths in accordance with their supplied instructions s Do not allow the LCD screen to come in contact with volatile compounds such as insecticide Also never let the LCD screen come in contact with rubber or plastic products for an extended period of time This type of contact may damage the coating or cause the LCD screen to det...

Page 6: ...becomes dark flickers or does not appear the fluorescent lamp has run down and should be replaced For replacement consult qualified service personnel Installation and moving Carry the TV in the specified manner If you carry the TV in a manner other than specified it may drop and cause serious injury Be sure to follow the instructions below s Carry the TV holding the upper and bottom frames of the ...

Page 7: ...ord Protection Do not allow anything to rest on or roll over the power cord and do not place the unit where the power cord is subject to wear or abuse s Never cover the slots and openings with a cloth or other materials s Never block the slots and openings by placing the unit on a bed sofa rug or other similar surface s Never place the unit in a confined space such as a bookcase or built in cabine...

Page 8: ...ion and to so certify When the unit reaches the end of its useful life ask a qualified service technician to dispose of the unit Antennas Outdoor Antenna Grounding If an outdoor antenna is installed follow the precautions below An outdoor antenna system should not be located in the vicinity of overhead power lines or other electric light or power circuits or where it can come in contact with such ...

Page 9: ...nto your outlet consult an electrician for replacement of the obsolete outlet 10 Protect the power cord from being walked on or pinched particularly at plugs convenience receptacles and the point where they exit from the apparatus 11 Only use attachments accessories specified by the manufacturer 12 Use only with the cart stand tripod bracket or table specified by the manufacturer or sold with the ...

Page 10: ...10 ...

Page 11: ...tellite Receiver 27 Connecting a Satellite Receiver and a VCR 28 Connecting an AV Receiver 29 Connecting a DVD Player with Component Video Connectors 30 Connecting a DVD Player with S Video and Audio Connectors 31 Connecting a Digital Cable Box 32 Connecting a Digital Satellite Receiver 33 Connecting a Digital Satellite Receiver with HDMI Connector 34 Setting the TV 36 Setting the Channels 36 Usin...

Page 12: ...61 Selecting the TV Speakers or an External Amplifier to Listen to the TV 61 Selecting How to Control the Volume of the TV s Speakers 62 Using the Parental Control Feature 63 Activating the Parental Control feature 64 Selecting a Custom Rating 66 What the Ratings Mean 68 Ratings in the U S A 68 Ratings in Canada 70 Turning Off the TV Automatically 72 Additional Information Troubleshooting 73 Self ...

Page 13: ...control 1 and size AA batteries 2 Overview of the Remote Control Insert two size AA batteries supplied by matching the e and E on the batteries to the diagram inside the remote control s battery compartment Notes Remove the batteries to avoid damage from possible battery leakage whenever you anticipate that the remote control will not be used for an extended period Handle the remote control with c...

Page 14: ...ity on page 57 Press repeatedly to step through the Wide Screen Mode settings Wide Zoom Normal Full and Zoom The Wide Screen Mode settings can be also accessed in the Screen menu For details see pages 45 and 47 Press to jump back and forth between two channels The TV alternates between the current channel and the last channel that was selected Press to display the top menu of your DVD VCR Press to...

Page 15: ...ay off Press repeatedly until the TV displays the time in minutes 15 30 45 60 or 90 that you want the TV to remain on before shutting off To cancel Sleep Timer press SLEEP repeatedly until Sleep Off appears Press 0 9 to select a channel the channel changes after 2 seconds Press ENT to change channels immediately Press to display the menu Press again to exit from the menu For details see page 38 Pr...

Page 16: ...or press the SAT CABLE FUNCTION and RESET buttons simultaneously DVD VCR and SAT CABLE buttons flash 2 Press the function button you want to program To program video equipment Press DVD VCR FUNCTION To program a cable box or a satellite receiver Press SAT CABLE FUNCTION 3 Enter the three digit manufacturer s code number using the 0 9 buttons 4 Press ENT enter 5 To check if the code number works ai...

Page 17: ...2 LXI SEARS 332 305 330 335 338 Magnavox 308 309 310 Marantz 314 336 337 Marta 332 Memorex 309 335 Minolta 305 304 Mitsubishi MGA 323 324 325 326 Multitech 325 338 321 NEC 314 336 337 Olympic 309 308 Optimus 327 Orion 317 Panasonic 308 309 306 307 Pentax 305 304 Philco 308 309 Philips 308 309 310 Pioneer 308 Quasar 308 309 306 RCA PROSCAN 304 305 308 309 311 312 313 310 329 Realistic 309 330 328 3...

Page 18: ... Cable Box To Turn on off Control a cable box Select a channel Change channels Go to the previous channel Operating a Satellite Receiver To Turn on off Control a satellite receiver Select a channel Change channels Go to the previous channel Display the channel number Display the DBS guide Display the DBS menu Move the highlight cursor Select the item Press SAT CABLE POWER SAT CABLE FUNCTION 0 9 bu...

Page 19: ...orward or CH to step backward 0 9 buttons MENU TOP MENU V v B b Press DVD VCR POWER F1 F2 TOP MENU MENU V v B b VOL MUTING Operating a DVD VCR or DVD HDD Combo Unit To Turn on off If you have a DVD VCR combo component Select the DVD Select the VCR If you have a DVD HDD combo component Select the DVD Select the HDD Record Play Stop Fast forward Rewind the tape Pause Search the picture forward or ba...

Page 20: ... this LED will remain lit For details see page 72 Press 1 Power to turn on and off the TV The LED lights up green when the TV is turned on When in standby mode the LED lights up in red If the LED blinks continuously this may indicate the TV needs servicing see page 73 Connects to your headphones If your headphones do not match the jack use a suitable plug adaptor not supplied Press repeatedly to c...

Page 21: ... audio input jacks of your audio or video equipment You can use these outputs to listen to your TV s audio through your stereo system Connect to your DVD player s or digital satellite receiver s or digital cable box s component video Y PB PR and audio L R jacks Component video provides better picture quality than the S VIDEO 2 the VHF UHF 1 or the composite video 2 connections HDMI High Definition...

Page 22: ...over towards you 2 Detach the cable cover from the hooks on the side of the TV Attaching the cable cover 1 Attach the cable cover to the hooks on the side of the TV 2 While pressing the hooks push the cable cover onto the TV until it clicks Tip Attach the cable cover to the TV after connecting the cables ...

Page 23: ...of them hanging down on either side of the TV Clip Adjusting the Viewing Angle of the TV You can adjust the angle to avoid the reflection of light and get a better view of the TV Note When adjusting the angle steady the base of the stand with your hand Be careful not to get your fingers caught between the TV and the stand When you adjust the angle make sure that the cables are not caught between t...

Page 24: ...le connect the cable box s OUT jack to the TV s VHF UHF jack Tips The supplied remote control can be programmed to operate your cable box see Programming the Remote Control on page 16 To change channels using the cable box set your TV to channel 3 or 4 depending on the cable box channel output If you will be controlling all channel selection through your cable box consider using the Channel Fix fe...

Page 25: ...For 120 V AC Connecting Optional Equipment Use the instructions in this section to connect the following optional equipment If you are connecting See page VCR and Cable TV 26 page Satellite Receiver 27 page Satellite Receiver and VCR 28 page AV Receiver 29 page DVD Player with Component Video Connectors 30 page DVD Player with S Video and Audio Connectors 31 page Digital Cable Box 32 page Digital ...

Page 26: ...IDEO 1 2 repeatedly until the desired video input appears 2 Press MENU 3 Press V v to select Setup then press 4 Press V v to select Auto YC then press 5 To watch the pictures input from the S VIDEO input jack Press V v to select On then press To watch the pictures input from the VIDEO input jack Press V v to select Off then press 6 Press MENU to exit the menu screen Use this hookup if You subscrib...

Page 27: ...Ocables connectthesatellitereceiver sAUDIOand S VIDEO OUT jacks to the TV s AUDIO and S VIDEO IN jacks VIDEO 1 IN or VIDEO 2 IN Tip If your satellite receiver is not equipped with S VIDEO use a VIDEO cable yellow instead of the S VIDEO cable 3 Connect the supplied 75 ohm coaxial cable from your cable box or antenna to the TV s VHF UHF jack Note When you connect video equipment to both the VIDEO an...

Page 28: ...bles connect the VCR s AUDIO and S VIDEO OUT jacks to the TV s AUDIO and S VIDEO IN jacks VIDEO 1 IN or VIDEO 2 IN Note When you connect video equipment to both the VIDEO and the S VIDEO input jacks make sure Auto YC in the Setup menu is set to On to view the S VIDEO input see page 26 Tips Be sure your VCR s video input is set correctly Consult your VCR s operating manual for instructions Use VIDE...

Page 29: ...ur audio system set Audio Out to Fixed Notes The video signal is not output through the AUDIO OUT jacks When Audio Out in the Audio menu is set to Variable Speaker is to Off check if the speaker volume is moderate before switching Speaker from Off to On Otherwise the speaker volume may be too loud Connecting an AV Receiver Disconnect all power sources before making any connections Using an AUDIO c...

Page 30: ...ct all power sources before making any connections 1 Using a component video cable connect the DVD player s Y PB and PR jacks to the Y PB and PR jacks on the TV Use the HD DVD 3 IN connections 2 Using an AUDIO cable connect the DVD player s AUDIO OUT jacks to the TV s AUDIO IN jacks Note The Y PB and PR jacks do not provide audio so audio cables must be connected to provide sound Tip Use VIDEO 3 o...

Page 31: ...take advantage of the Wide Screen Modes set the aspect ratio of the output signal to 16 9 on your DVD player For details refer to the operating instructions supplied with your DVD player Disconnect all power sources before making any connections 1 Using an A V cable connect the DVD player s AUDIO OUT jacks to the TV s AUDIO IN jacks 2 Using an S VIDEO cable connect the DVD player s S VIDEO OUT jac...

Page 32: ...n is necessary to view 480p 720p and 1080i formats Note that this TV displays all format types of picture in a resolution of 1 366 dots 768 lines 2 Using an AUDIO cable connect the Digital Cable Box s AUDIO OUT jacks to the TV s AUDIO IN jacks Note The Y PB and PR jacks do not provide audio so audio cables must be connected to provide sound Tip Use VIDEO 3 on the remote control to select HD DVD 3 ...

Page 33: ...R connection is necessary to view 480p 720p and 1080i formats Note that this TV displays all format types of picture in a resolution of 1 366 dots 768 lines 2 Using an AUDIO cable connect the Digital Satellite Receiver s AUDIO OUT jacks to the TV s AUDIO IN jacks Note The Y PB and PR jacks do not provide audio so audio cables must be connected to provide sound Tip Use VIDEO 3 on the remote control...

Page 34: ...Using an HDMI cable not supplied connect the Digital Satellite Receiver s HDMI OUT connector to the TV s HDMI IN connector Use the HDMI 4 IN connection Tips The HDMI connector provides both video and audio signals so it is not necessary to connect the audio cable Use VIDEO 4 on the remote control to select HDMI 4 IN to watch the digital satellite receiver input HDMI cable not supplied Digital Sate...

Page 35: ...HDTV OUT connector using the HDMI cable not supplied 1 Using a HDMI to DVI HDTV adapter or cable not supplied connect the Digital Satellite Receiver s DVI HDTV OUT connector to the TV s HDMI IN connector Use the HDMI 4 IN connection Note The DVI HDTV VIDEO connector does not provide audio so audio cables must be connected to provide sound when an HDMI to DVI HDTV adapter is used 2 Using an AUDIO c...

Page 36: ... v to select Channel then press 3 Press V v to select Auto Program then press 4 Press Auto Program appears and the TV starts scanning and presetting channels automatically When all the receivable channels are stored the Channel Skip Add menu appears Using this menu you can start skipping unnecessary channels see To skip channels on page 37 5 Press MENU to exit the menu screen To cancel Auto Progra...

Page 37: ...ns 1 Press MENU 2 Press V v to select Channel then press 3 Press V v to select Channel Skip Add then press 4 Press V v to select the channel you want to skip then press Tip To scroll through the list press and hold V v 5 Press V v to select Skip then press If you want to re enter the skipped channel select Add 6 Press MENU to exit the menu screen Example Select this to skip channel 5 Channel TV v ...

Page 38: ...it the menu screen Notes When you fix a TV channel the Favorite Channel feature cannot be used When you fix a TV channel you cannot select Channel Skip Add in the menu To use it set Channel Fix to Off Using the Menu Most of advanced settings and adjustments are performed using the menu screen Basic operations to navigate through menus are described below Items which appear in yellow are selected Y...

Page 39: ...an select the language to be displayed in all menus Picture 50 1 Press MENU Video Exit Set Select Return Mode Vivid Picture 50 Brightness 50 Color 25 Hue 0 Sharpness 50 Backlight 5 Color Temp Cool NR On Mild Mode On Dynamic Picture On CineMotion Off TV Video Return Mode Vivid Picture 50 Brightness 50 Color 25 Hue 0 Sharpness 50 Backlight 5 Color Temp Cool NR On Mild Mode On Dynamic Picture On Cine...

Page 40: ... 5 Press MENU to exit the menu screen Return Caption Vision Off Video Label Language English Auto YC Setup TV Select Back Exit Set Setup TV Select Back Exit Set Return Caption Vision Off Video Label Language English Auto YC English Español Français Setup TV Select Back Exit Set Return Caption Vision Off Video Label Language English Auto YC ...

Page 41: ...NG DISPLAY JUMP Mute the sound Press it again or press VOL to restore sound Press once to display the current channel number channel label and the Wide Screen Mode or the current video input number video label and the Wide Screen Mode When the display is turned on the current channel number channel label or video input number video label remains displayed Press it again to turn the display off Jum...

Page 42: ...g either half or the whole screen Displays the program name and the time remaining in the program if the broadcaster offers this service Displays when the channel is changed or DISPLAY is pressed Return Caption Vision Off Video Label Language English Auto YC Setup TV Select Back Exit Set Setup TV Select Back Exit Set Return Caption Vision Off Video Label Language English Auto YC Off CC1 CC2 CC3 CC...

Page 43: ...DE TV SAT Selecting the Picture Mode You can select one of three different Picture Modes that best suits the program you are watching Furthermore you can adjust the picture quality for each Picture Mode see pages 57 58 You can set a different Picture Mode for each video input that can be selected using the Input Select buttons and store them in memory Press PICTURE repeatedly until the desired mod...

Page 44: ...e in a movie theater You can set the Effect mode for each video input that can be selected using the Input Select buttons and store them in memory SRS WOW increases the sound quality of a diverse range of audio sources dramatically based on proprietary state of the art technologies from SRS Labs Inc WOW SRS and symbol are trademarks of SRS Labs Inc WOW technology is incorporated under license from...

Page 45: ...EO 1 2 VIDEO 3 VIDEO 4 F1 F2 MENU SLEEP DISPLAY MODE SAT CABLE POWER RESET MTS SAP GUIDE TV SAT DVD VCR TOP MENU FREEZE Using the Wide Screen Mode The Wide Screen Mode lets you watch any signals or other picture sizes such as Letterbox in several Wide Screen Modes 16 9 aspect ratio Tip The aspect ratio is the ratio of width to height of the screen 16 9 is also referred to as widescreen format Chan...

Page 46: ...s a 720p or 1080i signal that is 4 3 aspect ratio picture with a black bar at each side Full returns the picture to its original size You can also access the Wide Screen Mode settings in the Screen menu For details see page 47 Original source 16 9 source High definition source Wide Zoom enlarge to fill the screen with minimum distortion Normal This mode is not available Full display 16 9 picture i...

Page 47: ... Wide Zoom V Center 0 H Center 0 Screen Select Back Exit Set TV Wide Zoom Normal Full Zoom Return Wide Mode Normal 4 3 Default Wide Zoom V Center H Center 0 Screen Select Back Exit Set TV Video Exit Set Select Return Mode Vivid Picture 50 Brightness 50 Color 25 Hue 0 Sharpness 50 Backlight 5 Color Temp Cool NR On Mild Mode On Dynamic Picture On CineMotion Off TV MUTING PICTURE WIDE FAVORITES TV VI...

Page 48: ...y 16 9 picture in original size Select to enlarge the original picture without distorting the aspect ratio Select to enlarge the 4 3 picture to fill the 16 9 screen keeping the original image as much as possible Select to return the 4 3 picture to its original size Select to enlarge the 4 3 picture horizontally only to fill the 16 9 screen Select to enlarge the 4 3 picture horizontally and vertica...

Page 49: ...information you want to capture is displayed press FREEZE The picture freezes Press FREEZE again and the frozen picture is released and the picture begins to move again Tip While the picture is frozen the sound continues to be output normally MUTING PICTURE WIDE FAVORITES TV VIDEO 1 2 VIDEO 3 VIDEO 4 F1 F2 MENU SLEEP DISPLAY MODE SAT CABLE POWER TOP MENU RESET FREEZE MTS SAP GUIDE TV SAT DVD VCR ...

Page 50: ...eo 4 Tips When Skip is selected as a label using Video Label in the Setup menu the selected input will be skipped in the cycle see page 51 You can also select the inputs by using the TV VIDEO button on the TV TV t VIDEO 1 IN t VIDEO 2 IN R HDMI 4 IN T HD DVD 3 IN T When you have preset a label for each video input using Video Label in the Setup menu the label will be displayed see page 51 2 Operat...

Page 51: ...eceiver Satellite Cable Box 8mm DTV Game LD Beta Video 3 4 Skip DVD Satellite Cable Box DTV HD 7 Press MENU to exit the menu screen 2 6 1 7 Return Caption Vision Off Video Label Language English Auto YC Setup TV Select Back Exit Set Video Exit Set Select Return Mode Vivid Picture 50 Brightness 50 Color 25 Hue 0 Sharpness 50 Backlight 5 Color Temp Cool NR On Mild Mode On Dynamic Picture On CineMoti...

Page 52: ...hannels 7 Press MENU to exit the menu screen Return Favorite Channels Cable On Channel Fix Off Auto Program OK Channel Skip Add Channel Label Channel TV Select Back Exit Set Video Exit Set Select Return Mode Vivid Picture 50 Brightness 50 Color 25 Hue 0 Sharpness 50 Backlight 5 Color Temp Cool NR On Mild Mode On Dynamic Picture On CineMotion Off TV Channel TV 2 1 2 3 4 5 6 7 8 3 4 5 6 7 8 9 Return...

Page 53: ...for Favorite Channels you can have that label displayed on the screen 1 Press MENU 2 8 1 9 Favorite Channels 1 ABC 2 HBO 3 MTV 4 FOX 5 CBS 6 COMED 7 7 8 8 Video Exit Set Select Return Mode Vivid Picture 50 Brightness 50 Color 25 Hue 0 Sharpness 50 Backlight 5 Color Temp Cool NR On Mild Mode On Dynamic Picture On CineMotion Off TV MUTING PICTURE WIDE FAVORITES F1 F2 MENU SLEEP DISPLAY MODE SAT CABL...

Page 54: ...he menu screen Tip Press the RESET button to clear the channel label when you open the Channel Label option or Label option Return Favorite Channels Cable On Channel Fix Off Auto Program OK Channel Skip Add Channel Label Channel TV Select Back Exit Set Channel Label Return Channel Label _ _ _ _ _ Channel TV Select Back Exit Set 1 Channel Label Return Channel Label _ _ _ _ _ Channel TV Select Back ...

Page 55: ...page 45 in the following cases To move the position of the picture in Wide Zoom and Zoom modes When subtitles may not fit in the screen 1 5 2 4 Moves up Moves up Moves down Moves down Using Advanced Features Return Wide Mode Wide Zoom 4 3 Default Wide Zoom V Center 0 H Center 0 Screen Select Back Exit Set TV V Center 0 Video Exit Set Select Return Mode Vivid Picture 50 Brightness 50 Color 25 Hue 0...

Page 56: ...ure Position Horizontally You can move the position of the picture left and right This function allows for horizontal adjustment of the picture being displayed 1 5 2 4 Return Wide Mode Wide Zoom 4 3 Default Wide Zoom V Center 0 H Center 0 Screen Select Back Exit Set TV H Center 0 Video Exit Set Select Return Mode Vivid Picture 50 Brightness 50 Color 25 Hue 0 Sharpness 50 Backlight 5 Color Temp Coo...

Page 57: ...or Temp Cool NR On Mild Mode On Dynamic Picture On CineMotion Off TV Video Return Mode Vivid Picture 50 Brightness 50 Color 25 Hue 0 Sharpness 50 Backlight 5 Color Temp Cool NR On Mild Mode On Dynamic Picture On CineMotion Off Select Back Exit Set TV Video Return Mode Vivid Picture 50 Brightness 50 Color 25 Hue 0 Sharpness 50 Backlight 5 Color Temp Cool NR On Mild Mode On Dynamic Picture On CineMo...

Page 58: ... IN and HDMI 4 IN 7 Repeat steps 5 and 6 to adjust other options 8 Press MENU to exit the menu screen To reset to the factory settings Press RESET while the menu is on the screen and the cursor is located on the right side of any menu item When the pop up window or bar indication is displayed only the menu item being adjusted is reset to the factory settings Description Select to give white colors...

Page 59: ...mode see page 44 1 6 2 5 Treble 0 Exit Return Treble 0 Bass 0 Balance 0 Effect Off MTS Stereo Speaker On Audio Out Audio TV Select Back Set Exit Return Treble 0 Bass 0 Balance 0 Effect Off MTS Stereo Speaker On Audio Out Audio TV Select Back Set Video Exit Set Select Return Mode Vivid Picture 50 Brightness 50 Color 25 Hue 0 Sharpness 50 Backlight 5 Color Temp Cool NR On Mild Mode On Dynamic Pictur...

Page 60: ...edly until the desired sound indication appears Each time you press the button the sound indication changes as follows Sound indication Stereo Auto SAP Mono This is available only for VHF UHF input 1 5 2 4 Description Select for stereo reception when viewing a program broadcast in stereo Select to automatically switch the TV to second audio programs when a signal is received If no SAP signal is pr...

Page 61: ...udio TV Select Back Set Exit Return Treble 0 Bass 0 Balance 0 Effect Off MTS Auto SAP Speaker On Audio Out Audio TV Select Back Set Stereo Auto SAP Mono Exit Return Treble 0 Bass 0 Balance 0 Effect Off MTS Auto SAP Speaker On Audio Out Audio TV Select Back Set Video Exit Set Select Return Mode Vivid Picture 50 Brightness 50 Color 25 Hue 0 Sharpness 50 Backlight 5 Color Temp Cool NR On Mild Mode On...

Page 62: ...gh your external audio system speakers 1 Press MENU Exit Return Treble 0 Bass 0 Balance 0 Effect Off MTS Stereo Speaker On Audio Out Audio TV Select Back Set Exit Return Treble 0 Bass 0 Balance 0 Effect Off MTS Stereo Speaker On Audio Out Audio TV Select Back Set Video Exit Set Select Return Mode Vivid Picture 50 Brightness 50 Color 25 Hue 0 Sharpness 50 Backlight 5 Color Temp Cool NR On Mild Mode...

Page 63: ...g station or cable service provider 2 Press V v to select Audio then press 3 Press V v to select Audio Out then press 4 Press V v to select the desired option then press 5 Press MENU to exit the menu screen Note Audio Out can be selected only when the Speaker is set to Off Option Audio Out Easy control of volume adjustments Description Variable Fixed The TV s speakers are turned off but the audio ...

Page 64: ...rd see page 65 5 Press V v to select Select Country then press 1 9 3 2 4 8 1 2 3 4 5 6 7 8 0 9 Parent TV Exit Back Press to enter password Parent TV Exit Back Enter password using 0 9 buttons Return Lock Off Select Country U S A Change Password Parent TV Select Back Exit Set Return Lock OffSelect Country 0 Select Country Change Password Parent TV Select Back Exit Set U S A Canada Parent TV Return ...

Page 65: ...be set as your password If you entered 4357 the message of Password incorrect press to try again appears When you select a Parental Control program and the indication is displayed on the screen you cannot view that program even if you enter 4357 see To view blocked programs on page 65 6 Press V v to select your country region U S A or Canada then press 7 Press V v to select Lock then press 8 Press...

Page 66: ...ting a Custom Rating If you want to select the ratings to be blocked from Custom once you have activated the Parental Control feature page 64 follow the procedure below For a detailed description of each rating see What the Ratings Mean on page 68 2 9 10 In Canada In U S A Return Movie Rating TV Rating Unrated Allow Custom Parent TV Select Back Exit Set Return English Rating French Rating U S A Ra...

Page 67: ...er indicating that the programs that match the extender can be viewed To relock the canceled extender select then press The indication appears to show that the programs that match the extender will be blocked again Example TV rating in U S A 6 To select a TV rating in U S A Press V v to select TV Rating then press To select a TV rating in Canada Press V v to select English Rating French Rating or ...

Page 68: ...ograms be aware that the following types of programs may be blocked programs broadcast from another country region emergency broadcasts political programs sports news public service announcements religious programs and weather What the Ratings Mean Ratings in the U S A Sony s predetermined ratings These are original ratings that Sony has predetermined according to the viewer s age Each rating allo...

Page 69: ...fically designed to be viewed by adults and therefore may be unsuitable for children under the age of 17 U S movie ratings U S movie ratings are for movies including those shown on TV rated according to the Motion Picture Association of America MPAA Guidelines Option G General Audiences All Ages Admitted PG Parental Guidance Suggested Some Material May Not Be Suitable For Children PG 13 Parents St...

Page 70: ...gs that Sony has predetermined according to the viewer s age Each rating allows you to view the certain programs as follows Option Child Youth Y Adult Young Adult For descriptions of Child Youth and Y Adult Young Adult ratings see the following custom rating options Description Suitable for children under the age of 8 Viewable Canadian English Language ratings C and G Viewable Canadian French Lang...

Page 71: ... children under the age of 8 C8 Programming generally considered acceptable for children aged 8 and older to watch on their own G General Audience PG Parental Guidance 14 Programming contains themes or content which may not be suitable for viewers under the age of 14 18 Adult Description There will be no realistic scenes of violence or no offensive language nudity or sexual content Careful attenti...

Page 72: ...e TV lights up in red To cancel the Sleep timer Press SLEEP repeatedly until Sleep Off appears Tips If you turn the TV off and then turn it on again the Sleep timer returns to Sleep Off TV will turn off soon appears one minute before the TV shuts off This message may not appear if you perform any operation with the menu opened Sleep 90 Sleep Off Sleep 15 Sleep 30 Sleep 45 Sleep 60 MUTING PICTURE W...

Page 73: ...TV s memory page 36 Check if the Sleep timer is activated page 72 Check the connection between the optional video equipment and the TV Press the Input Select buttons on the remote control page 50 When you connect video equipment to both the VIDEO and the S VIDEO input jacks make sure Auto YC in the Setup menu is set to On to view the S VIDEO input page 26 Trouble symptoms and remedies Troubleshoot...

Page 74: ...0 ohm twin lead cables as interference may occur Press MTS SAP to select Mono page 60 This is caused by video head interference Keep your VCR away from the TV Leave a space of 30 cm 11 7 8 inches between your VCR and the TV to avoid noise Avoid installing your VCR in front of the TV or at the side of the TV If the option you want to select appears in a pale color you cannot select it The current W...

Page 75: ... 32 44 1 and 48 kHz 16 20 and 24 bits AUDIO 500 mVrms 100 modulation Impedance 47 kilohms AUDIO OUT 500 mVrms 100 modulation More than 1 Vrms at the maximum volume setting Variable More than 500 mVrms Fixed Headphones Stereo mini jack Impedance 16 ohms Speaker Woofer ø70 mm 2 Tweeter ø28 mm 2 Speaker output 4 W 4 W Power requirement 120 V AC 60 Hz Power consumption In use 95 W In standby Less than...

Page 76: ...Channel setting 36 Channel Fix 38 Channel Label 53 Channel Skip Add 37 Closed caption 42 Component Video connectors 30 32 33 Connecting 24 antenna 24 AV receiver 29 cable box 24 digital cable box 32 digital satellite receiver 33 34 DVD player 30 31 power cord 25 satellite receiver 27 28 VCR 26 D DISPLAY 41 R Remote control 13 battery installation 13 programming 16 using with other equipment 18 S S...

Page 77: ......

Page 78: ......

Page 79: ......

Page 80: ...Printed on 100 recycled paper Printed in Japan ...

Reviews: