background image

Projecting

7

 US

1

Turn on both the unit and the equipment connected to 
the unit.

2

Press INPUT to display the input palette on the 
screen.

3

Select the equipment from which you want to display 
images.
Press INPUT repeatedly or press 

M

/

m

/

 (enter) to 

select the equipment from which to project.

1

Press the 

?

/

1

 (On/Standby) button.

The message “POWER OFF?” appears.

2

Press the 

?

/

1

 (On/Standby) button again before the 

message disappears.
The ON/STANDBY indicator flashes in green and the 
fan continues to run to reduce the internal heat.

The fan stops and the ON/STANDBY indicator 
changes from flashing green to remaining red.

The power is turned off completely, and you can 
disconnect the AC power cord.

Never disconnect the AC power cord while the indicator is flashing.

Tip

You can turn off the unit by holding the 

?

/

1

 (On/Standby) button for 

about 1 second, instead of performing the above steps.

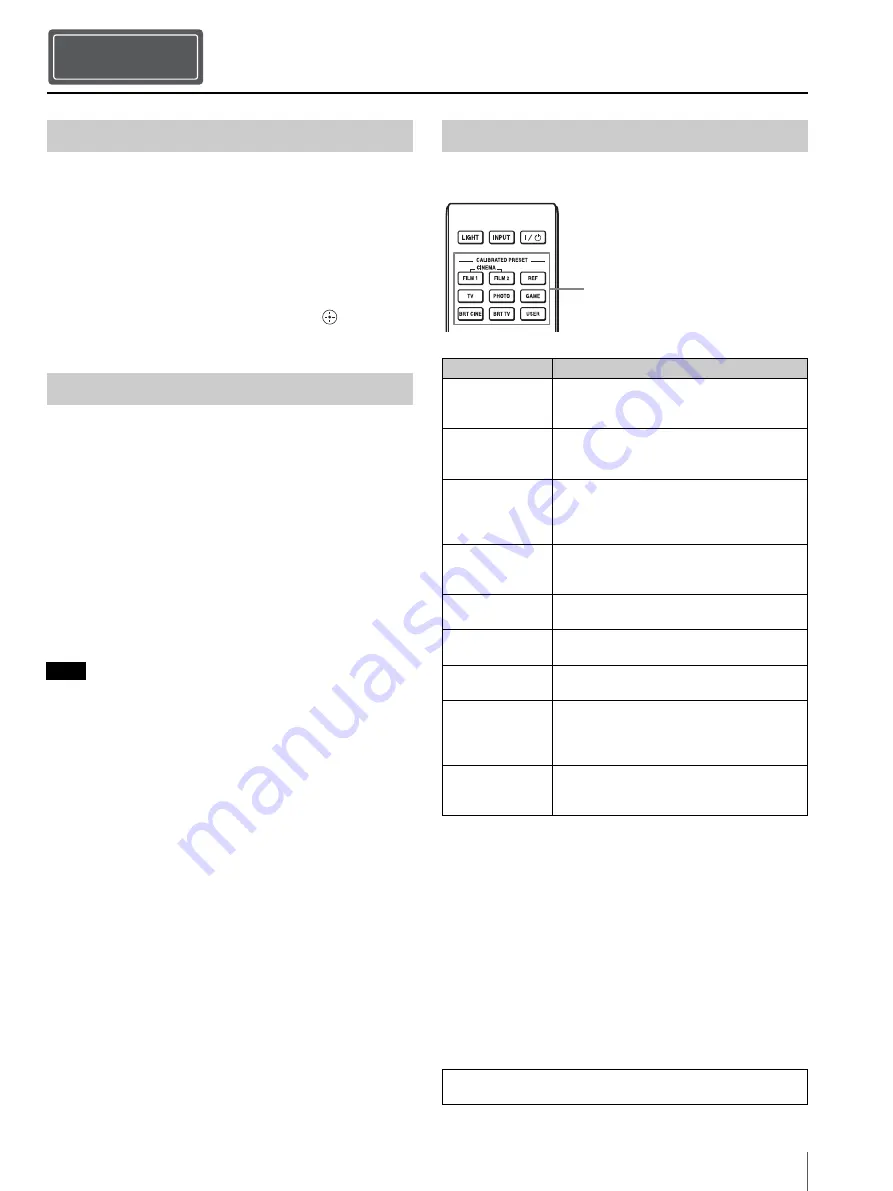
Press one of the CALIBRATED PRESET buttons.

Projecting

Step 4

Projecting the Picture

Turning Off the Power

Note

Selecting the Picture Viewing Mode

Setting items

Description

CINEMA FILM 1 Picture quality suited to reproducing the 

highly dynamic and clear images typical of 
master positive film.

CINEMA FILM 2 Picture quality suited to reproducing the rich 

tone and color typical of a movie theater, 
based on the “CINEMA FILM 1.”

REF

A picture quality setup suitable for when you 
want to reproduce faithfully the original 
image quality, or for enjoying image quality, 
without any adjustment.

TV

Picture quality suited for watching TV 
programs, sports, concerts, and other video 
images.

PHOTO

Ideal for projecting still images taken with a 
digital camera.

GAME

Picture quality suited to gaming, with well-
modulated colors and fast response.

BRT CINE

Picture quality suited for watching movies in 
a bright environment, such as a living room.

BRT TV

Picture quality suited for watching TV 
programs, sports, concerts, and other video 
images in a bright environment, such as a 
living room.

USER

Adjusts the picture quality to suit your taste 
then saves the setting. The factory default 
setting is the same as “REF.”

CALIBRATED PRESET buttons

For more information, refer to “Projecting” in the Operating 
Instructions.

Summary of Contents for VPL-VW1025ES

Page 1: ...Video Projector VPL VW1025ES 5 031 130 11 1 2021 Sony Corporation Quick Reference Manual ___ US Guide de reference rapide _ FR Printed in China ...

Page 2: ...eference Manual Preparing Page 3 Installing the Unit Page 4 Connecting the Unit Page 6 Projecting Page 7 Error Handling About Indicators Page 8 Step 1 Step 2 Step 3 Step 4 Downloading Manuals Manuals that describes how to operate the unit can be downloaded from the Sony website Download the required manual by accessing the site using the following QR code or URL https rd1 sony net help vpl vw890 h...

Page 3: ...ution about handling the remote control Handle the remote control with care Do not drop or step on it or spill liquid of any kind onto it Do not place the remote control in a location near a heat source a place subject to direct sunlight or a damp room Preparing Step 1 Checking the Supplied Accessories Inserting the Batteries into the Remote Control Push and slide to open Insert the batteries E si...

Page 4: ... pressing the M m button b Adjust the picture size Press the LENS ADJUSTMENT ZOOM button to display the Lens Zoom adjustment window test pattern Then adjust the size of the picture by pressing the M m button c Adjust the picture position Press the LENS ADJUSTMENT SHIFT button to display the Lens Shift adjustment window test pattern Then adjust to the proper position of the picture by pressing the ...

Page 5: ...S Lens adjustment window test pattern 1 78 1 16 9 2 35 1 1 85 1 1 33 1 4 3 The dashed lines show the screen sizes of each aspect ratio For more information refer to Connections and Preparations in the Operating Instructions ...

Page 6: ...of the connected equipment Connecting the Unit When you monitor and control the projector via the network access the Setup page of the projector refer to Using Network Features in the Operating Instructions via a Web browser and enable the desired control protocol Step 3 Right side of the unit Equipment with HDMI output connectors to HDMI output HDMI cable not supplied Computer Video signal flow A...

Page 7: ... Note Selecting the Picture Viewing Mode Setting items Description CINEMA FILM 1 Picture quality suited to reproducing the highly dynamic and clear images typical of master positive film CINEMA FILM 2 Picture quality suited to reproducing the rich tone and color typical of a movie theater based on the CINEMA FILM 1 REF A picture quality setup suitable for when you want to reproduce faithfully the ...

Page 8: ...ource and light source power Turn off then turn on the power after a while If the symptom persists consult qualified Sony personnel Six times The unit detects a drop impact If there is abnormality on the unit consult with qualified Sony personnel If there are no abnormalities on the unit disconnect the AC power cord and check that the ON STANDBY indicator turns off then connect the AC power cord a...

Page 9: ......

Page 10: ... Page 3 Installation de l appareil Page 4 Raccordement de l appareil Page 6 Projection Page 7 Gestion des erreurs À propos des indicateurs Page 8 Etape 1 Etape 2 Etape 3 Etape 4 Téléchargement des manuels Les manuels décrivant le fonctionnement de l appareil peuvent être téléchargés sur le site Web de Sony Téléchargez le manuel nécessaire en accédant au site à l aide du code QR ou de l URL suivant...

Page 11: ...télécommande Manipulez la télécommande avec précaution Ne renversez aucun liquide sur la télécommande ne la laissez pas tomber et ne marchez pas dessus Ne placez pas la télécommande à proximité d une source de chaleur dans un endroit exposé aux rayons directs du soleil ou dans une pièce humide Préparation Etape 1 Vérification des accessoires fournis Insertion des piles dans la télécommande Appuyez...

Page 12: ...n appuyant sur le bouton M m b Réglez la taille de l image Appuyez sur le bouton LENS ADJUSTMENT ZOOM pour afficher la fenêtre de réglage Zoom d objectif mire d essai Réglez ensuite la taille de l image en appuyant sur le bouton M m c Réglez la position de l image Appuyez sur le bouton LENS ADJUSTMENT SHIFT pour afficher la fenêtre de réglage Déplac objectif mire d essai Réglez ensuite la position...

Page 13: ...réglage de l objectif mire d essai 1 78 1 16 9 2 35 1 1 85 1 1 33 1 4 3 Les lignes pointillées indiquent les tailles d écran de chaque rapport de format Pour plus d informations reportez vous à Raccordements et préparatifs dans le Mode d emploi ...

Page 14: ...d emploi de l appareil à raccorder Raccordement de l appareil Pour surveiller et commander le projecteur via le réseau accédez à la page Setup du projecteur reportez vous à la section Utilisation des fonctionnalités réseau du Mode d emploi via un navigateur Web et activez le protocole de contrôle souhaité Etape 3 Côté droit de l appareil vers la sortie HDMI Câble HDMI non fourni Ordinateur Flux du...

Page 15: ...ction de l image Mise hors tension Remarque Sélection du mode d affichage de l image Paramètres Description CINEMA FILM 1 Qualité d image adaptée à la reproduction d images hautement dynamiques et nettes typiques d un chef d œuvre du cinéma CINEMA FILM 2 Qualité d image adéquate pour la reproduction de tons riches et de couleurs dignes du cinéma en fonction de l option CINEMA FILM 1 REF Configurat...

Page 16: ...limentation de la source lumineuse Mettez hors tension l appareil puis remettez le sous tension Si ce symptôme persiste consultez le service après vente Sony Six fois L appareil détecte l impact d une chute En cas d anomalie de l appareil consultez le service après vente Sony En l absence d anomalie sur l appareil débranchez le cordon d alimentation et assurez vous que l indicateur ON STANDBY s ét...

Page 17: ......

Page 18: ......

Page 19: ......

Reviews: