background image


VPCS1 Series Optical Disk Drive 


            Replacement Instructions 


P/N  989201343 

Rev. B


2/4


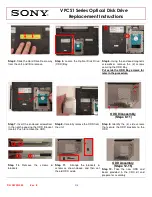
Step 4.

 Slide the Hard Drive Door away 

from the unit, and lift to remove. 

Step  5. 

Locate  the  Optical  Disk  Drive 

(ODD) Bay. 

Step  6.

  Using  the  enclosed magnetic 

screwdriver,  remove  the  (2)  screws 
securing the ODD Bay. 

Put  aside  the  ODD  Bay  screws  for 
later in the procedure.


ODD Disassembly  

(Steps 9-11) 

Step 7. 

Insert the enclosed screwdriver 

in the notch exposing the  ODD Bracket 
(metal). Push to remove the ODD. 

Step 8.

 Carefully remove the ODD from 

the unit. 
 

Step  9. 

Identify  the  (4)  side  screws 

that  secure  the  ODD  brackets  to  the 
ODD. 


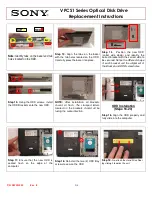
ODD Assembly  

(Steps 12-15)


Step  12.

  Take  the  new  ODD  and 

bezel  provided  in  the  CRU  kit  and 
prepare for assembly.


Step  10.

  Remove  the  screws  & 

brackets. 


Step  11.

    Arrange  the  brackets  & 

screws  as  shown  above,  and  then  set 
the old ODD aside. 

Summary of Contents for VPCS1 Series

Page 1: ...rd Drive Door Screws to re secure the Hard Drive Door later in the procedure These easy instructions are intended to guide you through the replacement process Before you begin place your notebook computer on a clean or covered surface to avoid damage to the computer s case Follow the ESD Electrostatic Discharge damage prevention instructions o Hold parts by the edges away from exposed circuitry wh...

Page 2: ...ws for later in the procedure ODD Disassembly Steps 9 11 Step 7 Insert the enclosed screwdriver in the notch exposing the ODD Bracket metal Push to remove the ODD Step 8 Carefully remove the ODD from the unit Step 9 Identify the 4 side screws that secure the ODD brackets to the ODD ODD Assembly Steps 12 15 Step 12 Take the new ODD and bezel provided in the CRU kit and prepare for assembly Step 10 ...

Page 3: ...nt shape of each bracket and the alignment of the Bracket and ODD screw holes Step 15 Using the ODD screws install the ODD Brackets onto the new ODD NOTE After installation all brackets should sit flush The stamped letters located on the brackets should all be facing the same direction ODD Installation Steps 16 20 Step 16 Align the ODD properly and fully slide into the computer Step 17 Ensure that...

Page 4: ... 2 Hard Drive Door Screws to secure the Door Step 21 Reinstall the battery pack and AC Adaptor Power on your computer and continue with the recovery process by following the instructions described on the back of the recovery disk s case Return the old ODD to Sony following the included shipping instructions ...

Reviews: