background image

Connecting the Power Cord 

The computer's power cord must be plugged into an AC power source, such as an AC wall outlet, surge protector, or
Uninterruptible Power Supply (UPS), before you can establish communication with your wireless keyboard and wireless
mouse. 


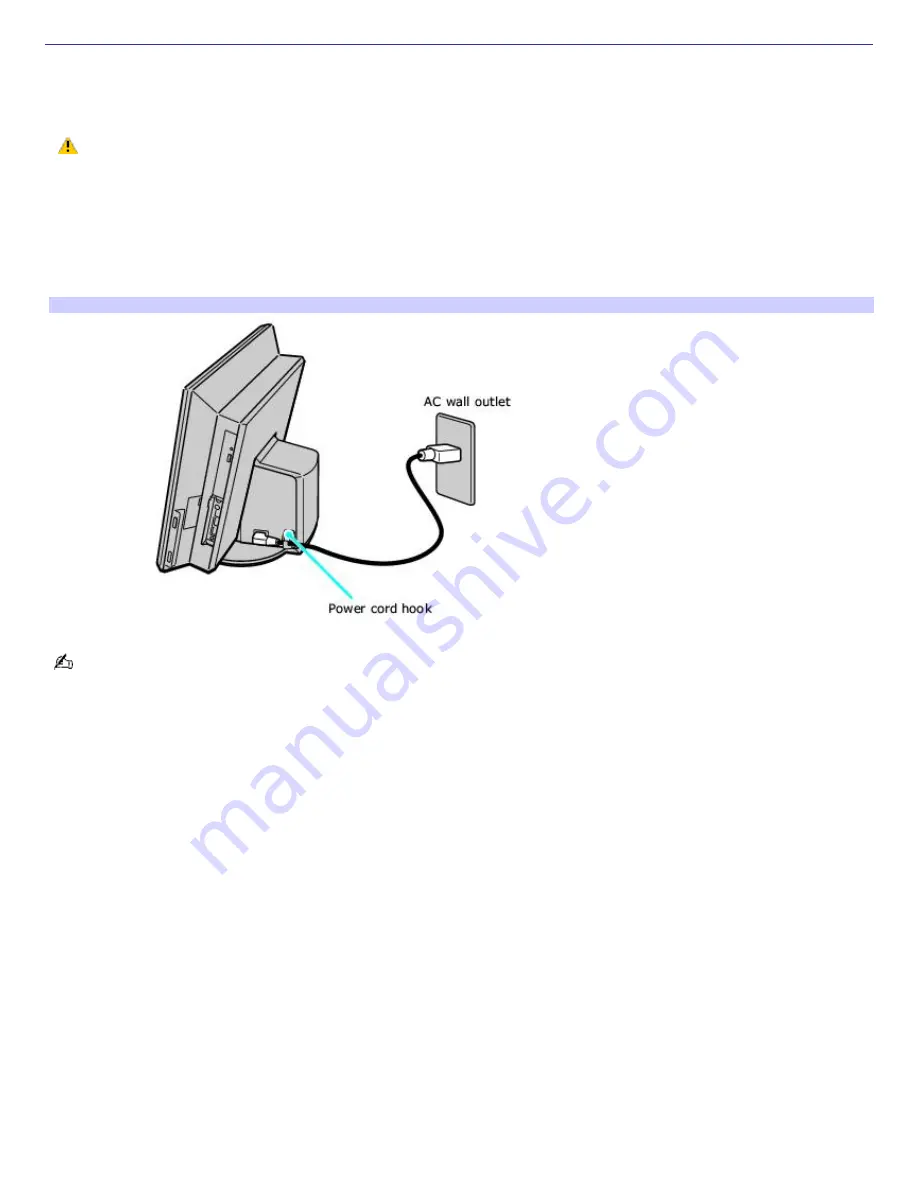
Your computer has the ability to be turned on its base and the power cord may become unplugged. You may

lose data if your system loses power while software programs are running. Use the attached power cord hook, located
on the right side of the computer, to avoid accidentally unplugging your computer. 

1.

Insert the power cord into the AC input port on the back panel of the computer. 

2.

Pass the power cord cable over the power cord hook, located next to the AC power port. 

3.

Insert the power cord plug into a grounded AC wall outlet, surge protector, or Universal Power Supply (UPS). 

  Connecting the power cord to a power outlet 


 Install your computer so you can easily reach the power outlet in the event of an emergency. 

Page  57

Summary of Contents for VGC-V517G VAIO

Page 1: ...rams included with your computer View the Electronic Flyer which provides updates and supplemental information about your computer Go to the Sony online support Web site to view the VAIO Computer Specifications which lists your computer s hardware specifications and preinstalled software information For information about the Sony software preinstalled on your computer click Start in the Windows ta...

Page 2: ... of the Sony VAIO computer Your new high performance multimedia computer combines state of the art computer functionality with the latest audio video and information technology features Unpacking Your Computer Planning an Ergonomic Work Space Page 2 ...

Page 3: ...or the remote control The VGC 517G model is supplied with two 2 AA alkaline batteries for the wireless mouse and four 4 AA manganese batteries for the wireless keyboard and remote control Manuals VAIO Computer Safety Information Provides safety legal guidelines and owner information VAIO Computer Welcome Provides information about supplied accessories and your computer s hardware configuration Onl...

Page 4: ...c RecordNow software Drag and drop to make custom data CDs or DVDs or make backup copies of your CDs and DVDs For more information about using the Sony software programs preinstalled on your computer visit VAIO Life To access this software information 1 Click Start in the Windows taskbar 2 Click Welcome to VAIO life Hard Disk Drive Recovery Your computer is equipped with the VAIO Recovery Wizard a...

Page 5: ...or the remote control The VGC 517G model is supplied with two 2 AA alkaline batteries for the wireless mouse and four 4 AA manganese batteries for the wireless keyboard and remote control Manuals VAIO Computer Safety Information Provides safety legal guidelines and owner information VAIO Computer Welcome Provides information about supplied accessories and your computer s hardware configuration Onl...

Page 6: ...c RecordNow software Drag and drop to make custom data CDs or DVDs or make backup copies of your CDs and DVDs For more information about using the Sony software programs preinstalled on your computer visit VAIO Life To access this software information 1 Click Start in the Windows taskbar 2 Click Welcome to VAIO life Hard Disk Drive Recovery Your computer is equipped with the VAIO Recovery Wizard a...

Page 7: ...or the remote control The VGC 517G model is supplied with two 2 AA alkaline batteries for the wireless mouse and four 4 AA manganese batteries for the wireless keyboard and remote control Manuals VAIO Computer Safety Information Provides safety legal guidelines and owner information VAIO Computer Welcome Provides information about supplied accessories and your computer s hardware configuration Onl...

Page 8: ...c RecordNow software Drag and drop to make custom data CDs or DVDs or make backup copies of your CDs and DVDs For more information about using the Sony software programs preinstalled on your computer visit VAIO Life To access this software information 1 Click Start in the Windows taskbar 2 Click Welcome to VAIO life Hard Disk Drive Recovery Your computer is equipped with the VAIO Recovery Wizard a...

Page 9: ...e keyboard or joystick may strain muscles or tendons Furniture and posture Sit in a chair with good back support and armrests Adjust the level of the chair so your feet are flat on the floor A footrest may make you more comfortable Sit with relaxed upright posture avoid slouching forward or leaning far backward Viewing angle of the display Position the unit so that the display is 18 to 26 inches d...

Page 10: ...the controls ports and jacks may vary from the illustrations shown in this section For more information about your computer and peripheral equipment see the specifications sheet for your computer on the Sony Online Support Web site at http www sony com pcsupport About the Front Panel About the Back Panel About the Interior Panel About the Side Panel About the Wireless Keyboard About the Mouse Abou...

Page 11: ...edia slot is in use 4 Power indicator Lights when the power is on or when the computer is in Stand by mode 5 Stereo speakers built in The stereo speakers provide sound for software audio and video media 6 Infrared receiver1 Enables communication with the remote control to turn on TV change TV channels and raise or lower volume 1 Your computer is equipped with a single infrared receiver The locatio...

Page 12: ... angle 1 Place your hands on the sides of the monitor as shown in the picture 2 Tilt the monitor to achieve the desired viewing angle To adjust monitor viewing angle Lifting the computer Grasp the computer on both sides holding the bottom edges firmly To lift the computer Page 12 ...

Page 13: ...edia slot is in use 4 Power indicator Lights when the power is on or when the computer is in Stand by mode 5 Stereo speakers built in The stereo speakers provide sound for software audio and video media 6 Infrared receiver1 Enables communication with the remote control to turn on TV change TV channels and raise or lower volume 1 Your computer is equipped with a single infrared receiver The locatio...

Page 14: ... angle 1 Place your hands on the sides of the monitor as shown in the picture 2 Tilt the monitor to achieve the desired viewing angle To adjust monitor viewing angle Lifting the computer Grasp the computer on both sides holding the bottom edges firmly To lift the computer Page 14 ...

Page 15: ...n Installing Memory Back panel 1 Back panel removable Slide the back panel up to access the audio video USB and i LINK ports located on your computer s interior panel 2 Back panel release tab Press the release tab to enable lowering of the back panel 3 Cable guides Pass the 1 TV coaxial 2 network and 3 modem cables through these guides to prevent accidental unplugging Page 15 ...

Page 16: ... interior panel of your computer The back panel slides up to provide access to these connections Bottom panel 1 S video In jack1 Connection for an S video cable optional Audio In jack Connection for an audio cable supplied 2 VHF UHF port Connection for a TV coaxial cable supplied 3 i LINK 4 pin S400 port IEEE 1394 Connection for a compatible digital device 4 Universal Serial Bus USB 2 0 ports 2 Co...

Page 17: ...a telephone and modem line to your computer i LINK is a trademark of Sony used only to designate that a product contains an IEEE 1394 connection The i LINK connection may vary depending on the software programs operating system and compatible i LINK devices All products with an i LINK connection may not communicate with each other Refer to the documentation that came with your compatible i LINK de...

Page 18: ... interior panel of your computer The back panel slides up to provide access to these connections Bottom panel 1 S video In jack1 Connection for an S video cable optional Audio In jack Connection for an audio cable supplied 2 VHF UHF port Connection for a TV coaxial cable supplied 3 i LINK 4 pin S400 port IEEE 1394 Connection for a compatible digital device 4 Universal Serial Bus USB 2 0 ports 2 Co...

Page 19: ...a telephone and modem line to your computer i LINK is a trademark of Sony used only to designate that a product contains an IEEE 1394 connection The i LINK connection may vary depending on the software programs operating system and compatible i LINK devices All products with an i LINK connection may not communicate with each other Refer to the documentation that came with your compatible i LINK de...

Page 20: ...IA card can be inserted into this slot to increase your computer s functional capabilities 2 Power button Press the power button to turn the computer on and off 3 Memory Stick media slot Reads and writes data from and to a Memory Stick media 4 Optical drive See the online specifications sheet for optical drive information 5 Optical disc drive access indicator Light is amber while reading and writi...

Page 21: ...hook Prevents the power cord from becoming unplugged from the system when the computer is rotated 1 Not available on all models For details about your computer s hardware configuration see the online specifications sheet i LINK is a trademark of Sony used only to designate that a product contains an IEEE 1394 connection The i LINK connection may vary depending on the software programs operating sy...

Page 22: ... area A warning message may also appear on the screen when the keyboard s battery power is low Do not mix old used and new batteries when replacing batteries in the wireless keyboard Always use the same type and manufacture of battery do not mix alkaline with manganese batteries Using incompatible batteries or mixing used new or different types of batteries can damage the keyboard Inserting batter...

Page 23: ... area A warning message may also appear on the screen when the keyboard s battery power is low Do not mix old used and new batteries when replacing batteries in the wireless keyboard Always use the same type and manufacture of battery do not mix alkaline with manganese batteries Using incompatible batteries or mixing used new or different types of batteries can damage the keyboard Inserting batter...

Page 24: ...o adjust the keyboard height 3 CONNECT button Press to enable the wireless keyboard to communicate with the computer 4 Battery compartment Compartment for the supplied AA batteries Using a wireless keyboard VGP WKB1 The wrist rest can be folded over the keyboard keys when the keyboard is not in use To handle a wireless keyboard Identifying keys and functions Page 24 ...

Page 25: ...u can also use the Fn key with the function keys to perform certain task These tasks vary between software programs Stand by Press to place the computer into Stand by mode Press again to resume normal operation1 Function The 12 function keys are used to perform certain tasks The task associated with each function key varies between software programs Numeric keypad Use the numeric keypad to type nu...

Page 26: ...uter s monitor The left and right buttons provide the same functions as the left and right buttons on a mouse To turn on the pointing device 1 Open the wireless keyboard s wrist rest panel completely 2 Slide the on off button to the On position 3 Use the input area and buttons to direct the pointer on the computer screen and perform your computing tasks Turning on the pointer device VGC WKB1 Actio...

Page 27: ...o adjust the keyboard height 3 CONNECT button Press to enable the wireless keyboard to communicate with the computer 4 Battery compartment Compartment for the supplied AA batteries Using a wireless keyboard VGP WKB1 The wrist rest can be folded over the keyboard keys when the keyboard is not in use To handle a wireless keyboard Identifying keys and functions Page 27 ...

Page 28: ...u can also use the Fn key with the function keys to perform certain task These tasks vary between software programs Stand by Press to place the computer into Stand by mode Press again to resume normal operation1 Function The 12 function keys are used to perform certain tasks The task associated with each function key varies between software programs Numeric keypad Use the numeric keypad to type nu...

Page 29: ...uter s monitor The left and right buttons provide the same functions as the left and right buttons on a mouse To turn on the pointing device 1 Open the wireless keyboard s wrist rest panel completely 2 Slide the on off button to the On position 3 Use the input area and buttons to direct the pointer on the computer screen and perform your computing tasks Turning on the pointer device VGC WKB1 Actio...

Page 30: ...le the wireless keyboard to communicate with the computer 3 Battery compartment Compartment for the supplied AA batteries 4 Wrist rest Detachable wrist rest that doubles as a keyboard cover Using a wireless keyboard PCVA KB6 The detachable wrist rest can be folded over the keyboard keys when the keyboard is not in use To handle a wireless keyboard Page 30 ...

Page 31: ...software programs Numeric keypad Use the numeric keypad to type numbers or to perform basic math calculations Press the Num Lock key to enable the numeric keypad function Press the Num Lock key again to disable the numeric keypad Direction arrows The Up Down Left and Right arrow keys move the pointer on the computer screen Applications Press to display a shortcut menu in certain software programs ...

Page 32: ...Page 32 ...

Page 33: ...le the wireless keyboard to communicate with the computer 3 Battery compartment Compartment for the supplied AA batteries 4 Wrist rest Detachable wrist rest that doubles as a keyboard cover Using a wireless keyboard PCVA KB6 The detachable wrist rest can be folded over the keyboard keys when the keyboard is not in use To handle a wireless keyboard Page 33 ...

Page 34: ...software programs Numeric keypad Use the numeric keypad to type numbers or to perform basic math calculations Press the Num Lock key to enable the numeric keypad function Press the Num Lock key again to disable the numeric keypad Direction arrows The Up Down Left and Right arrow keys move the pointer on the computer screen Applications Press to display a shortcut menu in certain software programs ...

Page 35: ...Page 35 ...

Page 36: ...se top 1 Left mouse button Press to perform specific mouse functions 2 Wheel Rotate the wheel to scroll up or down on the LCD screen 3 Right mouse button Press to perform specific mouse functions Wireless mouse Side and bottom 1 Power switch Slide power switch to turn the mouse on or off 2 CONNECT button Press to enable communication between your VAIO computer and the wireless mouse 3 Indicators1 ...

Page 37: ...ouse s battery power is low Do not mix old used and new batteries when replacing batteries in the wireless mouse Always use the same type and manufacture of battery do not mix alkaline with manganese batteries Using incompatible batteries or mixing used new or different types of batteries can damage the mouse Inserting batteries into the wireless mouse If your wireless mouse does not operate prope...

Page 38: ...se top 1 Left mouse button Press to perform specific mouse functions 2 Wheel Rotate the wheel to scroll up or down on the LCD screen 3 Right mouse button Press to perform specific mouse functions Wireless mouse Side and bottom 1 Power switch Slide power switch to turn the mouse on or off 2 CONNECT button Press to enable communication between your VAIO computer and the wireless mouse 3 Indicators1 ...

Page 39: ...ouse s battery power is low Do not mix old used and new batteries when replacing batteries in the wireless mouse Always use the same type and manufacture of battery do not mix alkaline with manganese batteries Using incompatible batteries or mixing used new or different types of batteries can damage the mouse Inserting batteries into the wireless mouse If your wireless mouse does not operate prope...

Page 40: ...s of your remote control Remote control 1 MUTE button Press to turn off the sound Press again to restore the sound 2 Channel number buttons 0 9 Press to select specific channels Press the ENTER button to activate channel selection 3 JUMP button Press to go to the previous channel Press again to return to the current channel 4 LIVE TV button Press to watch current TV programming Page 40 ...

Page 41: ...in the VAIO Zone software 9 VOLUME button Press to raise or lower the volume 10 STANDBY button Press to place the system into Stand by mode Note You cannot place the computer into Stand by mode when certain VAIO Zone functions are running 11 ENTER button Press to activate channel selection See Channel number buttons 12 REC button Press to begin recording Note The REC function is available for VAIO...

Page 42: ...g a VAIO Zone software feature such as playing music or watching a photo slide show 17 Direction arrows and ENTER button Press a direction arrow to locate and select options in VAIO Zone software Press ENTER to activate the selection 18 CONTROLS button Press to display the playback controls in VAIO Zone software Press again to hide the playback controls 19 CHANNEL button Press to change channels a...

Page 43: ...manganese batteries Using incompatible batteries or mixing used new or different types of batteries can damage the remote control If your remote control does not operate properly the batteries may need to be replaced When your remote control is not being used for extended periods of time remove the batteries to avoid possible damage from battery leakage Page 43 ...

Page 44: ...s of your remote control Remote control 1 MUTE button Press to turn off the sound Press again to restore the sound 2 Channel number buttons 0 9 Press to select specific channels Press the ENTER button to activate channel selection 3 JUMP button Press to go to the previous channel Press again to return to the current channel 4 LIVE TV button Press to watch current TV programming Page 44 ...

Page 45: ...in the VAIO Zone software 9 VOLUME button Press to raise or lower the volume 10 STANDBY button Press to place the system into Stand by mode Note You cannot place the computer into Stand by mode when certain VAIO Zone functions are running 11 ENTER button Press to activate channel selection See Channel number buttons 12 REC button Press to begin recording Note The REC function is available for VAIO...

Page 46: ...g a VAIO Zone software feature such as playing music or watching a photo slide show 17 Direction arrows and ENTER button Press a direction arrow to locate and select options in VAIO Zone software Press ENTER to activate the selection 18 CONTROLS button Press to display the playback controls in VAIO Zone software Press again to hide the playback controls 19 CHANNEL button Press to change channels a...

Page 47: ...manganese batteries Using incompatible batteries or mixing used new or different types of batteries can damage the remote control If your remote control does not operate properly the batteries may need to be replaced When your remote control is not being used for extended periods of time remove the batteries to avoid possible damage from battery leakage Page 47 ...

Page 48: ...ected i LINK device if the device is equipped with a 6 pin connector See the instructions supplied with your i LINK device for more information on installation and use Connecting an i LINK IEEE 1394 device 1 Use the symbol to locate the i LINK port on your compatible i LINK device Plug the device s i LINK cable connector into this port 2 Plug the other end of the cable into the i LINK port on your...

Page 49: ...ected i LINK device if the device is equipped with a 6 pin connector See the instructions supplied with your i LINK device for more information on installation and use Connecting an i LINK IEEE 1394 device 1 Use the symbol to locate the i LINK port on your compatible i LINK device Plug the device s i LINK cable connector into this port 2 Plug the other end of the cable into the i LINK port on your...

Page 50: ... the PC Card does not insert easily remove it from the PC Card slot and verify that it is not upside down or backwards Carefully reinsert the PC Card without forcing it into the slot Removing a PC Card 1 Close all software programs that may access the PC Card to avoid data loss 2 Double click the Safely Remove Hardware icon in the Windows taskbar 3 Click to select the name of the card that you wan...

Page 51: ...carefully 7 Close the PC Card panel on the computer If you eject the PC Card incorrectly your computer may not work properly Page 51 ...

Page 52: ... the PC Card does not insert easily remove it from the PC Card slot and verify that it is not upside down or backwards Carefully reinsert the PC Card without forcing it into the slot Removing a PC Card 1 Close all software programs that may access the PC Card to avoid data loss 2 Double click the Safely Remove Hardware icon in the Windows taskbar 3 Click to select the name of the card that you wan...

Page 53: ...carefully 7 Close the PC Card panel on the computer If you eject the PC Card incorrectly your computer may not work properly Page 53 ...

Page 54: ... the PC Card does not insert easily remove it from the PC Card slot and verify that it is not upside down or backwards Carefully reinsert the PC Card without forcing it into the slot Removing a PC Card 1 Close all software programs that may access the PC Card to avoid data loss 2 Double click the Safely Remove Hardware icon in the Windows taskbar 3 Click to select the name of the card that you wan...

Page 55: ...carefully 7 Close the PC Card panel on the computer If you eject the PC Card incorrectly your computer may not work properly Page 55 ...

Page 56: ...et for your computer on the Sony Online Support Web site at http www sony com pcsupport for details about your computer s hardware configuration Connecting the Power Cord Connecting the Wireless Keyboard Connecting the Wireless Mouse Connecting the Modem Cable Turning On Your Computer Registering Your Computer Turning Off Your Computer Page 56 ...

Page 57: ...oses power while software programs are running Use the attached power cord hook located on the right side of the computer to avoid accidentally unplugging your computer 1 Insert the power cord into the AC input port on the back panel of the computer 2 Pass the power cord cable over the power cord hook located next to the AC power port 3 Insert the power cord plug into a grounded AC wall outlet sur...

Page 58: ...s keyboard over 5 Press the CONNECT button3 on the bottom of the keyboard to activate communication between the wireless keyboard and the computer Connecting the keyboard Additional information about using a wireless keyboard The wireless keyboard requires unobstructed communication with the system unit for proper operation To maintain good communication operate your wireless keyboard within the d...

Page 59: ...e of battery do not mix alkaline with manganese batteries Using incompatible batteries or mixing used new or different types of batteries can damage the keyboard 1 The supplied wireless keyboard model varies with the computer model purchased 2 O perate the keyboard V GP WKB1 within 32 feet of the computer O perate the keyboard PC V A KB6 within 2 5 feet of the computer 3 The location of the wirele...

Page 60: ...nformation about using a wireless optical mouse A wireless optical mouse requires unobstructed communication with the system unit for proper operation To maintain good communication operate your wireless mouse within the distance limitations of the mouse1 Confirm that the supplied AA batteries are properly installed Press the CONNECT button located on the right panel of the computer first and then...

Page 61: ...e requires an appropriate surface texture in order to provide precision pointing and tracking Use surfaces such as plain paper card stock or fabric that have minimal repetitive patterns Avoid surfaces such as mirrors smooth glass or magazines that have half tone printing 1 O perate the mouse V GP WMS1 within 32 feet of the computer O perate the mouse PC V A MS2 within 2 5 feet of the computer Page...

Page 62: ...1 Unplug your telephone cable from the wall jack 2 Insert the telephone cable into one of the RJ 11 jacks on a splitter device optional 3 Insert one end of the modem cable supplied into the other RJ 11 jack on the splitter device 4 Insert the plug end of the splitter device into the wall jack 5 Plug the modem cable into the modem line jack located on the interior panel of your computer 6 Pass the ...

Page 63: ...omputer Press the power button to turn the computer on When you start your computer it may detect new hardware and prompt you to restart your computer Respond to this prompt immediately To turn on your computer Page 63 ...

Page 64: ...investment See the Limited Warranty Card for more details You are prompted to register your computer the first time you turn on the computer Follow the on screen instructions to complete the registration process If you are not able to register your computer during the first session you can register your computer online at the Sony VAIO PC Registration Web site Go to http www sony com vaioregistrat...

Page 65: ...n Off option Respond to any prompts about saving your documents 3 Wait for your computer to turn off automatically the power indicator light turns off 4 Turn off any peripheral devices connected to your computer If you plan to stop using your computer for a short period of time use Stand by mode About the power button If your computer stops responding press and hold the Power button for more than ...

Page 66: ...al video recording and music playback This section describes how to set up your television TV channels set top box and other features1 To set up TV connections Setting up TV viewing 1 The hardware configuration of your computer may vary from the illustrations shown in this section Go to the Sony O nline Support Web site at http www sony com pcsupport to see the specifications sheet for your comput...

Page 67: ...r display and cable service access is determined by the type of cable connection or service available in your home Your VAIO computer is supplied with certain cables Your in home cable access may require extra cables adapters or connection equipment not supplied with your computer Page 67 ...

Page 68: ...onnect the other end to the single connection end of a splitter adapter optional 2 Connect the TV coaxial cable supplied to the double connection end of the splitter adapter Connect the other end to the VHF UHF port on the interior panel of your computer Pass the TV coaxial cable through the cable guide to avoid accidental disconnection 3 Connect a third TV coaxial cable optional to the double con...

Page 69: ...V coaxial cable optional to your antenna outlet Connect the other end to a VHF UHF RF combiner transformer optional 2 Connect the TV coaxial cable supplied from the combiner transformer to the VHF UHF port on the interior panel of your computer Option 2 1 Connect both ends of the antenna s twin lead cable to the screw type grips on the combiner transformer 2 Connect the TV coaxial cable supplied f...

Page 70: ...y vary between service providers Contact your cable or satellite service provider for details on using STB equipment and accessories Option 1 1 Connect one end of a TV coaxial cable optional to your cable service access Connect the other end to the In jack on the back panel of your set top box STB 2 Connect a second TV coaxial cable optional to the Out jack on your STB Connect the other end to the...

Page 71: ...n the interior panel of your computer To connect in STB mode Option 2 5 Connect one end of an S video cable optional to the Video Out jack on the back panel of your STB unit 6 Connect the other end of the same S video cable to the S video In jack on the interior panel of your computer The video cable adapter supplied can be used with a video cable optional to connect your set top box to the comput...

Page 72: ...u can locate the appropriate connections on the interior panel of the system unit You can connect a VCR or camcorder using the audio jack and video port Your VCR or camcorder may have either standard video or S video connection capability To connect a VCR or camcorder The video cable adapter supplied can be used with a video cable optional to connect your VCR to the computer s S video In jack Page...

Page 73: ...video Out jack on your TV monitor or display located on either the side or back of your TV monitor 3 Connect the single jack end of an audio cable optional to the Audio In jack located on the interior panel of your computer Connect the double jack end of the audio cable to the Audio In L R on your TV monitor or display located on either the side or rear of your TV monitor display Page 73 ...

Page 74: ...VAIO Zone software for the first time you are prompted to set up your TV channel source and establish the listings for your local TV program guide The VAIO Zone setup wizard opens automatically to provide step by step instructions Page 74 ...

Page 75: ...er s time and date settings are correct The time and date settings are displayed in the Windows taskbar notification area To correct these settings 1 Right click with your mouse or use the pointing device s right button A shortcut menu appears 2 Select Adjust Date Time and a dialog box appears 3 Correct the date and time if necessary Page 75 ...

Page 76: ...l of the computer 2 Press the VAIO button on the remote control The VAIO Zone main window appears 3 Use the direction arrows and ENTER button to locate options and activate selections To start VAIO Zone software with the wireless mouse or pointing device 1 Click Start in the Windows taskbar and select VAIO Zone from the Start menu The VAIO Zone main window appears 2 Use the mouse or pointing devic...

Page 77: ...ect the option that best describes your TV connection type and select Next Cable or Satellite with a set top box Select this option if your TV signal is received through a digital cable or satellite service set top box Cable without a set top box Select this option if you are using a TV coaxial cable to connect the cable service access wall outlet directly to your computer Antenna Select this opti...

Page 78: ...s scanning for TV channels you may see or hear intermittent TV programming This is part of the channel scanning process VAIO Zone Setup wizard Channel scanning in process When channel scanning is complete the wizard displays available channels VAIO Zone Setup wizard Scanning complete Page 78 ...

Page 79: ...ronic TV program guide VAIO Zone Setup wizard Set up electronic TV program guide 6 Select Yes to begin iEPG setup The iEPG Channel Setup Step 1 appears If you are not connected to the Internet you cannot set up the electronic TV program guide iEPG VAIO Zone software begins playing a current TV program iEPG Channel Setup Step 1 Page 79 ...

Page 80: ...the remote control or wireless mouse to select your service provider Select Continue A listing of available TV channels appears iEPG Channel Setup Step 3 9 Use the remote control or the mouse to scroll through the TV channel lineup to verify that the listing is correct Select Yes to confirm the lineup 10 Press Guide on the remote control to view the electronic TV program guide or press Live TV on ...

Page 81: ...ontent to DVDs Listening to music and creating your own audio CDs Creating slide shows using your favorite photos adding personal touches like music and transition effects Locating VAIO Zone software Help You can find instructions and other helpful information about VAIO Zone software in the software s Help To access the Help 1 Click Start in the Windows taskbar and point to All Programs 2 Point t...

Page 82: ... be equipped with all of the memory card readers described in this section depending on the computer model or configuration purchased To view the installed hardware configuration for your computer see the online Specifications sheet About Your Memory Card Readers Inserting a Memory Card Removing a Memory Card About Memory Stick Media Sharing Memory Cards Page 82 ...

Page 83: ...eaders to transfer data between digital cameras camcorders music players and other audio video devices Memory card readers and compatible media 1 Your computer may not be equipped with all of the memory card readers shown here or the configuration may be different To view the specifications for the installed memory card readers for your computer see the online specifications sheet Page 83 ...

Page 84: ...ders may be located on the side panel See your computer s specification sheet for details about your computer s memory card reader configuration Opening a front panel cover 1 Locate the appropriate reader for the memory card you want to use 2 Insert the memory card into the reader in the direction of the arrow on the media Do not force the card into the reader If the memory card does not go into t...

Page 85: ...light is on The card or its data may become damaged To remove a Memory Stick media Secure Digital SD MultiMediaCard SmartMedia or xD Picture Card media 1 Press the extended part of the memory card causing it to extend out from the reader s slot 2 When the card extends carefully remove it To remove a CompactFlash media1 1 Firmly grasp the extended part of the memory card 2 Pull to remove from the r...

Page 86: ...maller in size Compatibility between software programs and Memory Stick media formats may vary At this time Sony suggests using only MagicGate Memory Stick media to store and transfer any data created with SonicStage or OpenMG software Visit the Sony online support Web site at http www sony com pcsupport regularly for the latest information on Memory Stick media Memory Stick media do not support A...

Page 87: ...rly Format the memory card by using it in the device first See the information supplied with the device for details how to format the memory card If your device does not recognize memory card that has been formatted by your computer follow these steps 1 Save the card s contents to your hard disk drive 2 Reformat the memory card using the device not your computer Page 87 ...

Page 88: ...mputer In the future you may want to increase the functionality of your VAIO computer This section provides information about upgrading your system Overview Installing Memory Replacing the Lithium Battery Replacing a Hard Disk Drive Page 88 ...

Page 89: ... for modifying electronic equipment To locate information about your computer See the computer s online specifications sheet for more information about your computer s hardware configuration To view the online specifications sheet 1 Connect to the Internet 2 Go to the Sony online support Web site at http www sony com pcsupport 3 Click the Documentation link and follow the on screen instructions to...

Page 90: ...s power source may result in personal injury or equipment damage Always turn the power off before you open the system or connect your computer to peripheral equipment Otherwise damage may occur to the integrated circuits in your computer Electrostatic discharge ESD can damage disk drives add on cards and other components Follow the procedures described here only at an ESD workstation If such a sta...

Page 91: ...s power source may result in personal injury or equipment damage Always turn the power off before you open the system or connect your computer to peripheral equipment Otherwise damage may occur to the integrated circuits in your computer Electrostatic discharge ESD can damage disk drives add on cards and other components Follow the procedures described here only at an ESD workstation If such a sta...

Page 92: ...Gently place the system unit on a flat and stable surface with the LCD screen facing down 4 Slide the back panel cover open as shown 5 Lift the cover away from the unit and set aside Removing the back cover Use caution when placing the LCD screen face down on a table or other flat surface The work surface must be free of dirt or debris that may damage the screen Page 92 ...

Page 93: ...the back cover 2 Remove the screws on the memory cover and set aside 3 Lift the edge of the memory cover and disengage the memory cover tabs from the slots on the computer Removing the memory cover 4 Remove the memory cover to access the memory module slots Page 93 ...

Page 94: ...you wish to remove 2 Push down on the latches located on both sides of the module to gently eject it from the slot Removing a memory module 3 Grasp the memory module by the sides and remove from the system unit Store the module in a static free bag Page 94 ...

Page 95: ...n the open module slot 3 Firmly insert the lower edge of the module into the slot by pressing down evenly against the module s upper corners The side latches snap into position holding the memory module in place To avoid damaging a memory module or the memory module slot move the side latches slightly outward to relieve pressure The module is properly inserted when the side latches click into plac...

Page 96: ...ry cover tabs to the slots on the computer 2 Gently press down on the memory cover until the cover snaps into place 3 Replace the screws in the memory cover 4 Replace the back cover See Replacing the back cover Replacing the memory cover Page 96 ...

Page 97: ... back cover 1 Place the back panel cover against the computer aligning it to the tracks on each side 2 Gently slide the back cover onto the computer until it gently snaps into place Replacing the back cover Page 97 ...

Page 98: ...replaced incorrectly Contact your local dealer to replace the lithium battery Replace the battery only with a CR2032 type lithium battery Dispose of the lithium battery properly In some areas the disposal of lithium batteries in household or business trash may be prohibited You can return your unwanted lithium batteries to your nearest Sony Service Center or Factory Service Center To locate a Serv...

Page 99: ...ing a Hard Disk Drive Your computer has an installed ATA 100 3 inch hard disk drive Do not attempt to replace the hard drive Contact your local dealer for replacement or upgrade of the hard disk drive Page 99 ...

Page 100: ...software Your computer may not be equipped with all of the features or software discussed in this section depending on the computer model or configuration purchased About VAIO Computer Functions About System Security About Media Center About the Mouse and Keyboard About the Modem About the Speakers About Using a Microphone About Using Peripheral Equipment Page 100 ...

Page 101: ...gged the computer into a power strip or Uninterruptible Power Supply UPS make sure the power strip or UPS is turned on and working Verify that the monitor is plugged into a power source and turned on If your computer has a built in monitor confirm that it is plugged into an appropriate power source and that the computer is turned on Verify that the brightness or contrast control dials are adjusted...

Page 102: ...gged the computer into a power strip or Uninterruptible Power Supply UPS make sure the power strip or UPS is turned on and working Verify that the monitor is plugged into a power source and turned on If your computer has a built in monitor confirm that it is plugged into an appropriate power source and that the computer is turned on Verify that the brightness or contrast control dials are adjusted...

Page 103: ...t Down Windows1 window appears 3 Click the drop down list box and select Restart 4 Click OK The computer turns off and restarts If the Shut Down Windows window does not appear 1 Press Ctrl Alt Delete The Windows Task Manager window appears 2 Click Shut Down 3 Restart your computer If your computer still does not respond and you cannot restart shut down your computer by pressing and holding the pow...

Page 104: ...roubleshooting information you can search Windows Help 1 Click Start in the Windows taskbar and select Help and Support The VAIO Help And Support Center menu appears 2 Select Fixing a Problem and then select Startup and Shut Down problems A list of specific problem topics appears on the right side of the window 3 Select Startup and Shutdown Troubleshooter Follow the on screen instructions accordin...

Page 105: ...lose any programs that you are not currently using Increasing the computer memory may also help For information on installing memory please see the online VAIO User Guide To access the online User Guide 1 Click Start in the Windows taskbar and then click Help and Support 2 From the VAIO Help And Support Center menu click VAIO User Guide Page 105 ...

Page 106: ... in the Windows taskbar and then select Control Panel 2 Select Appearance and Themes and then select Change the screen resolution 3 Click the Settings tab 4 Change the Screen resolution and Color quality to the desired levels 5 Click Apply and then click OK Page 106 ...

Page 107: ...For troubleshooting information you can search Windows Help 1 Click Start in the Windows taskbar and select Help and Support The VAIO Help And Support Center menu appears 2 Select Fixing a Problem and then select Startup and Shut Down problems A list of specific problem topics appears on the right side of the window 3 Select Startup and Shutdown Troubleshooter Follow the on screen instructions acc...

Page 108: ...e Internet The Windows Updates Web site This site enables you to download computer updates without turning on the Automatic Updates feature Your computer must be connected to the Internet before you can receive updates To use the Automatic Updates feature 1 Connect to the Internet 2 Click the Automatic Updates icon in the Taskbar notification area The Automatic Updates Setup Wizard appears 3 Click...

Page 109: ...e Internet The Windows Updates Web site This site enables you to download computer updates without turning on the Automatic Updates feature Your computer must be connected to the Internet before you can receive updates To use the Automatic Updates feature 1 Connect to the Internet 2 Click the Automatic Updates icon in the Taskbar notification area The Automatic Updates Setup Wizard appears 3 Click...

Page 110: ...on area If you have not previously registered the antivirus software a series of information wizards appear 1 Follow the on screen instructions to complete each wizard 2 Double click the Norton Internet Security icon again The Norton Internet Security window appears If you have previously registered this antivirus software the Norton Internet Security window automatically appears 2 Click Live Upda...

Page 111: ... Digital Studio computers See your online specifications sheet for more information about your computer s configuration Why doesn t the REW button on the remote control work when I use My Music The REW button does not rewind music files Instead press Replay on your remote control for a similar function Page 111 ...

Page 112: ... Digital Studio computers See your online specifications sheet for more information about your computer s configuration Why doesn t the REW button on the remote control work when I use My Music The REW button does not rewind music files Instead press Replay on your remote control for a similar function Page 112 ...

Page 113: ...enMG ATRAC format and make edits such as title artist or genre using SonicStage software the changes become visible when the music file is played in My Music If you make changes to a music file using Media Center the changes are not visible when played in SonicStage software Page 113 ...

Page 114: ...tware to edit the song s information you may not see your changes when you play the song in My Music Windows Media Player supports playback of songs recorded in OpenMG ATRAC3 or ATRAC3 format but does not support any edits made to the OpenMG format music files Use SonicStage software to edit song information for music files that are recorded in OpenMG format Page 114 ...

Page 115: ...n you use SonicStage software to optimize music files to ATRAC3 or ATRAC3 format it may take a few moments for the music files to be available in My Music To access these files sooner start Windows Media Player software first and then play the song with My Music Page 115 ...

Page 116: ...yback of this file You can go to Microsoft and download a patch to resolve this issue1 as follows 1 Go to http support microsoft com 2 Enter 814129 in the Search the Knowledge Base text box 3 Click on the topic FIX Error in Windows Media Player 9 Series When You Play Specific MP3 Files located in the Summaries Search Results area 4 Follow the on screen instructions to download and install the patc...

Page 117: ...with SonicStage software Playlists albums recorded with SonicStage software may not be immediately available in the Media Center Album window To access these files sooner start Windows Media Player software first and then play the song with My Music Page 117 ...

Page 118: ...e of Click to DVD software both require the use a TV tuner MPEG encoder card and cannot access the card at the same time To avoid recording conflicts Do not open Media Center while capturing analog video using Click to DVD or Click to DVD Automatic Mode software Do not schedule a TV recording to start while capturing analog video using Click to DVD or Click to DVD Automatic Mode software If a sche...

Page 119: ... background in the View window the movie may be copyright protected Your computer is not able to display or record a video or DVD that is copyright protected by Macrovision or CGMS A Copy Generation Management System Analog Media Center software does not support recording a movie using analog input from external devices such as a VCR DVD player or Digital video camera Page 119 ...

Page 120: ...Why can t I fast forward or rewind a video The rewind and fast forward features are not supported by all video formats Try using the Skip or Replay buttons which provides a similar function Page 120 ...

Page 121: ... TV programs Media Center software and remote control do not have video adjustment capability Use the controls on the monitor to adjust video settings such as contrast hue and brightness See the information provided with your monitor for instructions on adjusting its video controls Page 121 ...

Page 122: ...s 1 Right click on the desktop and click Properties from the shortcut menu The Display Properties window appears 2 Click the Settings tab and then click Advanced 3 Click the Monitor tab and in the Monitor settings box confirm the screen refresh rate is set to 60 Hertz 4 If the refresh rate is not set to 60 Hz click the drop down arrow and select 60 Hertz Page 122 ...

Page 123: ...use there may be dust or dirt inside the mouse mechanism To clean the mouse follow these steps 1 Save and close all software programs and turn off your computer 2 Turn the mouse upside down 3 Remove the mouse ball cover on the back of the mouse by turning clockwise the ring that covers the mouse ball 4 Turn the mouse upright and drop the mouse ball into your hand 5 Using a piece of tape remove any...

Page 124: ...f battery do not mix alkaline with manganese batteries Using incompatible batteries or mixing used new or different types of batteries can damage the mouse 1 For wireless or standard optical mice 2 O perate the mouse V GP WMS1 within 32 feet of the computer O perate the mouse PC V A MS2 within 2 5 feet of the computer Page 124 ...

Page 125: ...use there may be dust or dirt inside the mouse mechanism To clean the mouse follow these steps 1 Save and close all software programs and turn off your computer 2 Turn the mouse upside down 3 Remove the mouse ball cover on the back of the mouse by turning clockwise the ring that covers the mouse ball 4 Turn the mouse upright and drop the mouse ball into your hand 5 Using a piece of tape remove any...

Page 126: ...f battery do not mix alkaline with manganese batteries Using incompatible batteries or mixing used new or different types of batteries can damage the mouse 1 For wireless or standard optical mice 2 O perate the mouse V GP WMS1 within 32 feet of the computer O perate the mouse PC V A MS2 within 2 5 feet of the computer Page 126 ...

Page 127: ...ws taskbar then click Control Panel 2 Click Printers and Other Hardware then click Mouse The Mouse Properties dialog box appears 3 From the Buttons tab select Switch primary and secondary buttons under the Button Configuration options 4 Click Apply then click OK Page 127 ...

Page 128: ...peration Avoid using radio controlled toys or equipment CB radios and other wireless devices in the area near your wireless keyboard These devices may cause interference causing your keyboard to stop working properly Do not place metal furniture near your computer or wireless keyboard as this may create interference causing your keyboard to stop working properly Do not mix old used and new batteri...

Page 129: ...SP check the following Contact your telephone company and ask them to verify that your telephone line is free from line noise If your problem is fax related check that there are no problems with the fax machine you are calling and that it is compatible with fax modems For optimum performance verify that your ISP point of presence POP telephone number is compliant with V 90 standards If you are hav...

Page 130: ...SP check the following Contact your telephone company and ask them to verify that your telephone line is free from line noise If your problem is fax related check that there are no problems with the fax machine you are calling and that it is compatible with fax modems For optimum performance verify that your ISP point of presence POP telephone number is compliant with V 90 standards If you are hav...

Page 131: ... modem If you have installed other software contact the software publisher for information on how to configure the software in order to recognize the modem If it appears that your modem is not functioning properly check the device status 1 Click Start in the Windows taskbar then click Control Panel 2 Click Printers and Other Hardware and then select Phone and Modem Options 3 From the Modems tab cl...

Page 132: ... Click Start in the Windows taskbar then click Control Panel 2 Click Printers and Other Hardware then click Phone and Modem options 3 From the Dialing Rules tab click Edit The Edit Location dialog box appears 4 Select the Tone or Pulse option Click OK Page 132 ...

Page 133: ...ect All Programs 2 Point to Accessories point to Communications and then click New Connection Wizard The New Connection Wizard appears The Location Information and the Phone and Modem Options windows appear when using your computer for the first time Enter your information as requested and continue to the New Connection Wizard window 3 Follow the on screen instructions to finish setting up your di...

Page 134: ...ume level You may not hear sound from your speakers if headphones are connected to your computer If the software program you are using has its own volume control check that the volume is turned up Check the volume controls in the Windows operating system using these steps 1 Click Start in the Windows taskbar then select Control Panel 2 Select Sounds Speech and Audio Devices then click Adjust the s...

Page 135: ...ume level You may not hear sound from your speakers if headphones are connected to your computer If the software program you are using has its own volume control check that the volume is turned up Check the volume controls in the Windows operating system using these steps 1 Click Start in the Windows taskbar then select Control Panel 2 Select Sounds Speech and Audio Devices then click Adjust the s...

Page 136: ...indow opens 3 Right click in the WinDVD window A shortcut menu appears 4 Click Setup to view the Setup dialog box 5 Select the Audio tab 6 From the section Audio Speaker Configuration select 6 channel speaker 5 1 Home Theater or the desired speaker configuration To enable S PDIF go to Audio Output Configuration and select Digital S PDIF out to External Processor 7 Click Apply and then click OK Int...

Page 137: ...speaker system Change the audio settings in the RealTek Sound Effect Manager software program Change the audio settings in the InterVideo WinDVD software program Change the audio settings in the Media Center software program s DVD settings 1 Your computer s supplied accessories may not include a 5 1 channel speaker system See your specifications sheet for details on your computer s supplied access...

Page 138: ...About Using a Microphone Why doesn t my microphone work properly Check that the microphone is plugged into the Microphone jack Page 138 ...

Page 139: ...About Using a Microphone Why doesn t my microphone work properly Check that the microphone is plugged into the Microphone jack Page 139 ...

Page 140: ... Sound recording section and click Volume The Recording Control dialog box appears If the volume control for the microphone is visible skip to step 6 4 Select the Options menu and click Properties The Properties dialog box appears 5 In the section Show the following volume controls click to select the Microphone check box Click OK 6 From the Recording Control dialog box decrease the microphone vol...

Page 141: ...ce a check mark in the box Automatically detect and install my Plug and Play printer if you are installing a recently manufactured printer equipped with Plug and Play capability 5 Select the appropriate port usually LPT1 if using the parallel port and then click Next 6 Select the appropriate printer manufacturer and model 7 Follow the on screen instructions to print a test page and complete printe...

Page 142: ...ce a check mark in the box Automatically detect and install my Plug and Play printer if you are installing a recently manufactured printer equipped with Plug and Play capability 5 Select the appropriate port usually LPT1 if using the parallel port and then click Next 6 Select the appropriate printer manufacturer and model 7 Follow the on screen instructions to print a test page and complete printe...

Page 143: ...y when the computer resumes from a power saving mode Clear the printer memory by turning the printer off for approximately 10 seconds and then turning it back on If your printer does not resume normal operations try restarting your computer Page 143 ...

Page 144: ... procedures for handling your computer and common peripheral devices and using storage media About the Power Source About Handling the Computer About Using a Monitor Display About Disposing of the Lithium Battery About Recording and Data Storage Media Page 144 ...

Page 145: ... fluctuations you may want to purchase an Uninterruptible Power Supply UPS This device contains both a surge protector and a battery backup The surge protector prevents damage to your computer caused by power surges The battery backup safeguards your data during a brief period of power loss The power control button on the front panel does not turn off the AC power To remove power from the computer...

Page 146: ...cables otherwise problems may result Do not use cut or damaged connection cables Always switch the power off before connecting your computer to peripheral equipment otherwise damage may occur to the integrated circuits in your computer Your computer keyboard and mouse consist of high precision electronic parts Do not drop them or bump them against other objects Your Sony computer does not work wit...

Page 147: ...nterference causing your wireless device to stop working properly The hard disk drive Do not place the computer in a location that is subject to vibration or shock Do not move the computer during operation Do not subject the computer to sudden changes in temperature Do not turn off the power while the computer is accessing the hard disk drive Optical mouse An optical mouse requires an ideal surfac...

Page 148: ...ppears after a period of time You can use a screen saver to prevent residual images The screen becomes warm during operation This is normal and does not indicate a malfunction Do not leave the LCD in direct sunlight as this may damage the screen Use caution when using the computer near a window Do not exert pressure on the LCD or scratch the surface as this may cause the screen to malfunction The ...

Page 149: ...y Service Center or Factory Service Center For the Sony Service Center nearest you visit the Sony online support Web site at http www sony com pcsupport Do not handle damaged or leaking lithium batteries The lithium battery may explode if mistreated Do not disassemble it or dispose of it in fire Replace the battery with a Sony CR2032 lithium battery Using a type of battery other than a CR2032 may ...

Page 150: ...ures of the new Memory Stick PRO media You can use the new Memory Stick PRO media as you would use a standard Memory Stick media Visit the Sony online support Web site at http www sony com pcsupport regularly for the latest information on the new Memory Stick PRO media Using memory cards Certain VAIO computers support CompactFlash MultiMediaCard MMC Microdrive SmartMedia xD PictureCards and Secure...

Page 151: ...ms or to locate support for your VAIO computer This section describes all available resources and offers suggestions on how to access this information for maximum results Immediate Help and Support Software Help and Support Resources for Additional Help and Support Page 151 ...

Page 152: ...e hardware and software configuration of your VAIO computer To view the online specifications sheet 1 Connect to the Internet 2 Go to the Sony online support Web site at http www sony com pcsupport 3 Click the Documentation button and follow the on screen instructions to locate your model s specifications sheet Preinstalled software Help files Each preinstalled software program provides online Hel...

Page 153: ...cally burn DVDs from a digital video DV device Create DVDs by capturing video content straight from a DV device or by importing video from stored files You can also edit the video Create DVD photo albums and slide shows with picture files or by importing pictures from a digital still camera What s more you can easily give a professional look to your DVDs by adding chapter menus backgrounds and men...

Page 154: ...3 Norton Internet Security 90 day trial version Symantec Corp Web site http www symantec com techsupp PictureGear Studio Sony Electronics Inc PictureGear Studio is picture management software that can display photos from your hard drive or a Sony digital still camera The photos appear in a convenient light table format so that you can easily view the contents of an entire folder create your own ph...

Page 155: ... audio files in WAV format Web site http www sony com pcsupport telephone 888 4 SONY PC 888 476 6972 hours 7 days a week 24 hours a day SpySubtract Intermute Inc Web site http www intermute com support html VAIO Control Center Sony Electronics Inc VAIO Control Center provides a central location that gathers resources to configure your VAIO personal computer and view your computer s configuration a...

Page 156: ...4 SONY PC 888 476 6972 hours 7 days a week 24 hours a day VAIO Zone Sony Electronics Inc VAIO Zone software delivers an effortless way to browse and enjoy picture music and video files on your computer all through an elegant next generation interface You can enjoy media content stored on other VAIO computers media servers on your network VAIO Zone software enables you to record video and photo sli...

Page 157: ...status review warranty information e mail your question or comments to the Sony Customer Information Services Center check pricing and availability for products accessories and parts as well as purchase online access the Sony Solutions Knowledge Base a database that contains answers to many frequently asked questions Sony Customer Information Services Center If other support options do not resolve...

Reviews: