background image

VAIO

® 

Notebook User Guide

 $

Using the DVD-ROM/CD-ROM 

Your computer comes with a either a CD-ROM or DVD-ROM drive. The 
DVD-ROM drive plays both DVD-ROMs and CD-ROMs. 

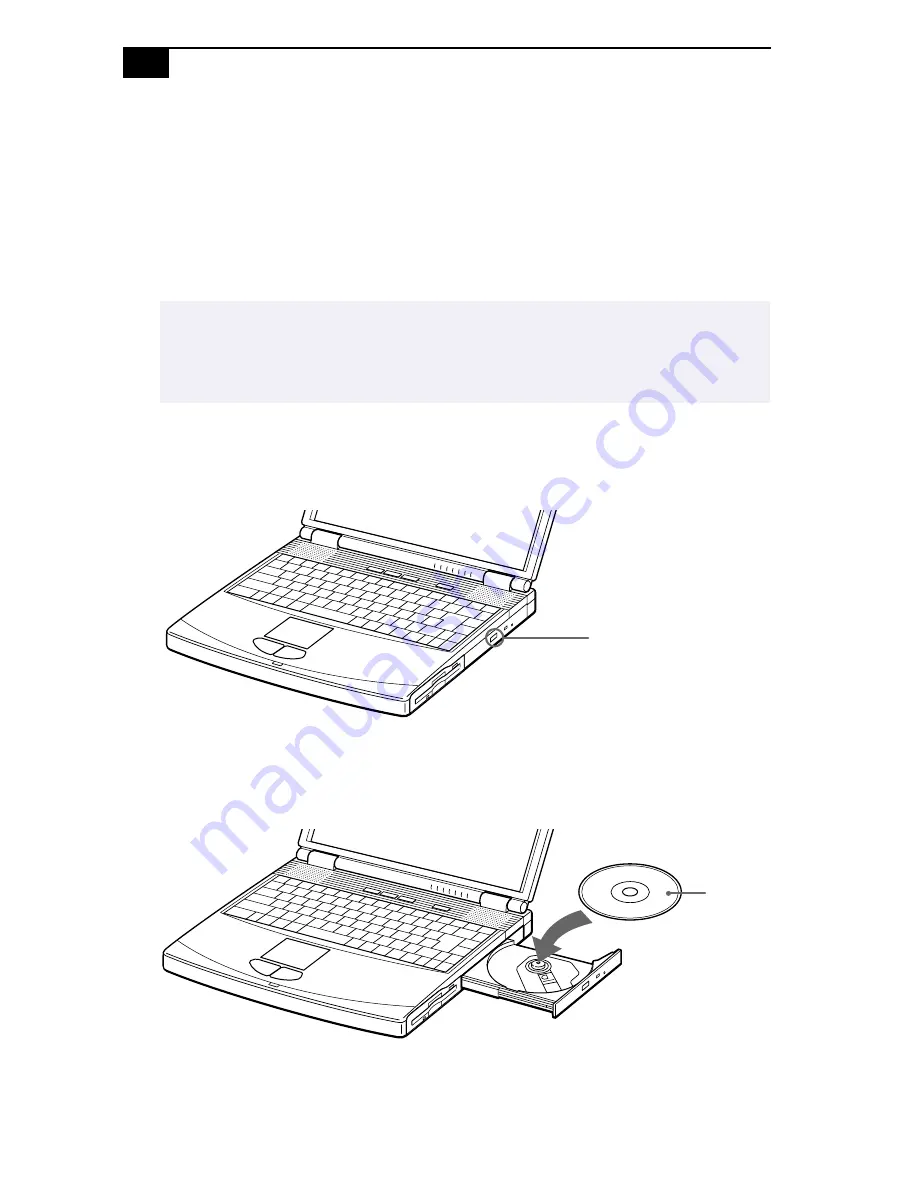
To insert a disc

1

Turn on the computer.

2

Press the Eject button to open the the CD-ROM or DVD-ROM drive. 

The tray slides out. 

3

Place a DVD-ROM/CD-ROM in the tray with the label side facing 
up. For DVD-ROMs which can be played on both sides, the side of 
the disc facing up is the side that plays. Push the disc onto the hub 
until the disc clicks into place.

When the computer is in 

S

ystem 

S

uspend or 

S

ystem Hibernation mode, you cannot 

insert a disc. See “Controlling Power Management” in the online document 

Customizing Your VAIO

®

 Notebook

 for more information on System Suspend and 

System Hibernation modes.

Eject button

Label side 

facing up

Summary of Contents for VAIO PCG-F420

Page 1: ...VAIO Notebook User Guide PCG F420 PCG F480 PCG F490 ...

Page 2: ...ditional charge Subscriptions to online service providers may require a fee and credit card information Financial services may require prior arrangements with participating financial institutions As an ENERGY STAR Partner Sony Corporation has determined that this product meets the ENERGY STAR guidelines for energy efficiency The International ENERGY STAR Office Equipment Program is an internationa...

Page 3: ...e telephone line has been disconnected at the network interface Use caution when installing or modifying telephone lines Avoid using the modem during an electrical storm Do not use the modem or a telephone to report a gas leak in the vicinity of the leak A socket outlet should be as close as possible to the unit and easily accessible Pour prévenir tout risque d incendie ou d électrocution garder c...

Page 4: ...or an experienced radio TV technician for help You are cautioned that any changes or modifications not expressly approved in this manual could void your authority to operate this equipment Only peripherals computer input output devices terminals printers etc that comply with FCC Class B limits may be attached to this computer product Operation with non compliant peripherals is likely to result in ...

Page 5: ... may request that you remove the equipment from the network until the problem is resolved Repair of this equipment should be made only by a Sony Service Center or Sony authorized agent For the Sony Service Center nearest you call 1 888 4SONYPC 1 888 476 6972 This equipment cannot be used on public coin service provided by the telephone company Connection to Party Line Service is subject to state a...

Page 6: ...degradation of service in some situations In some areas the disposal of lithium ion batteries in household or business trash may be prohibited Do not handle damaged or leaking lithium ion batteries Ne pas manipuler les batteries au lithium ion qui fuient ou sont endommagées Danger of explosion if battery is incorrectly replaced Replace only with the same or equivalent type recommended by the manuf...

Page 7: ...matériel fonctionnera à la satisfaction de l utilisateur Avant d installer ce matériel l utilisateur doit s assurer qu il est permis de le raccorder aux installations de l entreprise locale de télécommunication Le matériel doit également être installé en suivant une méthode acceptée de raccordement L abonné ne doit pas oublier qu il est possible que la conformité aux conditions énoncées ci dessus ...

Page 8: ......

Page 9: ...Left 6 Right 7 Back 7 Bottom 8 Connecting a Power Source 9 Using the AC Adapter 9 Starting Your Computer 13 Shutting Down Your Computer 14 Registering Your Computer 15 Using the Keyboard 16 Combinations and Functions with the Windows Key 18 Indicators 19 VAIO Action Setup 22 Programmable Power Keys 22 Internal Timer 22 Using the Touchpad 23 Using the Floppy Disk Drive 24 ...

Page 10: ...s 43 Connecting a Phone Line 44 Connecting the Port Replicator 45 Connecting a Printer 49 Connecting an External Display 50 Connecting an External Mouse or Keyboard 53 Connecting External Speakers 54 Connecting an External Microphone 55 Connecting a Digital Video Camera Recorder 56 Connecting a Universal Serial Bus USB Device 57 Troubleshooting 59 Power Management 66 Using the System and Applicati...

Page 11: ...es and entertainment software MPEG2 is not available on the PCG F420 Multimedia features Enjoy the stereo speakers or use a headphone not supplied to listen to audio and video CDs Microsoft Windows operating system Your system includes the latest operating system from Microsoft Communications Access popular online services send e mail browse the Internet and use fax features Digital Versatile Disc...

Page 12: ... User Guide this manual contains information on how to get the most from your computer find help and solve common problems It also includes product specifications The V AIO Consumer Information Guide contains ergonomic considerations and your computer s limited warranty statement The Microsoft Getting Started manual explains how to use the basic features of the Windows operating system Recovery CD...

Page 13: ...Unpacking Your Notebook Software CDs Microsoft Word 2000 Other Setting up your VAIO Notebook poster Packet containing special product offers ...

Page 14: ... ...

Page 15: ...ROM or DVD ROM drive Locating Controls and Connectors Front LCD Liquid Crystal Display screen page 20 Battery 1 and 2 indicators pages 11 19 Speakers pages 20 54 Hard disk drive indicator page 19 Keyboard page 16 Num Lock indicator page 19 Touchpad page 23 Caps Lock indicator page 19 Left right buttons page 23 Scroll Lock indicator page 19 Power indicator page 11 1 7 2 3 4 10 5 11 6 ...

Page 16: ...Notebook User Guide Left S400 i LINK connector page 56 Microphone connector pages 51 55 Infrared port page 34 PC card slots page 30 Video out Battery bay page 10 Headphone connector pages 51 54 1 5 2 6 3 7 4 ...

Page 17: ...mation on use Multipurpose bay pages 24 38 41 Power button Internal microphone DVD ROM drive CD ROM drive on PCG F420 page 26 Modem jack page 44 Monitor connector page 50 Mouse Keyboard connector page 53 USB connectors page 57 Serial connector DC In connector page 9 Printer connector page 49 1 4 2 5 3 cover 1 5 2 6 3 7 4 ...

Page 18: ... a ventilation slot located between the USB connector and the DC In connector Do not cover the ventilation slot when your computer is on Port replicator connector cover pages 46 48 Tilt stands Multipurpose bay RELEASE lever pages 40 42 1 3 2 ...

Page 19: ...attery pack as a power source Using the AC Adapter 1 Plug the cable attached to the AC adapter into the DC In connector on the computer 2 Plug one end of the power cord into the AC adapter 3 Plug the other end of the power cord into an AC outlet Notebook DC In AC adapter supplied Power cord supplied ...

Page 20: ...t fully charged at the time of purchase Follow the steps below to insert and charge the battery pack To insert the battery pack 1 Open the cover of the battery bay 2 Insert the battery pack into the battery bay on the left side of the computer 3 Close the cover of the battery bay until it clicks When attaching your computer to the port replicator do not attempt to insert or remove the battery pack...

Page 21: ...ttery Information in the online document Customizing Your V AIO Notebook for information on checking the battery life There are two battery indicator lights on the computer Battery Indicator Meaning 1 Indicates the status of the battery pack in the battery bay on the left side of the computer 2 Indicates the status of the battery pack in the multipurpose bay on the right side of the computer Batte...

Page 22: ...lly charged battery You can extend battery life by changing the power management modes in the PowerPanel utility See Using Power Saving Modes on page 36 The battery pack supplied with your computer is a lithium ion battery and can be recharged at any time Charging a partially discharged battery does not affect battery life The battery indicator light is on while you use the battery pack as a power...

Page 23: ...indicator light turns on 3 If necessary adjust the brightness controls for the LCD display To decrease the brightness press Fn F5 and then the down or left arrow key To increase the brightness press Fn F5 and then the up or right arrow key If you hold the power button in the On position for more than four seconds the computer turns off LCD lock lever Power button Power button Power indicator ...

Page 24: ...oss of data follow these steps to shut down your computer Respond to any prompts warning you to save documents If you are unable to shut down your computer using the steps described above press the Ctrl Alt Delete keys at the same time to restart the computer If you are unable to restart the computer in this way you can press the power button and hold it for four seconds This operation may result ...

Page 25: ...ur VAIO notebook to Sony for service of your computer If you have not already registered follow these steps to use your notebook s online registration service 1 Click the Sony VAIO Registration icon on the VAIO desktop 2 Enter the information requested on the first online registration form Press the Tab key to move from box to box 3 Click the Next button to advance to the next form 4 Complete the ...

Page 26: ...the Num Lock light will be on Navigation keys Several keys are devoted to moving the cursor on the screen Correction keys The Insert Back Space and Delete keys enable you to make corrections in your documents Function keys The twelve function keys along the top of the keyboard are used to perform designated tasks For example in many applications F1 is the Help key The task associated with each fun...

Page 27: ...an hold down Ctrl and press S referred to as Ctrl S The Shift key operates the same way as on a typewriter it is used to produce capital letters or special symbols such as and Windows key The key with the Windows logo displays the Windows Start menu it is the equivalent of clicking the Start button on the taskbar See Combinations and Functions with the Windows Key on page 18 Fn key The Fn key is u...

Page 28: ...d then Files or Folders from the Start menu Ctrl F Displays the Windows Find Computer window where you can locate other computers This is the equivalent of selecting Find and then Computer from the Start menu M Minimizes all displayed windows Shift M Returns all minimized windows to their previous size R Displays the Run window This is the equivalent of selecting Run from the Start menu Fn Insert ...

Page 29: ...er Hard disk Lights when data is being read from or written to the hard drive Do not enter System Suspend mode or turn off the computer when this indicator light is on Light On Off Num Lock The number keys in the numeric keypad are active The alphanumeric character keys in the keypad area are active Caps Lock The letters appear in uppercase as you type The Shift key lowers the case of typed letter...

Page 30: ...r volume To increase volume press Fn F4 then or To decrease volume press Fn F4 then or Fn F5 Brightness control Adjusts the brightness of the LCD To increase light intensity press Fn F5 and then or To decrease light intensity press Fn F5 and then or Fn F6 Contrast control Adjust the screen contrast PCG F420 only Fn F7 Switch to the external monitor LCD Toggles through the LCD external display conn...

Page 31: ...o its original state use the power button to turn on power Fn D Video standby Turns off the LCD to save power To turn the LCD back on press any key Fn F Change the display size Zooms the display size in or out when the display is set to a low resolution Fn S System Idle Puts the system into System Idle mode a power management state To return the system to the active state press any key Some functi...

Page 32: ...ys PPK at the top of you keyboard are shortcut buttons that can be programmed to carry out a variety of computer operations automatically If you wish you can use the VAIO Action Setup software to change the Programmable Power Keys preset functions See the online document Customizing Your V AIO Notebook for details Internal Timer The VAIO Action Setup software allows you to set your computer s inte...

Page 33: ...enu of context sensitive choices Drag Slide one finger while pressing the left button Scroll Move your finger along the right edge of the touchpad to scroll vertically Move your finger along the bottom to scroll horizontally The scroll function is available only with applications that support a touchpad scroll feature See Mouse Help for information on touchpad features such as clicking both button...

Page 34: ...e facing up 2 Gently push the diskette into the drive until it clicks into place To remove a diskette When you finish using the diskette wait until the LED indicator light turns off and then press the Eject button to remove the diskette Do not press the Eject button when the LED indicator is turned on Otherwise data may be lost Floppy disk drive Diskette Eject button LED indicator ...

Page 35: ...e Weight Saver on page 41 To reinsert the floppy disk drive 1 Turn off the computer 2 If another device is in the multipurpose bay remove the device See To remove the floppy disk drive on page 25 or To remove the second battery pack on page 40 3 Insert the floppy disk drive into the multipurpose bay with the VAIO label facing up Continue pushing the drive into the bay until the RELEASE lever locks...

Page 36: ...DVD ROM CD ROM in the tray with the label side facing up For DVD ROMs which can be played on both sides the side of the disc facing up is the side that plays Push the disc onto the hub until the disc clicks into place When the computer is in System Suspend or System Hibernation mode you cannot insert a disc See Controlling Power Management in the online document Customizing Your VAIO Notebook for ...

Page 37: ...ower Management in the online document Customizing Your VAIO Notebook for more information about System Suspend and System Hibernation modes If the disc does not come out when you press the Eject button turn off the computer and insert a thin pointed object into the manual eject hole For PCG F480 only The DVD player automatically adjusts the screen properties when you play a DVD movie Depending on...

Page 38: ...st the display resolution to 640 x 480 as described in the online document Customizing Your V AIO Notebook To play DVDs in Normal Display Mode For PCG F420 PCG F480 To play DVDs in a display mode of 1024 x 768 16 bits 1 Click Stop in the DVD Player window If you have maximized the DVD player window right click the window to display the pop up menu Choose Show the control area on top to display the...

Page 39: ...ay wallpaper while playing a DVD For PCG F480 only 1 Follow the instructions in To play DVDs in Normal Display Mode For PCG F420 PCG F480 on page 28 or 2 Follow step 1 and step 2 of To play DVDs in Normal Display Mode For PCG F420 PCG F480 on page 28 then remove the check from the check box labeled Do not show wallpaper when playing back DVD ...

Page 40: ... compatible with Card Bus Some PC cards may require that you disable idle devices when using the PC card You can use Sony Notebook Setup to disable devices See Displaying the Sony Notebook Setup Screen in the online document Customizing Your VAIO Notebook for details Be sure to use the most recent software driver provided by the PC card manufacturer If an mark appears on the Device Manager tab in ...

Page 41: ...to the slot as this may damage the connector pins If you have difficulty inserting a card check that you are inserting the card with the correct orientation See the manual that came with your PC card for more information on use For some PC cards if you alternate between normal power operation and the System Suspend or System Hibernation power management modes while the card is inserted you may fin...

Page 42: ...ns that are using the PC card 2 Click the PC card icon in the taskbar and close the card window 3 Pull the PC card release button up and press it in toward the computer 4 Gently grasp the card and pull it out 5 Insert the PC card slot protector back into the empty slot ...

Page 43: ... the Smart Connect online help for more information i LINK cables compatible with your VAIO notebook include cables with the following part numbers VMC IL4415 a 1 5 meter cable with a 4 pin connector at each end VMC IL4615 a 1 5 meter cable with a 4 pin connector at one end and a 6 pin connector at the other and VMC IL4408A a 0 8 meter cable with a 4 pin connector at each end When you use Smart Co...

Page 44: ...ocated on the left side You can use this port to communicate with other infrared equipped devices with compatible protocols such as a digital still camera or other computers To use infrared communication with another computer Align the infrared ports on the two computers so that they are in a direct line ...

Page 45: ... disable infrared communication Do not use the icon in the taskbar Check the Status tag of the Infrared Monitor in the Windows Control Panel to determine if the infrared device is detected If the two devices are too far apart or too close together data transfer may be interrupted or there may be noise in the transmission Do not cover the infrared ports with your hand or any other object Avoid dire...

Page 46: ...he power management setting you select Normal Mode This is the normal state of your computer when it is in use The green power indicator light is on in this mode To save power you can turn off a specific device such as the LCD or the hard disk System Idle Mode This mode is convenient if you do not need to use your computer for a brief period The hard disk and video display enter a low power state ...

Page 47: ...ion mode Press Fn F12 The Save to Disk Manager screen appears and then the computer enters System Hibernation mode You can also use the PowerPanel utility to enter System Hibernation mode To return to normal mode Turn on the computer by pressing the power button The computer returns to its previous state Time to return to normal mode System Idle requires less time than System Suspend and System Su...

Page 48: ...ing the battery indicator lights To insert a second battery pack 1 If another device is in the multipurpose bay remove the device See To remove the floppy disk drive on page 25 2 Insert the battery pack into the multipurpose bay If the battery is being used the battery 2 indicator light turns on 3 Attach the weight saver to the computer to stabilize the battery pack There is a RELEASE lever on the...

Page 49: ...e battery indicator flashes while the battery is charging See also To charge the battery pack on page 11 for more information To determine the amount of time the battery lasts see Displaying Battery Information in the online document Customizing Your VAIO Notebook Second battery pack not supplied Battery indicators Battery pack supplied ...

Page 50: ...ving is on right click the battery icon on the task tray and click the Switch discharge battery option 1 There is a Release lever on the bottom of the weight saver To remove the battery pack slide this lever in the direction of arrow 1 then slide the RELEASE lever on the bottom of the computer in the direction of arrow 2 2 Remove the weight saver and then pull out the battery pack 3 Reinsert the w...

Page 51: ...multipurpose bay remove the device See To remove the floppy disk drive on page 25 or To remove the second battery pack on page 40 2 Fold out the hinged arm of the weight saver and then push on the hinged arm to lock it into place Slide the weight saver in the direction of the arrow until it clicks 3 Manually lock the weight saver s Release lever Weight saver supplied ...

Page 52: ...ight saver slide this lever in the direction of arrow 1 then slide the Release lever on the bottom of the computer in the direction of arrow 2 2 After removing the weight saver pull out the weight saver s hinged arm and fold it into the weight saver Arrow 1 Weight saver Release lever Arrow 2 Release lever ...

Page 53: ...ouse or keyboard page 53 External speakers page 54 External microphone page 55 Digital video camera recorder page 56 Universal Serial Bus USB device page 57 Before you connect peripherals turn off the computer and all peripherals You do not need to turn off your computer to connect USB devices Connect the power cord only after connecting all cables Turn on the computer only after turning on all pe...

Page 54: ... register your software online and use Sony Customer Support you must connect to a phone line You must register your computer to receive the extended warranty Your computer does not work with party lines cannot be connected to a coin operated telephone and may not work with multiple phone lines or a private branch exchange PBX Some of these connections may result in excess electrical current and c...

Page 55: ...page 57 Monitor page 50 Printer page 49 Serial DC In page 9 Mouse Keyboard page 53 The port replicator can be powered only with an AC power adapter Do not remove the AC adapter from the port replicator or the AC outlet while using the port replicator this may cause data damage or hardware malfunctions When you attach your computer to the port replicator for the first time the installation of the n...

Page 56: ...connect all peripherals 2 On the bottom of the computer slide the port replicator connector cover open 3 Attach the bottom of the computer to the port replicator connector until it clicks When attaching your computer to the port replicator do not attempt to insert or remove the battery pack Lifting and turning the computer with an attached port replicator could cause a temporary loss of power Port...

Page 57: ...or on the port replicator Plug the power cord into the AC adapter and an AC outlet The power indicator light turns green 5 Turn on the computer Use the AC adapter that comes with your computer or the optional Sony PCGA ACX1 adapter AC adapter Power cord Port replicator connector Power Release lever ...

Page 58: ...ort replicator to disengage the computer from the port replicator 3 Lift the computer away from the port replicator 4 Close the port replicator connector cover on the bottom of your computer It is extremely important to close the port replicator connector cover after removing your computer from the port replicator If the cover is left open dirt may get inside and damage the computer Lever ...

Page 59: ...uter See the manual that came with your printer for more information on installation and use If your printer stops functioning after resuming from a power saving mode see I cannot print on page 66 Before using the printer you may need to change the Printer setting in the Sony Notebook Setup software See Displaying the Sony Notebook Setup Screen in the online document Customizing Your VAIO Notebook...

Page 60: ...1 To connect a computer display Use the symbol on the back of the computer to locate the Monitor connector Plug the display cable not supplied into this connector on the back of the computer If necessary plug one end of the display power cord into the display and the other end into an AC outlet See the manual that came with your computer display for more information on installation and use Compute...

Page 61: ...ector Plug the speaker cable into this connector 3 Use the symbol to locate the Microphone connector Plug the microphone cable into this connector To connect a projector You can use a projector such as the Sony LCD Projector as an external display See the manual that came with your multimedia computer display for more information on installation and use See the manual that came with your projector...

Page 62: ...r or both devices Use the Fn F7 keys to select a display See also Selecting the Display Mode in the online document Customizing Your V AIO Notebook for more information To Press Result Switch to an external display Fn F7 Toggles between the LCD the external display connected to the Monitor connector or both the LCD and external display Only LCD LCD and external display Only external display ...

Page 63: ...on connector See Using the Keyboard on page 16 for more information on using the keyboard See the manual that came with your mouse or keyboard for more information on installation and use Before you connect or disconnect the mouse or keyboard turn off the computer Do not connect or disconnect the PS 2 device keyboard or mouse when the computer is on It may cause malfunction The Sony USB mouse PCGA...

Page 64: ...tor Plug the speaker cable into this connector Make sure your speakers are designed for computer use Turn down the volume of the speakers before you turn them on Do not place diskettes on the speakers the speakers magnetic field may damage the data on the diskettes See the manual that came with your speakers for more information on installation and use Speakers Speaker cable supplied with speakers...

Page 65: ...t an external microphone Use the to locate the Microphone connector Plug the microphone cable into this connector Make sure your microphone is designed for computer use The microphone should be compliant with the plug in power microphone See the manual that came with your microphone for more information on installation and use Microphone to Microphone ...

Page 66: ...e manual that came with your digital video camera recorder for more information on installation and use Do not connect more than one digital video camera at a time The software supplied with your computer will not recognize multiple cameras The i LINK connector on the computer does not supply power to external devices If the external device requires power from the i LINK connector you cannot use t...

Page 67: ...nd of the USB cable into this port and the other end into the USB device You can use the optional Sony USB mouse PCGA UMS1 with this computer The USB mouse software driver is preinstalled in the computer Therefore you only need to plug the USB mouse into the USB connector See the manual that came with your USB device for more information on installation and use to USB device USB USB connecting cab...

Page 68: ... ...

Page 69: ...nfirm that the power cord and all cables are connected firmly as described in Connecting Peripheral Devices on page 43 If you plugged the computer into a power strip or UPS make sure the power strip or UPS is turned on and working If you are using an external display check that it is plugged into a power source and turned on Check that the brightness and contrast controls are adjusted correctly Se...

Page 70: ... 6 Select Exit Save Changes then press the Enter key The message Save Configuration changes and exit now appears 7 Check that Yes is selected then press the Enter key The computer restarts When I turn on my computer the message Operating system not found appears and Windows does not start Check the floppy disk drive to see if a non bootable diskette is in the drive If a non bootable diskette is in...

Page 71: ...he battery packs are inserted properly and that they are charged The computer may be in LCD Video Standby mode Press any key to activate the display The screen image on my external display is not centered or sized properly Use the controls on your external display to adjust the image See the manual supplied with your display for more information My computer locks up Try restarting the computer On ...

Page 72: ...play a DVD ROM If a region code warning appears when you are using the DVD player it could be that the DVD ROM you are trying to play is incompatible with the DVD ROM drive in your notebook The region code is listed on the disc s packaging If you hear audio but cannot see video your computer s video resolution may be set too high For best results change the Windows Control Panel Display Settings t...

Page 73: ...at the battery packs are inserted properly and that they are charged If you are using an application that has its own volume control check that the volume is turned up Check the volume controls in Windows 98 If you connect external speakers check that the speakers are properly connected and the volume is turned up If the speakers have a mute button make sure it is off If the speakers are powered b...

Page 74: ...SP check that the ISP is not experiencing technical problems If you have a second phone line available try connecting the modem to that line My microphone does not work If you are using an external microphone check that the microphone is plugged into the Microphone connector See Connecting an External Microphone on page 55 for details My mouse does not work If you are using an external mouse check...

Page 75: ...uter does not shut down It is best to shut down your computer using the Shut Down command on the Windows Start menu Using other methods including those listed here may result in loss of unsaved data If the Shut Down command does not work properly follow these steps Restart the computer by pressing Ctrl Alt Delete If this does not work press the power button and hold it for at least four seconds to...

Page 76: ...y not function after the computer resumes from a power saving mode When this occurs follow the procedures below to reset the printer connection 1 Right click the My Computer icon on the desktop and then select Properties 2 Click the Device Manager tab 3 Select Refresh and then click OK The printer should now function properly Power Management The operating system may become unstable if a lower pow...

Page 77: ...came with your computer without formatting the hard disk Word 2000 must be restored from the enclosed CD ROM Full Restore with Format formats the hard disk drive and then restores all the original software If your hard drive is partitioned into C and D drives the computer offers you the option to reformat the drive into a single partition Word 2000 must be restored from the enclosed CD ROM Operati...

Page 78: ...rs 3 Press the arrow keys to select the Exit menu 4 Press the arrow keys to select Get Default Values and then press the Enter key The message Load default configuration now appears 5 Check that Yes is selected then press the Enter key 6 Press the arrow keys to select Exit Save Changes and then press the Enter key The message Save configuration changes and exit now appears 7 Check that Yes is sele...

Page 79: ... To use the Application Recovery CD s 1 Turn on your computer If your computer is already on close all applications 2 When the Windows desktop appears insert the Sony Application Recovery CD in the DVD ROM drive The Application Recovery utility loads automatically 3 When the Application Recovery menu appears select the icon for the application you want to restore and then follow the on screen inst...

Page 80: ... ...

Page 81: ...or by contacting Sony at http www sony com accessories The procedures described below assume familiarity with the general terminology associated with personal computers and with the safety practices and regulatory compliance required for using and modifying electronic equipment Disconnect the system from its power source and from any telecommunications links networks or modems before you open the ...

Page 82: ...the procedure Do not open the memory module package until you are ready to install the module The package protects the module from ESD Use the special bag for preventing ESD or use aluminum foil when you store the memory module PCG F480 PCG F420 Typical expansion memory configuration PCG F490 Typical expansion memory configuration To remove a memory module 1 Shut down your computer and disconnect ...

Page 83: ... 6 Tighten the screw on the bottom of the computer To install a memory module 1 Follow steps 1 to 4 of To remove a memory module 2 Remove the memory module from its packaging Your computer comes with a memory module installed in the memory slot To upgrade your memory you will need to remove this module from the slot before installing your upgrade memory screw 1 Pull the tabs in the direction of th...

Page 84: ...er 2 Click the Start button point to VAIO and click Sony Notebook Setup The Sony Notebook Setup screen appears 3 Click the About This Computer tab to view the amount of system memory If the additional memory is not shown repeat steps 1 4 in To install a memory module 1 Slide the memory module into the slot 2 Press the module into place until it clicks ...

Page 85: ...abilities 16 bit CD quality stereo sound Diskette Drive Removable 3 5 1 44 MB CD ROM Drive Reads CD data from 10 3X to 24X variable transfer rate DVD ROM Drive Reads CD data from 10 3X to 24X variable transfer rate Reads DVD data from 1 7X to 4X variable transfer rate Laser Diode Properties CD ROM drive wave length 795 nm laser output 16 5 µW DVD ROM drive wave length 780 nm and 650 nm laser outpu...

Page 86: ...o one year from original date of purchase upon registration Power Requirements 49 5 watts maximum 19 5V DC AC 120 240V Power Management Energy Star compliant Advanced Configuration and Power Interface ACPI Battery Lithium ion supports dual battery operation Dimensions 12 7 w x 1 4 h x 10 4 d 324 x 37 9 x 265 5 mm 12 8 w x 2 1 h x 10 5 d 324 x 54 1 x 265 5 mm Weight 7 0 lbs 3 2 kg with battery and ...

Page 87: ... 14 4 kbps Your modem is capable of downloading at maximum of 56 kbps using K56flex technology or V 90 Your online service or Internet Service Provider however may not support this technology or operate at this speed Certain restrictions apply Height measured at thickest point Thinnest height for PCG F420 is 37 9mm thinnest height for PCG F480 is 54 1mm and thinnest height for PCG F490 is 54 1mm I...

Page 88: ... ...

Page 89: ...built in speakers See also speakers buttons Eject left right Start Windows 98 C cables phone power cord cameras digital video recorder canceling commands Caps Lock indicator light CD ROM DVD ROM discs ejecting inserting troubleshooting charge status indicator light charging battery packs choosing power source coin operated telephones computer lithium ion battery LE setting up starting troubleshoot...

Page 90: ...g inserting into drive troubleshooting display options See also monitor selecting disposal of lithium ion battery LE drives floppy disk installing additional hard disk DV devices troubleshooting DV In Out DVD ROM drive closing tray opening tray using DVD ROM drive tray troubleshooting DVD ROM CD ROM discs troubleshooting E Eject button ejecting battery packs CD ROM DVD ROM discs diskettes weight s...

Page 91: ...y module peripherals interference EL internal microphone internal speakers See speakers K keyboard connector L LCD lock lever selecting to display output troubleshooting LCD Video Standby mode LED indicator left button lever LCD weight saver release Limited Warranty card Line In Liquid Crystal Display screen See LCD lithium ion battery disposal LE safety precautions LE loading battery pack M memor...

Page 92: ...ng line jack laws governing L port replicator connecting disconnecting lever network power cord indicator light switch power saving modes System Hibernation System Idle System Suspend Video Standby power sources connecting Print Screen key printer connecting connector port troubleshooting Printer connector Programmable Power Keys PPK using projector R radio interference EL rechargeable battery pac...

Page 93: ... monitor System Hibernation mode System Idle mode System Recovery CD System Suspend mode T touchpad troubleshooting startup turning on computer TV interference EL U unpacking the computer USB connecting connector mouse V ventilation slot video camera Video Standby mode viewing the amount of memory volume control of fan troubleshooting W warranty weight saver attaching connecting fold out arm remov...

Page 94: ... ...

Reviews: