background image

Preparations

11

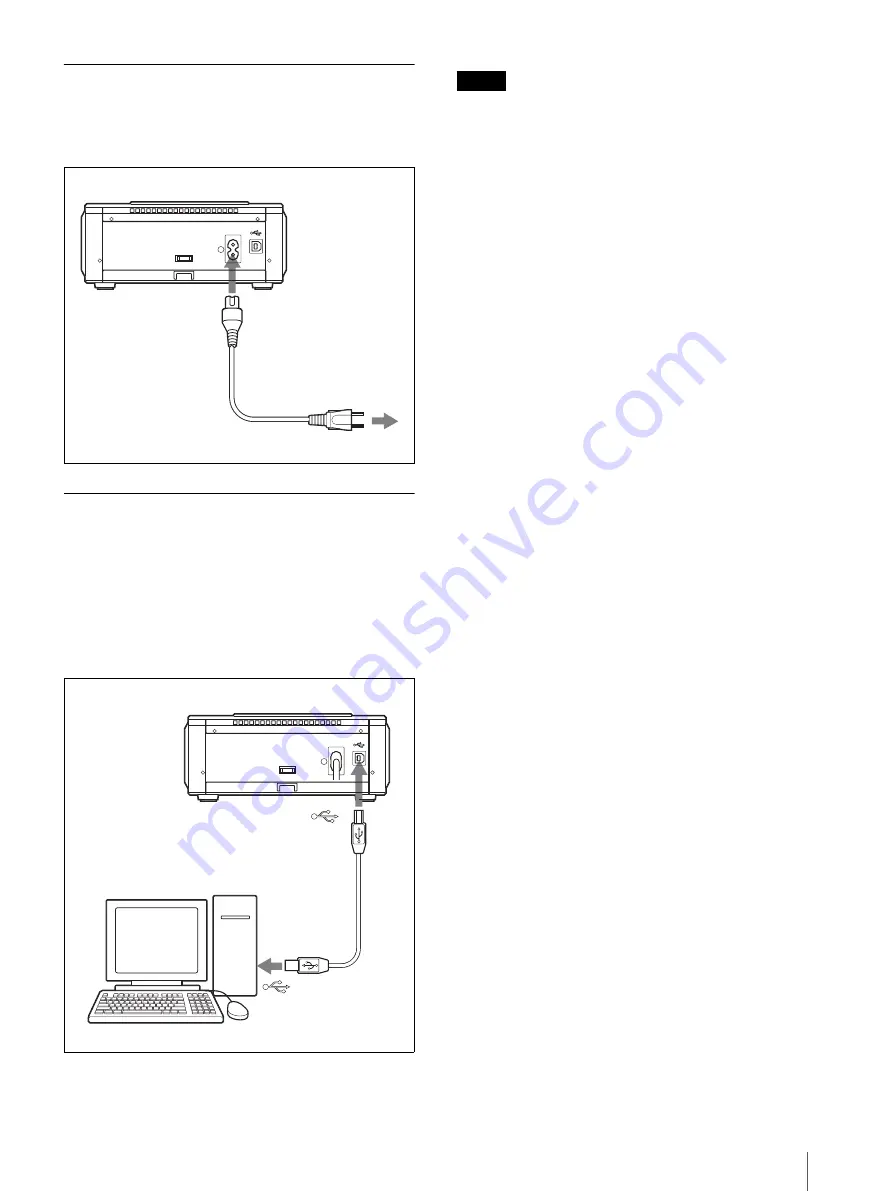
Connecting the Printer to a Wall 
Outlet

Connect the supplied AC power cord to the AC IN 
connector of the printer and then to wall outlet. 

Connecting to a Computer

To print images from your computer, connect the USB 
connectors of the printer and a computer (a PC with 
Windows) using a commercially available USB cable, 
and install the supplied printer driver on the computer. 
For details on installation and operation of the printer 
driver, refer to “Read me (English)” contained on the 
supplied CD-ROM.

Notes

• For connection, use a commercially available A-B 

TYPE USB cable less than 3 meters long. As the 
proper cable may differ according to the type of 
computer, determine the type of cable you need, 
consulting the instruction manual for your computer.

• Refer to the instruction manual for your computer, as 

well.

• The supplied Sony UP-DX100 Printer Driver does not 

support a network printer, nor can be used with a 
commercially available printer buffer unit.

• Do not connect or disconnect the USB cable during 

data transfer or printing. Proper printing results may 
not be obtained.

• When connecting a computer using a USB cable, 

depending on the type of computer, normal operation 
may not be obtained. In such a case, use a 
commercially available USB hub.

-

AC IN

-

AC IN

UP-DX100

AC power cord
(supplied)

to wall outlet

-

AC IN

UP-DX100

USB cable

Computer

Summary of Contents for UPD-X100

Page 1: ... Printer 2003 Sony Corporation UP DX100 Operating Instructions Page 2 ______________________________ GB Mode d emploi Page 25 ____________________________________ FR Manual de instrucciones página 47 ___________________________ ES ...

Page 2: ...let on a circuit different from that to which the receiver is connected Consult the dealer or experienced radio TV technician for help You are cautioned that any changes or modifications not expressly approved in this manual could void your authority to operate this equipment All interface cables used to connect peripherals must be shielded in order to comply with the limits for a digital device p...

Page 3: ...ostanowieniami Dyrektywy 1999 5 WE Szczegółowe informacje znaleźć można pod następującym adresem URL http www compliance sony de For the customers in Europe The manufacturer of this product is Sony Corporation 1 7 1 Konan Minato ku Tokyo Japan The Authorized Representative for EMC and product safety is Sony Deutschland GmbH Hedelfinger Strasse 61 70327 Stuttgart Germany For any service or guarante...

Page 4: ...s of Each Menu Item 12 Bluetooth 13 Bluetooth Wireless Technology 13 The Basic Imaging Profile 13 Communication Between the Printer and Another Device Using the Bluetooth Function 13 Authentication 14 Giving Your Printer a Device Number 15 Printing a Picture 15 Reprinting a Picture Stored in Memory COPY PRINT 16 Adjustments 16 Adjusting the Printing Location PRINT SETTING 16 Adjusting the Print Qu...

Page 5: ... DX100TR optional paper tray is inserted in the printer you can also use UPC X45 print paper on which stamping with water based ink is possible not supported by the UPX C300 Paper tray allowing bulk printing of 25 30 sheets With the supplied paper tray you can print up to 25 sheets for Post card size and 30 sheets for Small size print paper at one time Printing from your computer with a convenient...

Page 6: ... select a menu item and to settle the selection G Lamps lamp Lights when the Bluetooth function is enabled PRINT lamp Lights while printing is in progress and flashes while the printer is receiving image data lamp Lights if paper runs out the print cartridge is out of ink or cartridges and paper of different types or sizes are mixed ALARM lamp Lights in case of occurrence of problem H Cartridge co...

Page 7: ...connector Connect to a wall outlet using the supplied AC power cord C USB connector Connect to the USB connector on a computer using a USB cable Note When connecting a computer using a USB cable depending on the type of computer normal operation may not be obtained In such a case use a commercially available USB hub 1 2 3 AC IN ...

Page 8: ...d for the size of the print paper you use If you mix cartridges and paper of different types or sizes printing may not be possible or a paper jam or other trouble may occur Do not print on the used print paper Printing an image twice on the same paper will not make the printed image thicker This may even cause a malfunction or breakdown Do not touch the ink ribbon of the print cartridge or the pri...

Page 9: ...s not loaded when you turn on the printer the lamp lights up Do not touch the ink ribbon or place the print cartridge in a dusty location Fingerprints or dust on the ink ribbon may result in imperfect printing Do not change the print cartridge while printing Avoid placing the print cartridge in a location subject to high temperatures high humidity excessive dust or direct sunlight When you are goi...

Page 10: ...cur Do not write or type on the printing surface of the paper before printing You may not be able to proceed with printing If you want to write greetings or draw on the printed surface after printing use an oil ink pen Do not attach stickers or anything else on the printing surface before printing Do not print on the used print paper Printing an image twice on the same paper will not make the prin...

Page 11: ...SB cable less than 3 meters long As the proper cable may differ according to the type of computer determine the type of cable you need consulting the instruction manual for your computer Refer to the instruction manual for your computer as well The supplied Sony UP DX100 Printer Driver does not support a network printer nor can be used with a commercially available printer buffer unit Do not conne...

Page 12: ...e yellow and the blue are adjusted DARK The brightness of a dark area is adjusted LIGHT The brightness of a bright area is adjusted SHARPNESS The sharpness of edges of objects in a picture is adjusted GAMMA The tone of a picture is adjusted SAVE SETTING 1 2 3 The adjusted values are stored in the built in memory LOAD SETTING 1 2 3 The adjusted values stored in memory are loaded COLOR ADJUST B W Yo...

Page 13: ... be compatible with the Image Push Feature of the Basic Imaging Profile BIP Before using the Bluetooth device check the Bluetooth and BIP specifications of the device Communication Between the Printer and Another Device Using the Bluetooth Function For communication between the printer and another device with Bluetooth functions the following settings are required The same passkey is set on the pr...

Page 14: ...his Passkey is also referred to as a Bluetooth passkey etc PIN is also used with the same meaning When the passkey entry screen appears on the other device Enter the desired passkey on your printer Then enter the same passkey on the other device Entering the passkey Enter the same passkey on the printer and the other device to be connected as follows 1 Turn on the printer Ready BT RSSI appears on ...

Page 15: ...you have set is stored 9 When the setting is completed press the MENU button Printing a Picture The UP DX100 automatically receives and prints the image sent from the camera that is connected with the Bluetooth functions Only JPEG format graphic image files can be received Graphic images sent from a computer connected with the printer using a USB cable can also be printed out During printing of gr...

Page 16: ...printing results make any adjustments necessary Adjusting the Printing Location PRINT SETTING Adjust so that a printed image is correctly located on the print paper when the UPC X46 is used The printing location can be shifted by 0 5 mm 1 Turn on the printer 2 Press the MENU button 3 Press v or V of the control button to display PRINT SETTING 4 Press B of the control button PRINT OFFSET appears 5 ...

Page 17: ...more magenta while pressing B makes the picture more greenish YEL BLU Pressing b makes the picture more yellowish while pressing B makes the picture more bluish DARK Contrast in the dark areas is adjusted Pressing B increases the darkness LIGHT Contrast in the bright areas is adjusted Pressing B increases the brightness SHARPNESS Pressing B makes the edges of objects in a picture sharper GAMMA Pre...

Page 18: ... B W display press B of the control button 2 Press V of the control button repeatedly until LOAD SETTING appears 3 Press b or B of the control button to select the memory cell number 1 2 or 3 4 Press the EXEC button The adjusted values stored in the memory cell with the number selected in Step 3 are retrieved and in force To exit COLOR ADJUST After a menu operation such as COLOR ADJUST setting sav...

Page 19: ...uch as a monitor on the printer Condensation If the printer is subject to wide and sudden changes in temperature such as when it is moved from a cold room to a warm room or when it is left in a room with a heater that tends to produce large amounts of moisture condensation may form inside the printer In such cases the printer will probably not work properly and may even develop a fault if you pers...

Page 20: ...B connector Bluetooth specifications Communication type Bluetooth specification ver 1 1 Maximum transmission speed1 About 723 Kbps Output Bluetooth specification Power Class 2 Communication distance2 About 10 m 3 3 feet without obstacles Compatible Bluetooth profile3 Basic Imaging Profile Image Push Responder Frequency band 2 4GHz 2 400 GHz 2 4835 GHz 1 Maximum data transmission speed based on Blu...

Page 21: ...ER Symptom Cause Action Cannot operate the printer after the printer is turned on The AC power cord is not connected correctly tConnect the AC power cord to an AC outlet securely page 11 Cannot print The print paper and print cartridge do not match tUse the recommended printing pack the same size of the print paper and print cartridge The thermal head may be overheated Waiting appears on the opera...

Page 22: ...tte and protective sheet will clean inside the printer After the cleaning is finished the protective sheet is automatically ejected 6 Remove the cleaning cassette from the printer and set the print cartridge and print paper Bluetooth Function AC IN Rear cover AC IN Jammed paper g White lines Symptom Cause Action Data cannot be transmitted The distance between the device and the printer is too grea...

Page 23: ... closer to the device The desired device is now connecting to another device tWhen the device is connected to another device the device may not be displayed as an available device or be connectable at that time The device is not connectable with the Bluetooth functions tSet the device so that it is connectable Symptom Cause Action Error message Cause Action SET NEW RIBBON PUSH EXEC The print cartr...

Page 24: ...Troubleshooting 24 ...

Page 25: ...sultez un personnel de service après vente qualifié Pour les clients en Europe Par la présente Sony Corporation déclare que le UP DX100 est conforme aux exigences essentielles et aux autres dispositions pertinentes de la directive 1999 5 CE Pour toute information complémentaire veuillez consulter l URL suivante http www compliance sony de Pour les clients en Europe Le fabricant de ce produit est S...

Page 26: ...nu 34 Fonctions des différents paramètres du menu 34 Bluetooth 35 Technologie sans fil Bluetooth 35 Le Basic Imaging Profile 35 Communication entre l imprimante et un autre appareil à l aide de la fonction Bluetooth 35 Authentication 36 Attribution d un numéro d unité à l imprimante 37 Impression d une image 37 Réimpression d une image enregistrée en mémoire COPY PRINT 38 Réglages 38 Réglage de la...

Page 27: ...ces UPC X34 plus économique Si un bac à papier UPA DX100TR en option est inséré dans l imprimante vous pouvez également utiliser du papier impression UPC X45 sur lequel un tamponnage à l encre à base d eau est possible non pris en charge par le UPX C300 Bac à papier permettant une impression en série de 25 30 feuilles Avec le bac à papier fourni vous pouvez imprimer jusqu à 25 feuilles en format c...

Page 28: ... Appuyez sur cette touche pour sélectionner un paramètre du menu et une option pour ce paramètre G Témoins Témoin S allume lorsque la fonction Bluetooth est activée Témoin PRINT S allume lorsqu une impression est en cours Clignote lorsque l imprimante reçoit des données d image Témoin S allume lorsqu il n y a plus de papier lorsque la cartouche d impression est épuisée ou lorsque la type ou le for...

Page 29: ...ccordez ce connecteur à une prise murale à l aide du cordon d alimentation secteur fourni C Connecteur USB Raccordez ce connecteur au connecteur USB d un ordinateur à l aide d un câble USB Remarque Pour certains types d ordinateur la connexion par câble USB ne permet pas d obtenir un fonctionnement normal Utilisez alors un concentrateur hub USB en vente dans le commerce 1 2 3 AC IN ...

Page 30: ...n Si le type ou le format de la cartouche et du papier ne correspondent pas il pourra résulter une impression impossible un bourrage papier ou un autre problème N imprimez pas sur du papier impression déjà utilisé En imprimant deux fois une image sur la même feuille vous ne rendrez pas l image imprimée plus épaisse Ceci pourra même entraîner un dysfonctionnement ou une panne Ne touchez pas le ruba...

Page 31: ...s de la flèche pour reprendre le mou Si la cartouche d impression n est pas en place lorsque vous mettez l imprimante sous tension le témoin s allume Ne touchez pas le ruban encreur et ne placez pas la cartouche d imprimante dans un endroit poussiéreux La présence de traces de doigts ou de poussière sur le ruban encreur entraînerait une impression imparfaite Ne remplacez pas la cartouche d impress...

Page 32: ...retirez pas ou n insérez pas le bac à papier pendant l impression Si l alimentation papier ne s effectue pas automatiquement le témoin s allume Retirez le bac à papier et vérifiez s il n y a pas de bourrage Lorsque vous ajoutez du papier dans un bac qui en contient déjà assurez vous que le nombre total de feuilles ne dépasse pas 25 pour un kit UPC X46 ou 30 pour un kit UPC X34 Ne placez pas des pa...

Page 33: ...B de l imprimante à celui de l ordinateur ordinateur avec Windows à l aide d un câble USB en vente dans le commerce et installez le pilote d impression fourni sur l ordinateur Pour plus d informations sur l installation et l utilisation du pilote d imprimante consultez le fichier Read me English sur le CD ROM fourni Remarques Pour le raccordement utilisez un câble USB TYPE A B en vente dans le com...

Page 34: ... numéro à l imprimante CONNECTION RECORD Affiche le relevé des connexions MODULE POWER Permet de mettre les circuits Bluetooth sous tension ou hors tension PRINT SETTING Permet de régler finement la position d impression sur le papier de l UPC X46 PRINT OFFSET 2 1 0 1 2 La position d impression peut être déplacée de 0 5 mm COPY PRINT Permet de réimprimer les dernières données enregistrées en mémoi...

Page 35: ...th doit être compatible avec l Image Push Feature du Basic Imaging Profile BIP Avant d utiliser l appareil Bluetooth vérifiez ses spécifications Bluetooth et BIP Communication entre l imprimante et un autre appareil à l aide de la fonction Bluetooth Les conditions suivantes sont nécessaires pour la communication entre l imprimante et un autre appareil à l aide de la fonction Bluetooth Le même mot ...

Page 36: ...orsque le relevé a été supprimé ou lorsque le paramétrage de la sécurité a été modifié Pour certains appareils il peut être nécessaire de saisir le mot de passe à chaque connexion Ce Passkey est également appelé Bluetooth passkey ou PIN etc Lorsque l écran de saisie du mot de passe apparaît sur l autre appareil Saisissez le mot de passe désiré sur votre imprimante Saisissez ensuite le même mot de ...

Page 37: ...mande pour spécifier le numéro d unité 8 Appuyez sur la touche EXEC DEVICE NAME Saving enregistrement du nom d unité et le numéro d unité spécifié est enregistré 9 Après avoir terminé appuyez sur la touche MENU Impression d une image L UP DX100 reçoit et imprime automatiquement les images qu elle reçoit de l appareil photo connecté à l aide de la fonction Bluetooth Seuls des fichiers d images grap...

Page 38: ...ectuez les réglages nécessaires après avoir vérifié le résultat d impression Réglage de la position d impression PRINT SETTING Lorsque le kit UPC X46 est utilisé réglez la position d impression de façon que l image imprimée soit correctement positionnée sur le papier La position d impression peut être déplacée de 0 5 mm 1 Mettez l imprimante sous tension 2 Appuyez sur la touche MENU 3 Appuyez sur ...

Page 39: ...e commande CYN RED apparaît 4 Appuyez sur b ou B de la touche de commande pour le réglage 5 Appuyez sur V de la touche de commande MAG GRN apparaît Répétez les opérations des étapes 4 et 5 pour effectuer les réglages nécessaires Les différents paramètres permettent d effectuer les réglages suivants CYN RED Une pression sur b donne plus de cyan à l image tandis qu une pression sur B la rend plus ro...

Page 40: ...2 ou 3 4 Appuyez sur la touche EXEC Les valeurs réglées sont enregistrées dans la cellule de mémoire portant le numéro sélectionné à l étape 3 Chargement des valeurs réglées Les valeurs réglées enregistrées en mémoire peuvent être rappelées 1 Sur l affichage COLOR ADJUST COLOR ou B W appuyez sur B de la touche de commande 2 Appuyez plusieurs fois sur V de la touche de commande jusqu à ce que LOAD ...

Page 41: ...un champ électromagnétique puissant Ne placez pas d objets lourds tel qu un écran sur l imprimante Condensation De la condensation peut se former dans l imprimante si elle est soumise à de fortes et brusques variations de température passage d une pièce froide à une pièce chaude par exemple ou exposée à un système de chauffage produisant une forte humidité L imprimante peut alors de ne pas fonctio...

Page 42: ...ations Bluetooth Type de communication Spécification Bluetooth ver 1 1 Vitesse de transmission maximale1 723 Kbps environ Sortie Spécification Bluetooth classe de puissance 2 Distance de communication2 10 m 33 pieds environ sans obstacles Profil Bluetooth compatible3 Basic Imaging Profile Image Push Responder Bande de fréquences 2 4 GHz 2 400 2 4835 GHz 1 Vitesse de transmission maximale des donné...

Page 43: ...ement branché tBranchez correctement le cordon d alimentation secteur à une prise de courant page 33 Impression impossible Le papier et la cartouche d impression ne correspondent pas tUtilisez le kit d impression recommandé avec du papier et une cartouche d impression de même format La tête thermique a peut être surchauffé Waiting patientez apparaît sur l afficheur tNe faites pas fonctionner l imp...

Page 44: ...e se trouvant dans le kit d impression Remarques Ne procédez à ce nettoyage que s il y a des lignes ou points blancs sur le tirage Si les performances d impression sont correctes le nettoyage n améliorera pas la qualité de l image imprimée 1 Retirez le bac à papier de l imprimante S il reste du papier impression dans le bac enlevez le 2 Placez la feuille protectrice avec la face portant les inscri...

Page 45: ...même mot de passe sur l imprimante et l appareil dans les 30 secondes Le même mot de passe n a pas été saisi tSaisissez correctement le même mot de passe sur l imprimante et l appareil dans les 30 secondes L appareil a été déconnecté ou a terminé la connexion tVérifiez l état de l appareil essayez à nouveau de connecter l imprimante à l appareil et saisissez correctement le mot de passe La vitesse...

Page 46: ...artouche ne correspondent pas tInsérez le bon papier d impression et appuyez sur la touche EXEC PAPER JAMMING REMOVE PRINTS Il y a un bourrage du papier d impression tDégagez le papier coincé et essayez d imprimer de nouveau Reportez vous à En cas de bourrage papier à la page 44 REMOVE PRINTS PUSH EXEC Il reste du papier d impression dans la fente d éjection tRetirez le bac à papier enlevez le pap...

Page 47: ...es aplicables o exigibles de la Directiva 1999 5 CE Para mayor información por favor consulte el siguiente URL http www compliance sony de Para los clientes de Europa El fabricante de este producto es Sony Corporation con dirección en 1 7 1 Konan Minato ku Tokio Japón El Representante autorizado para EMC y seguridad del producto es Sony Deutschland GmbH Hedelfinger Strasse 61 70327 Stuttgart Alema...

Page 48: ...emento de menú 56 Bluetooth 57 Tecnología inalámbrica Bluetooth 57 El Basic Imaging Profile 57 Comunicación entre la impresora y otro dispositivo mediante la función Bluetooth 57 Autentificación 58 Asignar a la impresora un número de dispositivo 59 Imprimir una fotografía 59 Imprimir de nuevo una imagen almacenada en la memoria COPY PRINT 60 Ajustes 60 Ajustar la Posición de impresión PRINT SETTIN...

Page 49: ... hay una bandeja de papel opcional UPA DX100TR insertada en la impresora también se puede utilizar papel de impresión UPC X45 en el que se puede realizar estampación con tinta de base acuosa no compatible con el sistema UPX C300 Bandeja de papel para impresiones de gran volumen para 25 30 hojas Con la bandeja de papel que se suministra es posible imprimir como máximo 25 hojas de tamaño postal y 30...

Page 50: ...ara seleccionar un elemento de menú y para confirmar la selección G Lámparas lámpara Se ilumina cuando está activa la función Bluetooth Lámpara PRINT Se ilumina cuando hay una impresión en curso y parpadea cuando la impresora está recibiendo datos de imagen lámpara Se ilumina si se agota el papel si se agota la tinta del cartucho o si se mezcla papel de diferentes tipos o tamaños Lámpara ALARM Se ...

Page 51: ...ión AC IN Conéctela a un enchufe mediante el cable de alimentación CA que se suministra C Conector USB Conéctela a la conexión USB de un ordenador mediante un cable USB Nota Es posible que al conectar el ordenador mediante un cable USB no obtenga un funcionamiento normal dependiendo del tipo de ordenador En tal caso utilice un concentrador USB comercial 1 2 3 AC IN ...

Page 52: ... el cartucho de impresión diseñado para el tamaño de papel que utilice para la impresión Si mezcla cartuchos y papeles de diferentes tipos o tamaños la impresión puede no ser posible y puede provocar atascos de papel u otros problemas No imprima en papel de impresión usado Imprimir una imagen dos veces en el mismo papel no hará que la imagen impresa sea más densa Incluso puede provocar averías o e...

Page 53: ...el cartucho de impresión no está cargado al encender la impresora se iluminará la lámpara No toque la cinta de tinta ni coloque el cartucho de impresión en un lugar en que haya polvo Las huellas de dedos o el polvo en la cinta de tinta pueden provocar una impresión imperfecta No cambie el cartucho durante la impresión Evite situar el cartucho de impresión en lugares expuestos a altas temperaturas ...

Page 54: ...a bandeja de papel durante la impresión Si el papel de impresión no se introduce automáticamente se iluminará la lámpara Retire la bandeja de papel y compruebe si hay un atasco de papel Cuando agregue papel de impresión a una bandeja parcialmente llena asegúrese de que el número total de hojas no supere las 25 para el UPC X46 o las 30 para el UPC X34 No coloque diferentes tipos o tamaños de papel ...

Page 55: ...r un PC con Windows mediante un cable USB comercial e instale el controlador de impresora que se suministra en el ordenador Para ver información detallada sobre la instalación y el funcionamiento del controlador de impresora consulte Read me English contenido en el CD ROM que se suministra Notas Para la conexión utilice un cable USB tipo A B comercial de menos de 3 metros de longitud Dado que el t...

Page 56: ...ar un número a la impresora CONNECTION RECORD Se muestra el registro de conexión MODULE POWER Se activa o se desactiva la alimentación de los circuitos Bluetooth PRINT SETTING La posición de impresión sobre el papel de la UPC X46 se ajusta con precisión PRINT OFFSET 2 1 0 1 2 La ubicación de impresión puede desplazarse en 0 5 mm COPY PRINT Los datos más recientes almacenados en la memoria se impri...

Page 57: ...ositivo Bluetooth debe ser compatible con la función Image Push Feature del Basic Imaging Profile BIP Antes de usar el dispositivo Bluetooth compruebe las especificaciones Bluetooth y BIP del dispositivo Comunicación entre la impresora y otro dispositivo mediante la función Bluetooth Para la comunicación entre la impresora y otro dispositivo con funciones Bluetooth son necesarias las siguientes co...

Page 58: ...e se desee establecer la conexión Esta Passkey también se conoce como Bluetooth passkey etc También se utiliza PIN con el mismo significado Cuando aparece la pantalla de entrada de contraseña en el otro dispositivo Escriba la contraseña que desee en la impresora A continuación escriba la misma contraseña en el otro dispositivo Escribir la contraseña Escriba la misma contraseña en la impresora y en...

Page 59: ...edará almacenado 9 Una vez completada la configuración pulse el botón MENU Imprimir una fotografía La UP DX100 recibe e imprime automáticamente la imagen enviada desde la cámara conectada mediante las funciones Bluetooth Sólo es posible recibir archivos de imagen gráfica en formato JPEG También es posible imprimir imágenes gráficas enviadas desde un ordenador conectado a la impresora mediante un c...

Page 60: ...ultados de la impresión haga los ajustes que sean necesarios Ajustar la Posición de impresión PRINT SETTING Cuando utilice la UPC X46 ajústela de modo que la imagen impresa quede correctamente ubicada sobre el papel de impresión La ubicación de impresión puede desplazarse en 0 5 mm 1 Encienda la impresora 2 Pulse el botón MENU 3 Pulse v o V en el botón de control para mostrar PRINT SETTING 4 Pulse...

Page 61: ...iguiente CYN RED Al pulsar b se aporta a la imagen más cián mientras que al pulsar B se hace más rojiza MAG GRN Al pulsar b se aporta a la imagen más magenta mientras que al pulsar B se hace más verdosa YEL BLU Al pulsar b se hace la imagen más amarillenta mientras que al pulsar B se hace más azulada DARK Se ajusta el contraste en las áreas oscuras Al pulsar B se hace más oscura LIGHT Se ajusta el...

Page 62: ...acenados en la memoria 1 En la pantalla COLOR ADJUST COLOR o B W pulse B en el botón de control 2 Pulse V en el botón de control repetidamente hasta que aparezca LOAD SETTING 3 Pulse b o B en el botón de control para seleccionar el número de celda de memoria 1 2 o 3 4 Pulse el botón EXEC Los valores de ajuste almacenados en la celda de memoria con el número seleccionado en el Paso 3 se recuperan y...

Page 63: ...os de temperatura amplios y repentinos como cuando se mueve de una habitación fría a una caliente o cuando se deja en una habitación con un aparato de calefacción que tiende a producir altos niveles de humedad es posible que se forme condensación dentro de la impresora En tales casos es probable que la impresora no funcione correctamente e incluso puede desarrollar averías si persiste en utilizarl...

Page 64: ...ales de la conexión USB Especificaciones Bluetooth Tipo de comunicación Especificación Bluetooth ver 1 1 Velocidad máxima de transmisión1 Alrededor de 723 Kbps Salida Especificación Bluetooth Clase de potencia 2 Distancia de comunicación2 Alrededor de 10 m 33 pies sin obstáculos Perfil Bluetooth compatible3 Basic Imaging Profile Image Push Responder Banda de frecuencia 2 4 GHz 2 400 GHz 2 4835 GHz...

Page 65: ...CHO PERÍODO O POR MOTIVOS DE CUALQUIER OTRA ÍNDOLE Síntoma Causa Acción No se puede utilizar la impresora después de encenderla El cable de alimentación CA no está conectado correctamente tConecte firmemente el cable de alimentación CA a un enchufe de CA página 55 No se puede imprimir El papel de impresión y el cartucho de impresión no coinciden tUtilice el paquete de impresión recomendado el mism...

Page 66: ...imagen impresa 1 Retire la bandeja de papel de la impresora Si hay papel de impresión en la bandeja retire el papel de impresión de la bandeja 2 Coloque la hoja protectora con el lado de impresión hacia abajo y la flecha apuntando en el mismo sentido que la flecha de la bandeja 3 Abra la tapa del compartimento del cartucho y retire el cartucho de impresión 4 Inserte la casete de limpieza que se su...

Page 67: ...e de tiempo de autentificación 30 segundos tEscriba la misma contraseña correctamente tanto en la impresora como en el dispositivo antes de 30 segundos No se ha escrito la misma contraseña tEscriba la misma contraseña correctamente tanto en la impresora como en el dispositivo antes de 30 segundos El dispositivo desconectó o terminó la conexión tCompruebe el estado del dispositivo intente conectar ...

Page 68: ...den tColoque el papel para impresión correcto y pulse el botón EXEC PAPER JAMMING REMOVE PRINTS Se ha producido un atasco de papel tRetire el papel atascado e intente imprimir nuevamente Consulte Si el papel se atasca en la página 66 REMOVE PRINTS PUSH EXEC El papel para impresión permanece en la ranura de expulsión tExtraiga la bandeja para papel retire el papel para impresión y a continuación pu...

Page 69: ......

Page 70: ......

Page 71: ......

Page 72: ...Sony Corporation Printed in Japan ...

Reviews: