background image

Sony Corporation  Printed in UK

Recyclable

Trinitron

4-206-496-

62

KD-32DX100 U

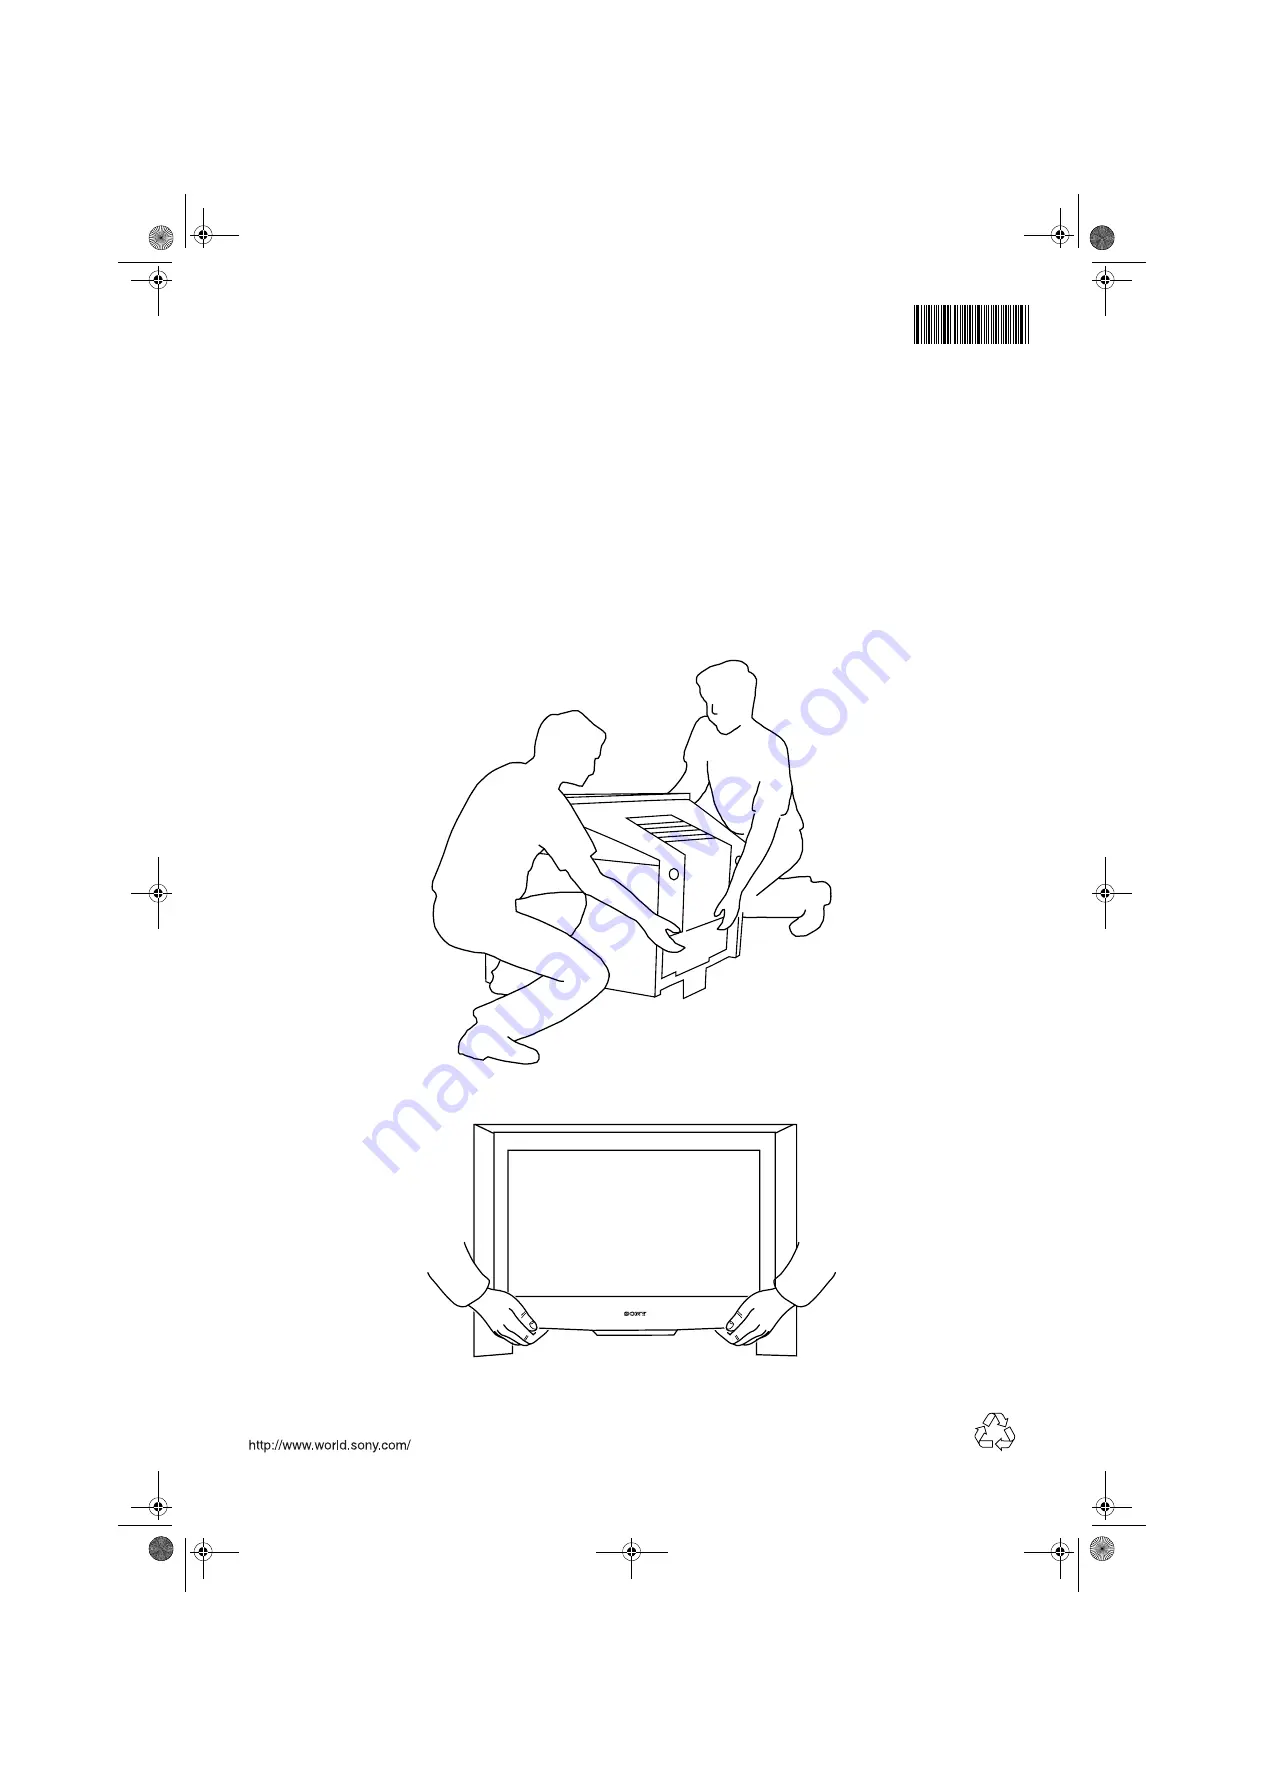
Lifting Instructions

Sony strongly recommends that this TV should not be lifted by less than two people.

When lifting, always grip the TV as shown below.

Always assume the correct posture when lifting.

Take care not to trap your fingers when placing the TV on a flat surface or stand. 

420649662

DX100 Cover.fm  Page 4  Tuesday, September 18, 2001  11:11 AM

Summary of Contents for Trinitron KD-32DX100U

Page 1: ...R 4 206 496 62 Trinitron Digital TV Operating Instructions GB KD 32DX100 U 2001 by Sony Corporation Printed in UK 420649662 DX100 Cover fm Page 1 Tuesday September 18 2001 11 11 AM ...

Page 2: ...n accordance with the following instructions The wires in this mains lead are coloured in accordance with the following code Blue Neutral Brown Live As the colours of the wires in the mains lead of this apparatus may not correspond with the coloured markings identifying the terminals in your plug proceed as follows The wire which is coloured blue must be connected to the terminal which is marked w...

Page 3: ...1 DX100 Pages 1 10 fm Page 1 Tuesday September 18 2001 11 12 AM ...

Page 4: ...nd the set Never place the TV in hot humid or excessively dusty places Do not install the TV where it may be exposed to mechanical vibrations Clean the TV with a soft lightly dampened cloth Do not use benzine thinner or any other chemicals to clean the TV Do not scratch the TV screen As a safety precaution unplug the TV before cleaning it Pull out the power lead by the plug Do not pull on the powe...

Page 5: ...he remote control 4 Connecting an aerial and a VCR 5 Switching on the TV 5 Automatically tuning the TV 6 Watching a pre recorded video tape 6 Basic Operation Overview of the remote control 7 Overview of the TV buttons 8 Selecting Digital or analogue mode 9 The Programme Index table 9 The Channel Index menu 9 Watching Widescreen programmes 11 Viewing Digital Teletext 12 Teletext Analogue 13 The Tel...

Page 6: ...ories supplied Batteries Remote control RF Loopthrough cable 2 Inserting batteries into the remote control Always remember to observe the correct polarity when inserting batteries dispose of batteries in an environmentally friendly way VIDEO TV DIGITAL DX100 Pages 1 10 fm Page 4 Tuesday September 18 2001 11 12 AM ...

Page 7: ...s 5 Connect the VCR to the mains socket and switch on 6 Insert a pre recorded tape into the VCR and press the PLAY button This enables the TV set to locate and store the video channel during the Automatically tuning the TV procedure 3 s 3 4 Switching on the TV 1 Connect the TV plug to your mains socket 220 240V AC 50 Hz and switch on 2 Push in the On Off button on the front of the TV If the red st...

Page 8: ...te control to choose your required language Press the OK button to confirm 2 The word Country is now highlighted Press the V or v buttons on the remote control to choose the country in which you are using this TV Press the OK button to confirm Note The Digital features of this TV are designed for use in Great Britain only 3 The autotune prompt screen appears Press the OK button to select Yes The a...

Page 9: ... switch off your TV temporarily The standby indicator on the front of the TV is lit Press again to return to normal operation Video Input Hold button In TV Mode Press to select signals from equipment connected to the TV sockets refer to Connecting additional equipment In Teletext Mode Press to hold the current page Press again to cancel Previous channel Exit button In TV Mode Press to return to th...

Page 10: ... Video input button Press to select signals from equipment connected to the TV sockets refer to Connecting additional equipment Reset button Press to return the picture and sound levels to the factory default setting Push up on the control panel as shown The control panel drops down Note For information on the front panel connectors please refer to the Connecting additional equipment section of th...

Page 11: ... and finish times is shown for each of the available channels The current channel is previewed in the top right corner of the screen with its channel name and number displayed below it 2 Press the V or v buttons to move the coloured cursor up or down the list to select the desired programme If you do not want to select a programme from the 6 channels listed press the GREEN button to display the ne...

Page 12: ...st along with the date and time 3 Press the OK button The Channel Index menu will now contain only programmes of the type selected The following categories are available 1 With the Channel Index menu on screen press the YELLOW button to access the Category pop up list 2 Highlight the Favourite category Press the OK button to display the Favourite list 3 Highlight the programme you wish to remove f...

Page 13: ...m 5 different formats as shown below Note In Smart Zoom and 14 9 formats parts of the bottom and top of the picture will be cut off Press the v or V buttons to adjust the position of the picture on the screen e g to read subtitles 4 3 14 9 Zoom Smart Conventional screen format Compromise between the 4 3 and 16 9 formats Imitation of wide screen effect for movies shown in cinemascopic letter box fo...

Page 14: ...nnel is displayed follow the on screen instructions to access the required information Note On some pages the TV programme is also displayed Instructions on screen will tell you how to change the displayed programme 3 If when viewing the Teletext pages you are requested to select OK or Cancel press the OK button for OK and the button for Cancel 4 When you have finished viewing Teletext press the b...

Page 15: ...ws you to directly access the required sub page When available a list of the available sub pages appears at the bottom of the TV screen Press the V or v buttons to select the required sub page Hold This feature allows you hold the current page until you are ready to proceed Press the button to hold the page currently being displayed Press again to cancel Mix This feature allows you to superimpose ...

Page 16: ...Clear This feature allows you view a TV programme while Teletext is searching for a page Once the required page has been found a blue symbol appears in the top left corner of the screen Press the button to view the page Reveal Some Teletext pages contain hidden information e g for a quiz which can be revealed Select to reveal all hidden information Time Page This feature allows a time coded Telete...

Page 17: ...o select a programme from the 5 channels listed press the GREEN button to display the next 5 channels or RED button to display the previous 5 channels 3 If a programme you highlight is currently being broadcast press the OK button to obtain a preview in the preview window If you have previously set a viewing age limit in the Digital Setting menu and the programme exceeds that age limit you will be...

Page 18: ...ayed reminding you to set your VCR timer Press the RED button to display the Manual Timer Record menu 2 Press the V or v buttons to select the correct date Press the b button to highlight the start time 3 Press the V or v buttons to select the start time Press the b button to highlight the stop time 4 Press the V or v buttons to select the stop time Press the b button to highlight the programme 5 ...

Page 19: ...ultiple languages REC Timer If you highlight a current programme the REC feature allows you to automatically set your VCR to record the selected programme With the Digital INFO display on the TV screen press the YELLOW button to access the REC pop up menu If your VCR does not have Smartlink a message is displayed reminding you to manually set your VCR Press the RED button to continue or press the ...

Page 20: ... the OK button A tick appears alongside that programme in the display If you wish to cancel your selection press the OK button again 5 Repeat steps 3 and 4 to store other programmes as favourites then press the BLUE button to return to the main menu 6 Press the YELLOW button on the remote control if you wish to delete clear all Favourite settings while in the Favourite programme menu 7 Press the B...

Page 21: ...ns below If you have already set a PIN code 1 Press the button on the remote control to display the Digital INFO display Press the BLUE button to display the Main Menu 2 Press the V or v button to highlight Parental Control then press the OK button to display the Parental Control menu 3 Using the numbered buttons on the remote control enter your 4 digit PIN code As you enter each digit it will be ...

Page 22: ...he service selection screen is displayed 8 Press the V or v button to find and highlight the service you wish to allocate to the channel number selected in Step 4 then press the OK button to display the channel selection screen 9 Repeat Steps 4 to 8 if you wish to manually add more channels to your TV 10 Press the BLUE button to remove the Digital INFO display from the TV screen This feature allow...

Page 23: ...the Current Setting should be set to Off 5 Press the OK button to confirm 6 Press the BLUE button to return to the Main menu 7 Press the BLUE button to remove the Digital INFO display from the TV screen This is an information screen only It tells you the current version of the software in your TV together with the signal strength as indicated by the coloured bar in the display 1 Press the button o...

Page 24: ...e not to damage the viewing card when inserting 4 Connect the TV to the mains and switch on 5 With the TV in Digital mode press the button on the remote control to display the Digital INFO display Press the BLUE button to display the Main Menu 6 Press the V or v button to highlight Detail Set up then press the OK button to display the Detail Set up menu 7 Press the V or v button to highlight CAM S...

Page 25: ...s colour and sharpness Press the B or b buttons to increase or decrease the levels Note Colour Brightness and Colour can only be adjusted when Picture Mode is set to Personal Reset This feature will reset all picture settings to the factory preset levels Press the b button to restore default picture settings AI Atifical Intelligence This feature will monitor the picture and limit any sudden increa...

Page 26: ...r Off Dual Sound When receiving a bi ligual broadcast This feature allows you to choose which language to listen to When receiving a stereo broadcast This feature allows you to choose between mono or stereo sound When receiving a bi ligual broadcast Press the V or v button to select A to listen to the first language or B to listen to the second language When receiving a stereo broadcast Press the ...

Page 27: ...ically switch to Smart mode therefore eliminating any dark areas on the TV screen Press the V or v buttons to select Off or On Sleep Timer This feature allows you to set a period of time after which the TV switches itself into standby mode This can be in 10 minute intervals up to a maximum of 90 minutes Press the V or v buttons to select the period of time required AV3 Output This feature allows y...

Page 28: ...ears on screen When all available signals have been captured and stored the display is removed and the TV returns to normal operation Note You can cancel the tuning at any time by pressing the MENU button Programme Sorting This feature allows you to change the order in which the analogue channels are stored on your TV 1 With the TV in analogue mode press the MENU button to display the main menu Pr...

Page 29: ...character of the name you wish to use Press the b button to select 6 Repeat Step 5 until all characters have been selected then press the OK button to store 7 Repeat Steps 4 7 to assign names to other connected equipment if required 8 Press the MENU button to return to normal TV operation Language Country OK When you first installed the TV you were asked to select your language and the country you...

Page 30: ...lect either C for terrestrial channels S for cable channels or F for direct frequency input Press the b button to confirm 8 Press the v or V buttons to search for the next available broadcast until the required broadcast is displayed on the TV screen Press the OK button to store 9 Repeat Steps 4 8 to manually tune other channels if required 10 Press the MENU button to return to normal TV operation...

Page 31: ...ight the symbol then press the b button to enter the Set Up menu 2 Press the v or V buttons to highlight Manual Set Up then press the b button to display the Manual Set Up menu on screen 3 Press the v or V buttons to highlight Further Programme Preset then press the b button to display the Further Programme Preset menu on screen 4 Press the v or V buttons to highlight the channel number you requir...

Page 32: ...H Size Press the v or V buttons to adjust the picture size over a range of 10 to 10 Press the OK button to store 7 Press the MENU button to return to normal TV operation Note If there is no equipment attached to the AV1 scart socket on the rear of the TV the RGB Centring option will not be available in the menu system Picture Rotation Due to the Earth s natural magnetism the picture might slant sl...

Page 33: ...ns to highlight Manual Set Up then press the b button to display the Manual Set Up menu on screen 3 Press the v or V buttons to highlight Personal ID then press the b button to select 4 Press the v or V buttons to display the first character of the code you wish to use Press the b button to select 5 Repeat Step 3 until all characters have been selected then press the OK button to store 6 A confirm...

Page 34: ...he DIGITAL button to return to normal TV operation On Screen Symbol Input Signals For equipment connected to socket A For equipment connected to socket B For equipment connected to socket C 1 2 3 Connecting a Smartlink VCR Smartlink is a direct link between the TV and VCR For more information on Smartlink please refer your VCR instruction manual Ensure that your Smartlink VCR is connected to the C...

Page 35: ...TV screen see table below 3 Switch on the connected equipment The picture from this equipment if any will appear on the TV screen 4 Press the DIGITAL button to return to normal TV operation Note To avoid picture distortion do not connect equipment to the G and H sockets at the same time Connecting headphones Connect your headphones to the E socket On screen symbol Input signals For equipment conne...

Page 36: ...pment with this remote control Note The brand codes you set may be lost if weak batteries are not replaced immediately Should this happen use the above procedure to re enter the code A small label has been attached to the inside of the battery cover for you to make a note of your brand codes Not all brands and models of DVDs or VCRs are covered in this list however Sony will endeavour to update th...

Page 37: ...r CENELEC standard including audio video input RGB input TV audio video output 21 pin Euro connector CENELEC standard including audio video input S video input selectable audio video output Audio outputs phono jacks MODEM Modem connection DIGITAL RF In Digital ANALOGUE RF In Analogue RF Out Conditional Access Module CAM socket Front Terminals Video input phono jack Audio inputs phono jacks S video...

Page 38: ...aerial Weak signal Scrambled subscription only channel Programme information without picture or sound Fault Volume control Wrong external mode selected Colour level setting Plug in the TV Press the button on the front of the TV If the indicator is on press the button or a numbered button on the remote control Check the aerial connection Select Picture Adjustment on the TV menu system then adjust t...

Page 39: ...ramme Preset menu 28 Manual timer 16 Manual tuning analogue 28 Digital 20 Media Select button 7 34 Movie mode 23 Naming a channel 28 Natural 24 Noise Detection 23 O On Off button 5 Overview of remote control 7 of the TV set buttons 8 P Q Page Catching 13 Page Overview 14 Parental control 19 Personal ID 31 Personal mode picture 23 sound 24 Picture Adjustment menu 23 Picture Rotation 30 PIN Code 20 ...

Page 40: ...y recommends that this TV should not be lifted by less than two people When lifting always grip the TV as shown below Always assume the correct posture when lifting Take care not to trap your fingers when placing the TV on a flat surface or stand 420649662 DX100 Cover fm Page 4 Tuesday September 18 2001 11 11 AM ...

Reviews: