background image

8

-EN

Basic Operations

TA-K800AV.3-810-853-11 (

En

, C1, C2)

MIC 1, 2, 3/
MIC CONTROL

Input selectors 
and indicators

POWER

MASTER 
VOLUME

Basic Operations

Before you start
Karaoke play

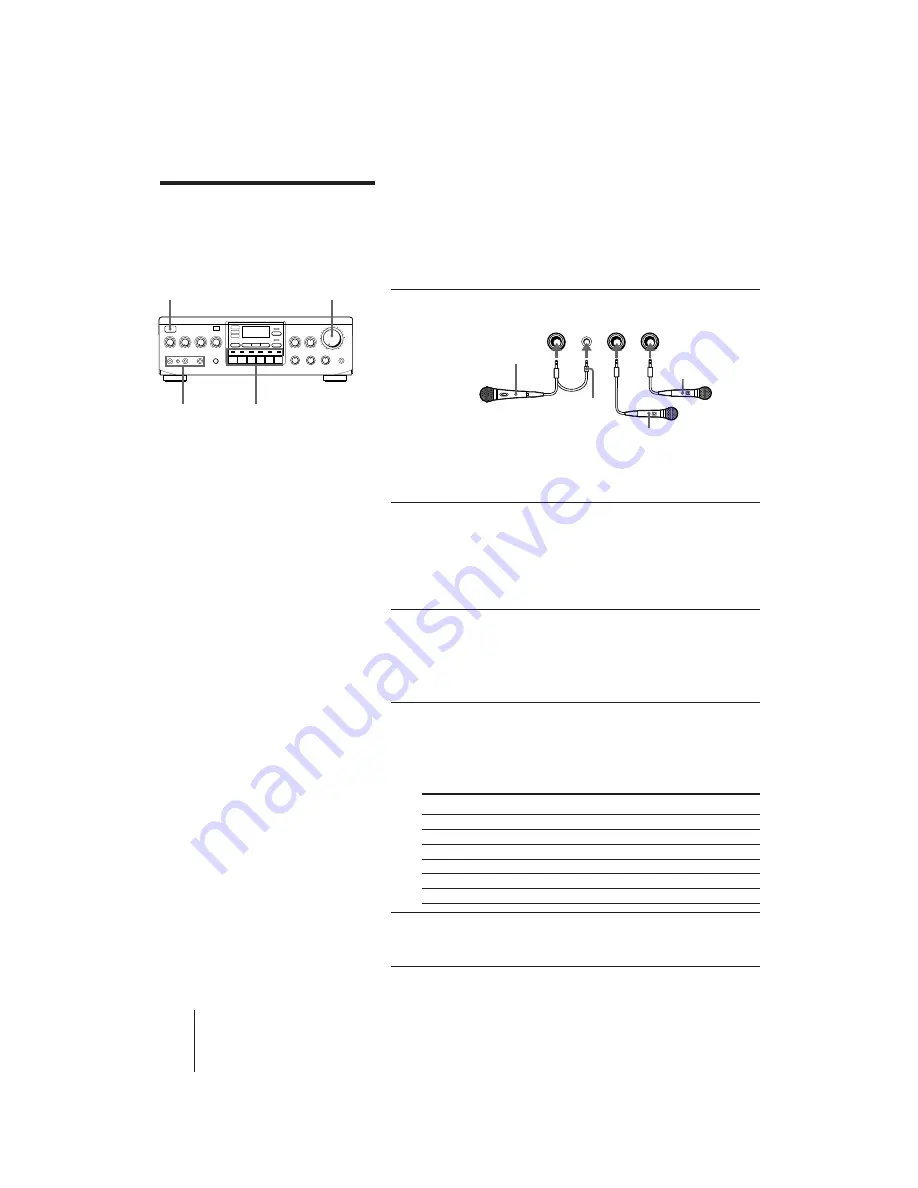
This section shows you how to set microphones and how to play a
program source.

Notes on the volume settings

Before you start, be sure to set the MASTER VOLUME control and
MIC VOL controls (MIC 1, 2 and 3) to the MIN position.

1

Connect the microphones.

You can also connect a microphone
without a control plug to MIC 1.

2

Press POWER to turn on the amplifier.

The indicator on MASTER VOLUME
flashes and then lights up.  In this state,
the 

N

 position of the KEY CONTROL

indicators and the previously selected
input indicator light up.

3

Turn on the program source you
want to listen to, and also turn on
the TV and set the input selector
on the TV to “Video” for watching
the picture of video sources.

4

Press the input selector (VCD/LD, VCR, CD,
MD, TAPE or TUNER) of the program
source to be played.

The indicator above the selector you
pressed lights up.

To play a

Press

Video CD or Laser disc

VCD/LD

Video tape

VCR

CD

CD

MD

MD

Cassette tape

TAPE

Radio broadcast

TUNER

5

Start playing the program source
and adjust the volume with
MASTER VOLUME.

Notes

• To sing a duet, connect

microphones to two of the
three jacks (MIC 1, 2 and 3).

• If you use a karaoke

microphone such as F-
VK600 or F-KM1 (not
supplied) with its control
plug connected, you can
control the backup key from
the microphone while
singing (you cannot use the
Repeat function with this
amplifier).

• Any noise heard when

turning the power on is not
a malfunction.

• The setting of the input

selector is not erased even
when the power is turned
off.

MIC 1

MIC 2

MIC 3

MIC

CONTROL

Microphone

(not supplied)

Karaoke microphone
such as F-VK600 or F-KM1

(not supplied)

Control
plug

Microphone

(not supplied)

Summary of Contents for TA-K800AV

Page 1: ...the wall outlet even if the amplifier itself has been turned off If you are not going to use the amplifier for a long time be sure to disconnect the amplifier from the wall outlet To disconnect the AC power cord grasp the plug itself never pull the cord AC power cord must be changed only at the qualified service shop On placement Place the amplifier in a location with adequate ventilation to preve...

Page 2: ...ing Started 4 Step 1 Unpacking 4 Step 2 Inserting batteries into the remote commander 5 Step 3 Connecting the amplifier Basic Operations 8 Before you start Karaoke play 10 Playing Karaoke Additional Operations 12 Recording Additional Information 13 Troubleshooting 14 Specifications 15 Index to parts and controls 18 Index Welcome Thank you for purchasing the Sony Karaoke AV amplifier Before operati...

Page 3: ...types of batteries together Do not recharge the batteries If you are not going to use the remote commander for an extended period of time remove the batteries to avoid possible damage from battery leakage If battery leakage should occur wipe off the leakage from the battery compartment then insert new batteries Do not let direct sunlight or powerful artificial light fall directly on the remote sen...

Page 4: ... connections are completed Use the audio connecting cords supplied with each component for hooking up with the amplifier Purchase and use optionally available cords as required When connecting the cord be sure to match the color coded cord to the appropriate jacks on the components Yellow video to Yellow Red right to Red and White left to White Be sure to make connections firmly to avoid hum and n...

Page 5: ...ITCHED y R L IN RECOUT TUNER VCD LD MONITOR TAPE MD CD VCR SPEAKERS ACOUTLET VOLTAGESELECTOR 110V 220V 230V IIMPEDANCE USE6 16Ω IN RECOUT IN IN IN OUT AUDIO IN AUDIO IN IN OUT VIDEO VIDEO OUT R L VIDEO MD recorder MD IN CD player CD IN MD REC OUT Tape deck TAPE IN TAPE REC OUT TUNER IN TUNER y MAX100WUNSWITCHED Audio components hookups This section describes how to connect your audio components to...

Page 6: ...rd is inserted firmly Be sure to match the speaker cord to the appropriate terminal on the components to and to If the cords are reversed the sound will be distorted and will lack bass Note Use speakers with a nominal impedance of 6 to 16 ohms AC power cord hookups Connect the AC power cords of the amplifier and the various components to a wall outlet AC OUTLET hookups Since this amplifier has two...

Page 7: ...or on the TV to Video for watching the picture of video sources 4 Press the input selector VCD LD VCR CD MD TAPE or TUNER of the program source to be played The indicator above the selector you pressed lights up To play a Press Video CD or Laser disc VCD LD Video tape VCR CD CD MD MD Cassette tape TAPE Radio broadcast TUNER 5 Start playing the program source and adjust the volume with MASTER VOLUM...

Page 8: ...osition Playing a program source without Karaoke effects Perform procedures from 2 to 5 and make sure that KARAOKE PON or MPX is turned off In addition MUSIC VOL should be set to the center position to obtain the original sound If you want to add the surround effects to the program source see Surround mode settings on page 11 To listen through the headphones Connect the headphones to HEADPHONES ja...

Page 9: ...ou use a karaoke microphone If you use a karaoke microphone such as F VK600 or F KM1 not supplied with its control plug connected you can also adjust the backup key from the microphone just as the amplifier Applying echo Since the echo effect is always applied to MIC 1 and 2 you can change the echo level with the ECHO control For MIC 3 you can cut off the echo effect by setting the MIC 3 ECHO swit...

Page 10: ...ve a simulated stereo effect 2 Adjust the vocal level with VOCAL VOL To Turn the control increase the vocal level towards MAX decrease the vocal level towards MIN 3 Adjust the accompaniment level with MUSIC VOL To Turn the control increase the accompaniment level towards MAX decrease the accompaniment level towards MIN To cancel MPX or KARAOKE PON Press MPX or KARAOKE PON so that the corresponding...

Page 11: ...hts up To record a Press Video CD or Laser disc VCD LD Video tape VCR CD CD MD MD Cassette tape TAPE Radio broadcast TUNER 5 Prepare the recording component for recording then start recording Recording your karaoke play When you sing into the microphone your voice mixed with the music accompaniment is output from all OUT jacks of the rear panel Thus you can record your karaoke play with the record...

Page 12: ...kers Lower the volume Speaker cord and terminal polarity are reversed Reconnect the cords with correct polarity Connect the audio connecting cords firmly The amplifier is picking up interference from a TV set Move the amplifier away from the TV set or turn the TV set off Microphones are turned off Turn the MIC 1 2 and 3 VOL controls clockwise TV is turned off The video component connections are in...

Page 13: ... 150 mV 10 kilohms MIC 1 2 3 jacks Standard jacks 1 4 mV Impedance below 1 kilohm Outputs Output level impedance REC OUT TAPE MD 150 mV 1 kilohm HEADPHONES 20 mW at 8 ohms General MIC CONTROL jack Mini jack for karaoke microphone Key control Variable range 2 whole steps Variable step Per 1 2 whole step Power requirements 110 220 230 V AC adjustable 50 60 Hz Power consumption 250 W Dimensions Appro...

Page 14: ... HEADPHONES jack 9 MUSIC VOL control 11 BASS TREBLE controls 9 1 SURROUND button and indicators 11 2 Remote sensor 4 3 ECHO control 10 4 MIC 1 2 and 3 VOL controls 9 5 POWER switch 8 12 6 MIC 1 2 and 3 microphone jacks standard jacks 8 7 MIC CONTROL jack 8 8 MIC 3 ECHO ØON øOFF switch 10 9 Input selectors and indicators 8 12 0 KEY CONTROL buttons and indicators 10 KARAOKE PON button and indicator ...

Page 15: ...4 5 Additional Information Remote commander 1 SURROUND button 11 2 KARAOKE PON button 11 3 MPX button 11 4 KEY CONTROL buttons 10 5 INPUT SELECTOR buttons 8 12 6 MASTER VOLUME buttons 8 12 Index to parts and controls continued See the pages indicated in for details ...

Page 16: ...TAGESELECTOR 110V 220V 230V y Rear 1 VCR VIDEO IN OUT and AUDIO IN OUT 6 2 CD IN 6 3 MD REC OUT IN 6 4 TAPE REC OUT IN 6 5 TUNER IN 6 6 y earth 7 VCD LD VIDEO IN AUDIO IN 6 8 MONITOR VIDEO OUT 6 9 SPEAKERS 7 0 AC OUTLET 7 AC power cord 7 VOLTAGE SELECTOR 3 Additional Information ...

Page 17: ...plied 4 Adjusting accompaniment level 11 balance 9 echo 10 microphone level 9 tone 9 vocal level 11 volume 8 B Backup key 10 Balance 9 C Connecting AC outlet 7 AC power cord 7 audio components 6 microphones 8 speaker system 7 video components 6 E Echo 10 I Input selectors 8 12 K L M Karaoke microphone 8 10 source 11 non karaoke source 11 Listening through the headphones 9 Multiplexed CD tape 11 P ...

Reviews: